Introduzione
Avvio rapido
Vai di fretta? Passa direttamente alla sezione Per iniziare.
Ricevere supporto
Hai bisogno di aiuto? Consulta Ricevere supporto.
Traduzioni
Questo manuale è stato tradotto da volontari. Di conseguenza, le traduzioni potrebbero non essere sempre aggiornate.
- Bahasa Indonesia
- Deutsch
- Español
- Français
- Polski
- Português Brasileiro
- русский язык
- العربية
- فارسى
- 日本語
- 简体中文
Se vuoi contribuire alla traduzione del manuale in un'altra lingua, consulta la documentazione sulla traduzione (inglese).
Background
Anki is a program which makes remembering things easy. Because it is a lot more efficient than traditional study methods, you can either greatly decrease your time spent studying, or greatly increase the amount you learn.
Anyone who needs to remember things in their daily life can benefit from Anki. Since it is content-agnostic and supports images, audio, videos and scientific markup (via LaTeX), the possibilities are endless. For example:
-
learning a language
-
studying for medical and law exams
-
memorizing people’s names and faces
-
brushing up on geography
-
mastering long poems
-
even practising guitar chords!
There are two simple concepts behind Anki: active recall testing and spaced repetition. They are not known to most learners, despite having been written about in the scientific literature for many years. Understanding how they work will make you a more effective learner.
Active Recall Testing
Active recall testing means being asked a question and trying to remember the answer. This is in contrast to passive study, where we read, watch, or listen to something without pausing to consider if we know the answer. Research has shown that active recall testing is far more effective at building strong memories than passive study. There are two reasons for this:
-
The act of recalling something strengthens the memory, increasing the chances we’ll be able to remember it again.
-
When we're unable to answer a question, it tells us we need to return to the material to review or relearn it.
You have probably encountered active recall testing in your school years without even realizing it. When good teachers give you a series of questions to answer after reading an article, or make you take weekly progress-check tests, they are not doing it simply to see if you understood the material or not. By testing you, they are increasing the chances you will be able to remember the material in the future.
A good way to integrate active recall testing into your own studies is to use flashcards. With traditional paper flashcards, you write a question on one side of a card, and the answer on the other side. By not turning the card over until you've thought about the answer, you can learn things more effectively than passive observation allows.
Use It or Lose It
Our brains are efficient machines, and they rapidly discard information that doesn't seem useful. Chances are that you don't remember what you had for dinner on Monday two weeks ago, because this information is not usually useful. If you went to a fantastic restaurant that day and spent the last two weeks telling people about how great it was, however, you're likely to still remember in vivid detail.
The brain's "use it or lose it" policy applies to everything we learn. If you spend an afternoon memorizing some science terms, and then don't think about that material for two weeks, you'll probably have forgotten most of it. In fact, studies show we forget about 75% of material learnt within a 48 hour period. This can seem pretty depressing when you need to learn a lot of information!
The solution is simple, however: review. By reviewing newly-learnt information, we can greatly reduce forgetting.
The only problem is that traditionally, reviewing has not been very practical. If you are using paper flashcards, it's easy to flick through all of them if you only have 30 of them to review, but as the number grows to 300 or 3000, it quickly becomes unwieldy.
Spaced Repetition
The spacing effect was reported by a German psychologist Hermann Ebbinghaus in 1885. He observed that we tend to remember things more effectively, if we spread reviews out over time, instead of studying multiple times in one session. Since the 1930s, there have been a number of proposals for utilizing the spacing effect to improve learning, in what has come to be called spaced repetition.
One example was in 1972, when a German scientist called Sebastian Leitner popularized a method of spaced repetition with paper flashcards. By separating the paper cards into a series of boxes, and moving the cards to a different box on each successful or unsuccessful review, it was possible to see at a glance a rough estimate of how well a card was known and when it should be reviewed again. This was a great improvement over a single box of cards, and it has been widely adopted by computerized flashcard software. It is a rather rough approach however, as it cannot give you an exact date on which you should review something again, and it does not cope very well with material of varying difficulty.
The biggest developments in the last 30 years have come from the authors of SuperMemo, a commercial flashcard program that implements spaced repetition. SuperMemo pioneered the concept of a system that keeps track of the ideal time to review material and optimizes itself based on the performance of the user.
In SuperMemo's spaced repetition system, every time you answer a question, you tell the program how well you were able to remember it — whether you forgot completely, made a small mistake, remembered with trouble, remembered easily, etc. The program uses this feedback to decide the optimal time to show you the question again. Since a memory gets stronger each time you successfully recall it, the time between reviews gets bigger and bigger — so you may see a question for the first time, then 3 days later, 15 days later, 45 days later, and so on.
This was a revolution in learning, as it meant material could be learnt and retained with the absolute minimum amount of effort necessary. SuperMemo's slogan sums it up: with spaced repetition, you can: "forget about forgetting".
Why Anki?
While there is no denying the huge impact SuperMemo has had on the field, it is not without its problems. The program is often criticized for being buggy and difficult to navigate. It only runs on Windows computers. It is proprietary software, meaning that end-users cannot extend it or access the raw data. And while very old versions have been made available for free, they are quite limited for modern use.
Anki addresses these issues. There are free clients for Anki available on many platforms, so struggling students and teachers with budgetary constraints are not left out. Anki is open source, with an already flourishing library of add-ons contributed by end-users. It is multi-platform, running on Windows, macOS, Linux/FreeBSD, and some mobile devices. And it is considerably easier to use than SuperMemo.
Anki's spaced repetition system is based on an older version of the SuperMemo algorithm called SM-2. Recently, a new algorithm called FSRS has been integrated as an alternative to the legacy SM-2 algorithm.
Note sulla piattaforma
La procedura per installare Anki e i possibili problemi che potresti riscontrare dipendono dal tipo di computer che utilizzi.
Windows
Installing & Upgrading Anki on Windows
For instructions on how to install or upgrade Anki on Windows, please see:
Problems
If you encounter any issues when installing or starting Anki, please see the subsections in the table of contents.
Installazione e aggiornamento di Anki su Windows
Requisiti
Le versioni recenti di Anki richiedono un computer con Windows 10 o 11 a 64 bit.
- L'ultima versione di Anki che supporta Windows 7 e 8.1 è la 2.1.49.
- L'ultima versione di Anki che supporta Windows a 32 bit è la 2.1.35-alternate.
Se possiedi un vecchio computer, puoi scaricare le versioni precedenti dalla pagina delle release.
Installazione
Per installare Anki:
- Scarica Anki da https://apps.ankiweb.net. La sezione successiva spiega come scegliere tra la versione -qt5 e -qt6.
- Salva l'installer sul desktop o nella cartella di download.
- Fai doppio clic sull'installer per eseguirlo. Se viene mostrato un messaggio di errore, consulta la pagina dei problemi di installazione.
- Una volta installato Anki, fai doppio clic sulla nuova icona a forma di stella sul desktop per avviare il programma.
Qt5 vs. Qt6
Le versioni recenti di Anki sono disponibili in due varianti separate: Qt5 e Qt6. La versione Qt6 è quella consigliata per la maggior parte degli utenti.
Vantaggi della versione Qt6:
- Correzione di diversi bug, incluso un miglior supporto per le lingue meno diffuse.
- Caricamento più veloce delle immagini di grandi dimensioni rispetto alla versione Qt5.
- Aggiornamenti di sicurezza. Il supporto per la libreria Qt5 è stato interrotto a novembre del 2020, il che significa che eventuali falle di sicurezza scoperte da allora non saranno risolte.
- Alcuni utenti riscontrano dei blocchi quando utilizzano un tasto di scorciatoia personalizzato per cambiare la lingua di input (inglese) in Qt5.
Svantaggi della versione Qt6:
- Alcuni add-on al momento funzionano solo con la versione Qt5.
Aggiornamento
Se stai effettuando l'aggiornamento da Anki 2.1.6 o versioni successive, non è necessario disinstallare la versione precedente, ma è sufficiente chiudere Anki qualora sia aperto e quindi seguire le istruzioni di installazione descritte in precedenza. Le tue carte verranno preservate durante l'aggiornamento.
Se invece stai effettuando l'aggiornamento da una versione di Anki precedente alla 2.1.6, oppure passi dalla versione standard a quella alternativa o viceversa, è consigliato disinstallare prima la vecchia versione. Tale operazione rimuoverà i dati di programma di Anki, ma non eliminerà i dati delle tue carte.
Se desideri effettuare il downgrade a una versione precedente, assicurati prima di effettuare il downgrade
Compatibilità degli add-on
Alcuni add-on potrebbero non funzionare con la versione più recente di Anki. Se hai effettuato l'aggiornamento all'ultima versione di Anki e scopri che un componente aggiuntivo indispensabile non funziona più, puoi scaricare una delle versioni precedenti di Anki dalla pagina delle release.
Problemi
Se riscontri problemi durante l'installazione o l'avvio di Anki consulta le seguenti pagine:
Se riscontri problemi con l'interfaccia consulta le seguenti pagine:
Windows installation issues
Some error messages you may encounter when installing Anki:
Please also see startup issues.
"Error opening file for writing"
If closing Anki and your browser does not help, please try restarting your computer, then running the installer again.
"Windows protected your PC"
When a new Anki version is released, Windows may display a scary-looking message until it has seen enough people using the new version. To be able to proceed with app installation, please use Run anyway.
Antivirus programs may sometimes also report a false positive.
Windows startup issues
- No error, but app does not appear
- Windows updates
- Windows 7/8
- Video driver issues
- Multiple displays
- Antivirus/firewall software
- Admin access
- Multiple Anki installations present after updating
- Debugging
- If all else fails
No error, but app does not appear
Recently there have been some reports of Anki failing to appear, without any error message showing up. If you run into this situation, you can either:
- Some users reported that the problems stopped after they disconnected multiple/external displays.
- Install the latest Anki version (try both qt6 and qt5)
- Or you can try adjusting your decimal separator if it is not a period.
- Or you can try the old 2.1.35-alternate build of Anki.
Windows updates
When starting Anki, you may receive a message like the following:
- Error loading Python DLL
- The program can't start because api-ms-win.... is missing
- Failed to execute script runanki
- Failed to execute script pyi_rth_multiprocessing
- Failed to execute script pyi_rth_win32comgenpy
These errors are usually because your computer is missing a Windows update or Windows library.
Please open Windows update, and ensure your system has all updates installed. If any needed to be installed, please restart your device after installing.
Windows 7/8
On Windows 7/8, you may need to manually install extra updates. Please try:
- https://www.microsoft.com/en-us/download/details.aspx?id=48234
- https://aka.ms/vs/15/release/vc_redist.x64.exe
- http://www.catalog.update.microsoft.com/Search.aspx?q=kb4474419
- http://www.catalog.update.microsoft.com/Search.aspx?q=kb4490628
Video driver issues
Please see display issues.
Multiple displays
If you get a LoadLibrary failed with error 126, this may be caused by the toolkit Anki is built on having trouble with multiple displays.
Antivirus/firewall software
Third-party software on your machine may prevent Anki from loading. You can try adding an exception to Anki, or temporarily disabling your antivirus/firewall to see if it helps.
Admin access
Some users have reported that Anki did not run for them until they right-clicked on the Anki icon and chose "Run as administrator". Anki stores all of its data in your user folder, and should not need administrator privileges, but it's something you can try if you've exhausted other options.
Multiple Anki installations present after updating
If the update process leaves you with multiple Anki installs (such as within
C:\Program Files\Anki and C:\Program Files (x86)\Anki), they may be left in a
non-working state, and Anki may refuse to start without showing an error message.
Try uninstalling all copies - you may be able to do so with the Windows Apps & features settings menu, or by running uninstall.exe in each Anki program
folder. Afterward, install Anki again.
Debugging
Starting Anki from a terminal may reveal a bit more information about some errors. After installing the latest Anki version and ensuring all Windows updates are installed, instead of running Anki directly, use Start>Run and type cmd.exe. When a console window appears, type
cd \program files\anki & anki-console
Presumably Anki will fail to open like before, but it may reveal something about what is causing the problem.
If all else fails
If you are unable to start Anki after trying the above workarounds, you have two remaining options:
- You can try running from Python.
- You can try an older Anki version built with an older toolkit, such as 2.1.35-alternate, and 2.1.15.
Windows display issues
On Windows, there are three ways of content being displayed on screen. The default is software, which is slower, but the most compatible. There are two other options that are faster: OpenGL and ANGLE. They are faster, but they may not work, or may cause display issues such as missing menubars, blank windows, and so on. Which one works best will depend on your computer.
If and how you can change this display method depends on which Anki version you are using, more precisely on the version of the used Qt toolkit.
Qt5
This toolkit is used by all Anki versions prior to 2.1.50. Here, the display driver can be adjusted via the Tools>Preferences menu. Make sure you restart Anki after adjusting it.
If you’re unable to get to Anki’s preferences screen, and restarting Anki a few times does not help, you may need to manually adjust the graphics driver. You can do this by starting cmd.exe and typing the following:
echo auto > %APPDATA%\Anki2\gldriver
It will not print anything. You can then start Anki again.
The default is software; the other two drivers you can try are angle and auto.
Qt6
Anki 2.1.50+ is available with the more recent Qt6 toolkit. The new toolkit defaults to having graphics acceleration enabled. If you run into display issues, you can try switching to software mode via cmd:
echo software > %APPDATA%\Anki2\gldriver6
Or you can do it via PowerShell:
echo software > $env:APPDATA\Anki2\gldriver6
It will not print anything. You can then start Anki again.
To revert to the default behaviour, change software to auto, or delete that file.
In Anki 23.10+, you can also change the graphics driver from preferences screen.
Full screen
Anki 2.1.50+ comes with a full screen mode, but due to various issues, it had to
be disabled while OpenGL is used. Turning on software rendering as described
above will allow the full screen option to be used, though please bear in mind
that rendering performance may suffer.
In Anki 23.10+, full screen mode is supported with the default Direct3D driver.
Copy and paste issues
If you are experiencing problems with copying and pasting, please check if you are running other programs on your computer that monitor the clipboard, such as dictionary programs, clipboard managers or clipping tools. The toolkit Anki uses can have trouble when such programs are running.
Text Size
If you find the text is the wrong size, there are two environmental variables you can try:
-
ANKI_NOHIGHDPI=1 will turn off some of Qt’s high dpi support
-
ANKI_WEBSCALE=1 will alter the scale of Anki’s web views (like the deck list, study screen, etc), while leaving interface elements like the menu bar alone. Replace 1 with the desired scale, such as 1.5 or 0.75.
On Windows you can add these to a batch file to make it easier to start Anki. For example, create a file called startanki.bat on your desktop with the following text:
set ANKI_WEBSCALE=0.75
start "Anki" "C:\Program Files\Anki\anki"
After saving, you can double click on the file to start Anki with that setting.
Windows permission problems
Permission Problems
If you receive "access denied" messages, some of Anki's files may be set to read only mode, meaning Anki is not able to write to them.
To fix the problem, you can do the following:
- in the search area of the start bar, type cmd.exe and hit enter
- in the window that opens, type the following and hit enter to see your username:
whoami
- type the following, hitting enter after each line, and replacing ____ (and keeping the :F part) with your username from the previous command
cd %APPDATA%
icacls Anki2 /grant ____:F /t
That command should fix the permissions on Anki's data folder, and you should now be able to start the program.
Antivirus/Firewall/Anti-Malware
Some users have experienced "permission denied" or "readonly" errors that were caused by security software installed on their machine. You may need to add an exception for Anki, or try temporarily disabling the software to rule it out as the cause. Some users have reported that simply turning off their software did not fix the problem, and they either had to add an exception for Anki or uninstall the software.
Debugging Permission Problems
If problems persist after you've ruled out Antivirus and related programs, have performed the steps above to fix permissions, and don't use OneDrive, please run the following commands in cmd.exe, pressing enter after each one.
whoami
cd %APPDATA%
icacls Anki2 /t
Then please copy & paste or screenshot what you see, and post it to us in a support ticket.
macOS
Installing & Upgrading Anki on macOS
For instructions on how to install or upgrade Anki on macOS, please see:
Problems
If you encounter any issues when installing or starting Anki, please see the subsections in the table of contents.
Installing & Upgrading Anki on macOS
Requirements
Recent Anki releases require a Mac running macOS 10.13.4 or later.
The last Anki release that supported macOS 10.10 to 10.13.3 was Anki 2.1.35-alternate. If you're on an old machine, you can obtain the old version from the releases page.
Installing
- Download Anki from https://apps.ankiweb.net. See the next section for how to choose between -qt5 and -qt6.
- Save the file to your desktop or downloads folder.
- Open it, and drag Anki to your Applications folder or desktop.
- Double-click on Anki in the location you placed it.
Qt5 vs. Qt6
Recent Anki versions come in separate Qt5 and Qt6 variants. The Qt6 version is recommended for most users.
Advantages of the Qt6 version:
- Native support for recent Apple Silicon Macs (faster, better battery life).
- Various bugfixes, including things like better support for less common languages.
- Security updates. Support for the Qt5 library was discontinued in Nov 2020, meaning that any security flaws discovered since then will remain unfixed.
Disadvantages of the Qt6 version:
- Tabbed windows (e.g in full screen) are no longer possible.
- Some Mac users have reported that the Intel Qt5 version was faster and more reliable for them.
- Some add-ons currently only work with the Qt5 version.
Upgrading
To upgrade, close Anki if it is open, and then follow the steps above. Drag the Anki icon into the same location you previously stored it, and when prompted, overwrite the old version. Your card data will be preserved.
Homebrew
Homebrew users can install Anki using
brew install --cask anki in their preferred Terminal application.
Upgrading can be done using brew upgrade, and for uninstalling: brew uninstall --cask anki
Add-on Compatibility
Some add-ons may not always work with the latest Anki release. If you upgrade to the latest Anki version and find an add-on you cannot live without stops working, you can download older Anki versions from the releases page.
Problems
If you encounter any issues when installing or starting Anki, please see:
Display Issues on macOS
Qt6 Video Driver
If you're experiencing display issues or crashes in Anki 23.10+, you can try changing the video driver in the preferences screen, then restarting Anki.
Older Anki versions did not provide an option in the preferences, but allowed you to adjust the driver by opening Terminal.app, then pasting the following and hit enter:
echo software > ~/Library/Application\ Support/Anki2/gldriver6
It will not print anything. You can then start Anki again.
If you wish to switch back to the default, change software to auto, or
remove that file.
eGPUs
If you experience blank screens when using an external graphics card on a Mac, you can ctrl+click on the Anki app, click "Get Info", and enable the "prefer eGPU" option.
Monitors with different resolutions
Please see this forum post.
Linux
Installing & Upgrading Anki on Linux
For instructions on how to install or upgrade Anki on Linux, please see:
Problems
If you encounter any issues when installing or starting Anki, please see the subsections in the table of contents.
Installazione e aggiornamento di Anki su Linux
Requisiti
Il pacchetto di Anki richiede un sistema Linux a 64 bit recente con processore Intel/AMD, glibc e librerie comuni come libwayland-client e systemd. Se utilizzi un'architettura diversa (ad esempio ARM/AArch64) o una distribuzione Linux minimale, non potrai utilizzare il pacchetto, ma potresti provare con i wheel di Python.
Se utilizzi Debian o una distribuzione derivata, come Ubuntu e Chromebook con Linux abilitato, esegui il seguente comando prima dell'installazione:
sudo apt install libxcb-xinerama0 libxcb-cursor0 libnss3
Nel caso in cui Anki non si avvii dopo l'installazione, potrebbero esserci delle librerie mancanti.
Se utilizzi la versione 24.04 di Ubuntu, vedi questa discussione (inglese).
Il sistema di build di Anki supporta solo glibc, pertanto le distribuzioni basate su musl non sono attualmente supportate.
Installazione
Per installare Anki:
- Scarica il file di installazione da https://apps.ankiweb.net e salvalo nella cartella Download. La sezione successiva spiega come scegliere tra le versioni -qt5 e -qt6.
- Verifica se zstd è installato sul tuo sistema, altrimenti provvedi alla sua installazione (ad esempio con
sudo apt install zstd). - Apri il terminale ed esegui i seguenti comandi, sostituendo il nome del file con quello della versione scaricata.
tar xaf Downloads/anki-2XXX-linux-qt6.tar.zst
cd anki-2XXX-linux-qt6
sudo ./install.sh
Su alcuni sistemi Linux potrebbe essere necessario utilizzare il comando tar xaf --use-compress-program=unzstd.
- Al termine dell'installazione, avvia Anki digitando "anki" a premendo invio. Se dovessi riscontrare problemi, consulta i link a sinistra.
Qt5 vs. Qt6
Le versioni recenti di Anki sono disponibili in due varianti separate: Qt5 e Qt6. La versione Qt6 è quella consigliata per la maggior parte degli utenti.
Vantaggi della versione Qt6:
- Correzione di diversi bug, incluso un miglior supporto per le lingue meno diffuse.
- Compatibilità con le versioni recenti di glibc (risolve il problema della schermata bianca sulle distribuzioni più recenti).
- Miglior supporto per l'HiDPI.
- Aggiornamenti di sicurezza. Il supporto per la libreria Qt5 è stato interrotto a novembre del 2020, il che significa che eventuali falle di sicurezza scoperte da allora non saranno risolte.
- Miglior supporto per Wayland.
Svantaggi della versione Qt6:
- Alcuni add-on al momento funzionano solo con la versione Qt5.
Aggiornamento
Se in precedenza utilizzavi una versione di Anki installata tramite un pacchetto .deb/.rpm/ecc., assicurati di rimuovere la versione di sistema prima di procedere con l'installazione del pacchetto fornito qui.
Se invece stai effettuando l'aggiornamento da un pacchetto installato in precedenza, ripeti semplicemente i passaggi di installazione per ottenere la versione più recente. I tuoi dati utente verranno preservati.
Qualora tu desideri effettuare il downgrade ad una versione precedente, assicurati prima di effettuare il downgrade
Compatibilità degli add-on
Alcuni add-on potrebbero non funzionare con la versione più recente di Anki. Se hai effettuato l'aggiornamento all'ultima versione di Anki e scopri che un componente aggiuntivo indispensabile non funziona più, puoi scaricare una delle versioni precedenti di Anki dalla pagina delle release.
Problemi
Se riscontri problemi durante l'installazione o l'avvio di Anki, consulta le seguenti pagine:
- Librerie mancanti
- Problemi grafici
- Finestra principale bianca
- Pacchetti per distribuzioni Linux
- Tema GTK errato
- Wayland
- Metodi di input
Librerie mancanti
Se Anki non si avvia, eseguilo dal terminale con il comando anki. Nel caso in cui venga segnalata la mancanza di una o più librerie, provvedi ad installarle e quindi riprova.
Se viene mostrato un messaggio di errore circa l'assenza di piattaforme disponibili, avvia Anki con il seguente comando, il quale dovrebbe mostrare le librerie mancanti:
QT_DEBUG_PLUGINS=1 anki
Dopo aver installato le librerie con apt-get o un altro gestore di pacchetti, ripeti la procedura. Potrebbe essere necessario effettuare l'operazione più volte finché tutte le librerie necessarie non saranno installate.
Display Issues on Linux
Qt5
Hardware acceleration defaults to off. Enabling it in the preferences screen and restarting Anki may make Anki’s interface more responsive, but some users may experience missing menubars, blank windows or crashes when it is enabled. (Blank windows may also be caused by this problem.)
You can adjust the display driver in Anki's Preferences screen. We recommend you try both settings, and see which one works best for you.
If you're unable to open Anki, you can adjust the driver in a terminal, by
writing either auto or software into ~/.local/share/Anki2/gldriver. Please
note that if you’re using nouveau, it is known to be buggy, and it only supports
software mode.
Qt6
Hardware acceleration defaults to on. If you experience blank screens or display issues, you can try enabling software rendering using the terminal:
echo software > ~/.local/share/Anki2/gldriver6
If you wish to switch back to the default, change software to auto, or
remove that file.
In Anki 23.10+, you can also change the graphics driver from preferences screen.
Blank Main Window
Some Linux distros have recently updated glibc. Recent versions break the web toolkit that Anki is built on, causing Anki's main window to appear blank.
There are two ways to work around this:
- Install the latest Qt6 version of Anki, which uses an updated toolkit:
- Use one of the workarounds posted on the following threads:
- https://forums.ankiweb.net/t/another-blank-main-window-solution-for-linux/32835
- https://forums.ankiweb.net/t/please-use-file-import-popup-on-startup/14695
- https://forums.ankiweb.net/t/setting-disable-seccomp-filter-sandbox-by-default-on-linux/13765
- https://forums.ankiweb.net/t/fedora-35-and-anki-2-1-47-updates-with-blank-anki-window/13431/11
Packages Distributed by Linux Distributions
We have seen a lot of issues caused by the customized versions of Anki distributed by Linux distributions:
- Anki depends on third-party libraries like Qt, and Linux distributions often substitute different versions of those libraries, without testing the impact of those changes.
- Sometimes the version of Anki they distribute is years old, or is an alpha/beta version not intended for stable release. Distributions will often disable the built-in update check as well, to prevent you from being notified of newer versions.
Compiled builds of Anki are available on https://apps.ankiweb.net. Most of the necessary libraries are included, and Anki has been tested to work with these library versions. If you're experiencing issues with your distro's version, the first thing you should try is switching to the latest packaged version we provide.
You are welcome to continue using your distro's version of Anki if you prefer, but if you run into any issues, you will need to report them to your distribution's package maintainers.
Anki not picking up GTK theme on Gnome/Linux
You can work around this issue by explicitly telling Anki what the GTK theme is. Run the following commands in a terminal:
theme=$(gsettings get org.gnome.desktop.interface gtk-theme)
echo "gtk-theme-name=$theme" >> ~/.gtkrc-2.0
echo "export GTK2_RC_FILES=$HOME/.gtkrc-2.0" >> ~/.profile
Then log out and log back into your computer, and Anki should pick up the GTK theme.
Wayland
From Anki 2.1.48, you can force Anki to use Wayland by defining ANKI_WAYLAND=1 before starting Anki. Wayland may give you better rendering across multiple displays, but it is currently off by default, due to the following issues:
- On some distros, windows are rendered without borders.
- Bringing windows to the front is not possible, so for example, clicking on Add to reveal an existing Add Cards window will not work.
Input Methods on Linux
Fcitx
The standard Anki build includes fcitx support, but it may not work on all distributions. If you are unable to use fcitx, you may want to run Anki from Python wheels instead.
Per iniziare
Installazione e aggiornamento
Consulta le istruzioni per il tuo computer:
Video
Per una rapida immersione in Anki, dai un'occhiata ai seguenti video introduttivi. Alcuni sono stati realizzati per versioni precedenti di Anki, ma i concetti restano gli stessi.
Se YouTube non è disponibile, puoi invece scaricare i video qui.
Concetti chiave
Carte
Una coppia di domanda e risposta è chiamata "carta" e si basa sul concetto di una carta fisica con la domanda su un lato e la risposta sull'altro. In Anki, però, le carte non sono come le carte fisiche e, quando ti viene mostrato il lato della risposta, la domanda rimane visibile per impostazione predefinita. Ad esempio, se stai studiando le basi della chimica, potresti avere una domanda come:
D: Simbolo chimico dell'ossigeno?
Dopo averci pensato e aver deciso che la risposta è O, puoi decidere di cliccare sul pulsante di risposta. A quel punto ti verrà mostrato:
D: Simbolo chimico dell'ossigeno?
R: O
Dopo aver confermato la correttezza della tua risposta, puoi indicare ad Anki quanto bene ricordi la risposta, e Anki sceglierà il momento in cui mostrartela nuovamente.
Tipologie di carta
-
Nuova: Carta che hai scaricato o creato, ma che non hai ancora studiato.
-
In apprendimento: Carta vista per la prima volta di recente e ancora in fase di apprendimento.
-
Di ripasso: Carta che ha superato la fase di apprendimento e che necessita di essere ripassata per non essere dimenticata. Questa tipologia si distingue in:
- Giovane: Carta con un intervallo inferiore a 21 giorni, ma non in fase di apprendimento.
- Matura: Carta con un intervallo di 21 giorni o superiore.
-
Riapprendimento: Carta che hai sbagliato in modalità di ripetizione, tornando quindi in modalità di riapprendimento per essere riappresa.
Mazzi
Un "mazzo" è un gruppo di carte. Puoi organizzare le carte in diversi mazzi per studiarne una parte anziché tutte insieme. Ciascun mazzo può avere impostazioni diverse, come ad esempio il numero di carte nuove da mostrare ogni giorno o l'intervallo di tempo da attendere prima di ripresentare le carte.
Un mazzo può contenere altri mazzi, permettendoti di organizzarli in una struttura ad albero. Anki utilizza "::" per separare i diversi livelli. Ad esempio, un mazzo chiamato "Cinese::Hanzi" si riferisce a un mazzo "Hanzi" contenuto all'interno del mazzo "Cinese". Se selezioni "Hanzi", vedrai solo le carte Hanzi; se selezioni "Cinese", vedrai tutte le carte cinesi, incluse quelle Hanzi.
Per inserire un mazzo all'interno di un altro, puoi utilizzare "::" nel suo nome oppure trascinarlo e rilasciarlo dall'elenco dei mazzi. Il mazzo nidificato sotto un altro (quindi quello che ha almeno un "::" nel nome) è spesso chiamato "sottomazzo", mentre il mazzo di livello superiore a volte è definito "mazzo principale" o "mazzo padre".
Anki include un mazzo iniziale chiamato "Predefinito"; qualsiasi carta che per qualche motivo si è separata dagli altri mazzi finirà qui. Se tale mazzo non contiene carte e hai aggiunto altri mazzi, Anki lo nasconderà. In alternativa, puoi rinominare questo mazzo e utilizzarlo per altre carte.
I mazzi sono visualizzati nell'elenco dei mazzi in ordine alfabetico. Questo può risultare in un ordine inaspettato se i mazzi contengono numeri: ad esempio, "Mazzo 10" verrà prima di "Mazzo 9", poiché 1 precede 9. Se desideri numerare i tuoi mazzi, puoi aggiungere uno "0" davanti ai numeri a cifra singola, ottenendo "Mazzo 01", "Mazzo 02" ... "Mazzo 10".
I mazzi sono più adatti a contenere categorie ampie di carte, piuttosto che argomenti specifici come "verbi della cucina" o "lezione 1". Se vuoi approfondire, consulta la sezione utilizzo appropriato dei mazzi.
Per informazioni su come i mazzi influiscono sull'ordine di visualizzazione delle carte, consulta la sezione ordine di presentazione.
Note e campi
Quando crei una carta, spesso è desiderabile crearne più di una per la stessa informazione. Ad esempio, se stai studiando il francese e scopri che la parola "bonjour" significa "ciao", potresti voler creare una carta che mostra "bonjour" e ti chiede di ricordare "ciao", e un'altra carta che mostra "ciao" e ti chiede di ricordare "bonjour". La prima carta testa la tua capacità nel riconoscere la parola straniera, mentre la seconda testa la tua capacità nel produrla.
Con le carte fisiche, l'unica opzione è scrivere le informazioni due volte su ogni carta. Alcuni programmi di carte per computer semplificano la vita permettendoti di capovolgere il lato anteriore e posteriore. Questo è un miglioramento rispetto alla situazione su carta, ma tale sistema presenta due svantaggi principali:
-
Poiché tali programmi non tracciano separatamente le tue prestazioni di riconoscimento e produzione, le carte tenderanno a non esserti mostrate nel momento ottimale, portandoti a dimenticare più di quanto vorresti o a studiare più del necessario.
-
Invertire la domanda e la risposta funziona solo quando il contenuto è lo stesso su entrambi i lati. Ciò significa che non è possibile mostrare informazioni aggiuntive sul retro.
Anki risolve questi problemi consentendoti di dividere il contenuto delle carte in parti diverse. Puoi specificare quali informazioni vuoi avere su ciascuna carta e Anki si occuperà di creare le carte e aggiornarle se apporterai modifiche in futuro.
Supponiamo di voler studiare il lessico francese e includere il numero della pagina sul retro di ciascuna carta. Vogliamo che le nostre carte siano simili a questa:
D: Bonjour
R: Buongiorno
   Pagina #12
E:
D: Buongiorno
R: Bonjour
   Pagina #12
In questo esempio, abbiamo tre informazioni correlate: il termine francese, il significato in italiano e il numero della pagina. Se le mettessimo insieme, si presenterebbero come segue:
Francese: Bonjour
Italiano: Buongiorno
Pagina: 12
In Anki, queste informazioni correlate vengono chiamate "nota", e ciascuna informazione è chiamata "campo". In questo caso, il tipo di nota ha tre campi: Francese, Italiano e Pagina.
Per aggiungere e modificare i campi, clicca sul pulsante "Campi..." durante l'aggiunta o la modifica delle note. Per ulteriori informazioni sui campi, consulta la sezione Personalizzazione dei campi.
Tipi di carta
Per far sì che Anki crei delle carte basate sulle nostre note, è necessario fornirgli un modello che indichi quali campi devono essere mostrati sul lato anteriore e posteriore di ciascuna carta. Questo modello è conosciuto come "tipo di carta". Ciascun tipo di nota può avere uno o più tipi di carta; quando aggiungi una nota, Anki creerà una carta per ogni tipo di carta associato.
Ciascun tipo di carta ha due "modelli", uno per la domanda e uno per la risposta. Nell'esempio francese di cui sopra, volevamo che la carta di riconoscimento apparisse così:
D: Bonjour
R: Buongiorno
   Pagina #12
Per ottenere questo risultato, possiamo configurare i modelli per la domanda e la risposta come segue:
D: {{Francese}}
R: {{Italiano}}<br>
   Pagina #{{Pagina}}
Racchiudendo il nome di un campo tra doppie parentesi graffe,
diciamo ad Anki di sostituirlo con il valore effettivo del campo.
Tutto ciò che non è racchiuso tra parentesi graffe rimane invariato.
Non è necessario digitare "Pagina #" nel campo Pagina
quando si aggiunge del materiale, in quanto viene aggiunto automaticamente
a ogni carta. "
" è un codice speciale che dice ad Anki
di andare a capo; per approfondire consulta la sezione modelli.
I modelli per le carte di produzione funzionano in maniera analoga:
D: {{Inglese}}
R: {{Francese}}<br>
   Pagina #{{Pagina}}
Una volta creato un tipo di carta, quando aggiungi una nuova nota, verrà creata una carta basata su quel tipo di carta. I tipi di carta consentono di mantenere una formattazione coerente delle carte e possono ridurre notevolmente lo sforzo necessario per aggiungere informazioni. Inoltre, permettono ad Anki di evitare che le carte correlate appaiano troppo vicine tra loro e ti permettono di correggere un errore di battitura o un errore fattuale una sola volta e di aggiornare tutte le carte correlate contemporaneamente.
Per aggiungere e modificare i tipi di carta, clicca sul pulsante "Carte..." durante l'aggiunta o la modifica delle note. Per ulteriori informazioni sui tipi di carta, consulta la sezione Carte e modelli.
Tipi di nota
Anki consente di creare diversi tipi di note per diversi tipi di materiale. Ogni tipo di nota ha il proprio set di campi e tipi di carta. È consigliabile creare un tipo di nota separato per ciascun argomento generale che stai studiando. Nell'esempio francese precedente, potremmo creare un tipo di nota chiamato "Francese" e, se volessimo imparare le capitali, potremmo creare un tipo di nota separato con campi come "Paese" e "Capitale".
Quando Anki controlla i duplicati, confronta solo le altre note dello stesso tipo. Pertanto, se aggiungi una capitale chiamata "Arancione" utilizzando il tipo di nota "Capitale", non vedrai un messaggio di duplicato quando verrà il momento di imparare a dire "Arancione" in francese.
Quando crei una nuova collezione, Anki aggiunge automaticamente alcuni tipi di nota standard. Questi tipi di nota sono forniti per facilitarel'utilizzo di Anki per i nuovi utenti, ma nel lungo termine è consigliato creare i propri tipi di nota per il contenuto che stai imparando. I tipi di nota standard sono:
-
Basilare
Contiene i campi Fronte e Retro e crea una carta. Il testo inserito in Fronte apparirà sul lato fronte della carta e il testo inserito in Retro apparirà sul retro della carta. -
Basilare (e carta inversa)
Come Basilare, ma crea due carte per lo stesso testo: una fronte→retro e una retro→fronte. -
Basilare (carta inversa opzionale)
Si tratta di una carta fronte→retro e, facoltativamente, di una carta retro→fronte. Presenta un terzo campo chiamato "Aggiungi inversa". Se inserisci del testo in quel campo, verrà creata una carta inversa. Maggiori informazioni sono disponibili nella sezione Carte e modelli. -
Basilare (digita la risposta)
Simile a Basilare, ma con una casella di testo aggiuntiva sul lato fronte in cui puoi digitare la risposta. Quando mostri il retro della carta, il tuo input verrà controllato e confrontato con la risposta. Maggiori informazioni sono disponibili nella sezione Controlla la risposta. -
Cloze
Permette di selezionare una parte del testo e trasformarla in una cancellazione Cloze (esempio: "L'uomo è sbarcato sulla luna nel […]" → "L'uomo è sbarcato sulla luna nel 1969"). Maggiori informazioni sono disponibili nella sezione Cancellazione cloze. -
Occludi Immagine
Simile al tipo di nota Cloze, ma usa le immagini invece del testo, particolarmente utile quando si studia materiale basato su immagini, come anatomia, geografia e altro. Per approfondire, consulta la sezione Occlusione immagine.
Per aggiungere nuovi tipi di nota e modificare quelli esistenti, vai su Strumenti → Gestisci i tipi di nota dalla schermata principale di Anki.
Note e tipi di nota sono comuni a tutta la tua collezione e non limitati a un singolo mazzo. Ciò significa che puoi utilizzare diversi tipi di nota in un particolare mazzo o avere diverse carte generate da una particolare nota in mazzi diversi. Quando aggiungi una nota attraverso la schermata Aggiungi, puoi scegliere quale tipo di nota utilizzare e in quale mazzo inserire la nota, e queste scelte sono completamente indipendenti l'una dall'altra. Puoi anche modificare il tipo di nota di alcune note dopo averle create.
Collezione
Una "collezione" è l'insieme del materiale archiviato in Anki: carte, note, mazzi, tipi di nota, opzioni del mazzo e così via.
Mazzi condivisi
Su Youtube puoi trovare un video sul concetto di mazzi condivisi e basi sulla ripetizione (inglese).
Il modo più semplice per iniziare con Anki è quello di scaricare un mazzo di carte condiviso da qualcuno:
-
Clicca sul pulsante "Ottieni mazzi condivisi" in fondo alla lista dei mazzi.
-
Trova un mazzo che ti interessa, quindi clicca sul pulsante "Download" per scaricare il pacchetto del mazzo.
-
Fai doppio clic sul pacchetto scaricato per caricarlo in Anki, oppure vai su File→Importa per importarlo.
Tieni presente che al momento non è possibile aggiungere mazzi condivisi direttamente su AnkiWeb. Devi prima importarli usando la versione di Anki per computer, quindi sincronizzare per caricarli su AnkiWeb.
Creare il proprio mazzo è il modo più efficace per imparare una materia complessa. Materie come le lingue e le scienze non possono essere comprese semplicemente memorizzando dei fatti, ma richiedono spiegazioni e contesto per apprenderle in maniera efficace. Inoltre, creare carte tu stesso ti costringe a decidere quali sono i punti chiave, favorendo così una migliore comprensione.
Se sei uno studente di lingue, potresti essere tentato di scaricare una lunga lista di parole e delle loro traduzioni corrispondenti, ma questo non ti insegnerà la lingua tanto quanto memorizzare equazioni scientifiche ti insegnerà l'astrofisica. Per imparare correttamente, hai bisogno di libri, insegnanti o dell'esposizione a frasi del mondo reale.
Do not learn if you do not understand (non imparare se non capisci).
--SuperMemo
La maggior parte dei mazzi condivisi sono creati da persone che apprendono il materiale al di fuori di Anki – da libri, lezioni, TV, ecc. Selezionano gli aspetti interessanti di ciò che imparano e li aggiungono ad Anki. Non si sforzano di aggiungere il contesto o spiegazioni alle carte, perché già comprendono l'argomento. Di conseguenza, quando qualcun altro scarica il loro mazzo e cerca di usarlo, lo troverà molto difficile a causa della mancanza di contesto e spiegazioni.
Questo non significa che i mazzi condivisi siano inutili, ma semplicemente che per materie complesse dovrebbero essere utilizzati come "integrazione" al materiale esterno, non come "sostituto". Se stai studiando il libro ABC e qualcuno ha condiviso un mazzo di idee di idee provenienti da tale libro, questo è un ottimo modo per risparmiare tempo. Per materie semplici che sono fondamentalmente una lista di fatti, come i nomi delle capitali o i quiz di cultura generale, probabilmente non hai bisogno di materiale esterno. Se però provi a studiare argomenti complessi senza materiale esterno, otterrai probabilmente risultati deludenti.
Ricevere supporto
Porre domande efficaci
Ad eccezione di AnkiMobile, Anki e il relativo supporto sono forniti gratuitamente da volontari che dedicano generosamente il loro tempo. Tienilo a mente quando richiedi aiuto - se sei scortese ed esigente, o non hai fatto alcuno sforzo per risolvere autonomamente il problema, è meno probabile che le persone siano disponibili ad aiutarti.
Prova innanzitutto a risolvere il problema autonomamente:
- Leggi la sezione per iniziare del manuale e guarda i video introduttivi.
- Se hai riscontrato un bug, segui questi passaggi.
- Utilizza il tasto di ricerca in questa pagina per cercare le domande frequenti.
- Utilizza il tasto di ricerca nel manuale.
- Utilizza il tasto di ricerca nel forum.
- Cerca il problema su Google.
Se hai provato quanto sopra e stai ancora incontrando difficoltà, è il momento di chiedere aiuto. Quando scrivi un post, spiega il problema che stai riscontrando in maniera chiara e dettagliata.
Per favore, evita di porre domande vaghe come:
"Anki non funziona, cosa devo fare?".
Fornisci invece il maggior numero di dettagli possibile. Per esempio:
"Quando faccio doppio clic sull'icona di Anki, appare un messaggio di errore. Ho cercato l'errore su Google, ma non ho trovato alcuna soluzione utile. Ho copiato e incollato il messaggio di errore in fondo al mio post. Ho seguito i passaggi descritti nella pagina "Quando si verificano problemi", ma il messaggio di errore persiste. Cosa devo fare?"
Questa è una domanda decisamente migliore, poiché ci fornisce informazioni su:
- Tentativi che hai fatto.
- Passati seguiti quando si verifica il problema.
- Problemi o errori che si verificano.
Conoscere questi dettagli rende molto più facile rispondere alla tua domanda.
I forum utilizzano credenziali di accesso differenti da quelli utilizzati per AnkiWeb, quindi ti invitiamo a crearne uno nuovo se è la prima volta che usi il forum.
Anki Desktop (versione per computer) e AnkiWeb
Dopo aver letto la sezione precedente, ti invitiamo a postare sul forum (inglese) per ricevere supporto.
I forum utilizzano credenziali di accesso differenti da quelli utilizzati per AnkiWeb, quindi ti invitiamo a crearne uno nuovo se è la prima volta che usi il forum.
AnkiDroid (dispositivi Android)
Consulta la pagina di supporto di AnkiDroid (inglese).
AnkiMobile (dispositivi iPhone/iPad)
Consulta la pagina di supporto di AnkiMobile (inglese).
Segnalazioni e domande private
Per segnalazioni di sicurezza e richieste di informazioni commerciali, puoi inviare un ticket privato qui (inglese). Se hai domande su Anki, AnkiWeb o AnkiDroid, utilizza invece i forum (inglese).
Studio
- Mazzi
- Panoramica dello studio
- Domande
- Carte in apprendimento/riapprendimento
- Carte di ripasso
- Conteggi delle carte programmate
- Fattore di sfumatura
- Modifica e altro
- Ordine di presentazione
- Carte sorelle e sepoltura
- Scorciatoie da tastiera
- Restare indietro
Una volta che hai trovato un mazzo di tuo gradimento o che hai aggiunto delle note, è giunto il momento di iniziare a studiare.
Mazzi
Lo studio su Anki è limitato al mazzo attualmente selezionato, compresi eventuali sottomazzi contenuti al suo interno.
Nella schermata dei mazzi sono presenti mazzi e sottomazzi organizzati in una lista, e sono visualizzate anche le carte Nuove, In apprendimento e Di ripasso in un determinato giorno.
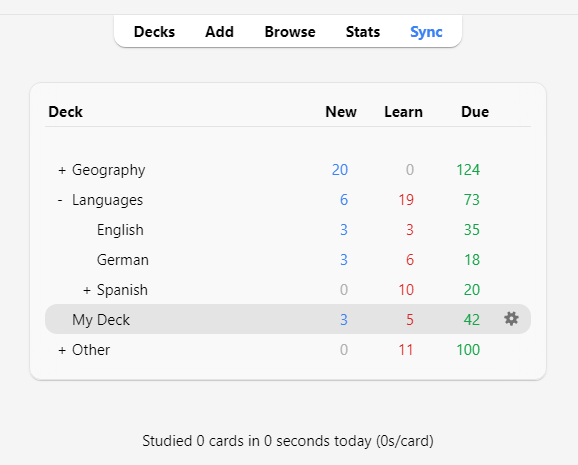
Facendo clic su un mazzo lo si rende il "mazzo attuale" e Anki passa automaticamente alla schermata di studio. Puoi tornare all'elenco dei mazzi in qualsiasi momento per selezionare un altro mazzo, accedendo a "Mazzi" nella parte superiore della finestra principale o, in alternativa, accedere a "Strumenti -> Studia mazzo" per selezionare un nuovo mazzo dalla tastiera oppure premere il tasto s per studiare il mazzo attualmente selezionato.
Facendo clic sull'icona a forma di ingranaggio alla destra di un determinato mazzo, puoi decidere di rinominarlo, eliminarlo, modificarne le opzioni o esportarlo.
Panoramica dello studio
Facendo clic su un mazzo per studiarlo apparirà una schermata che mostra quante carte sono da studiare per il giorno attuale. Questa schermata è chiamata "panoramica del mazzo":
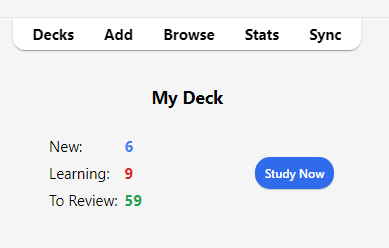
Le carte sono suddivise in tre categorie: Nuove, In apprendimento e Di ripasso. Se hai attivato l'opzione "Seppellisci carte sorelle" nelle impostazioni del mazzo, il numero delle eventuali carte sepolte verrà mostrato in grigio:
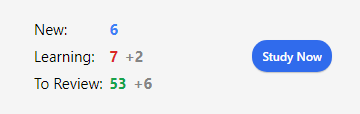
Per iniziare una sessione di studio, fai clic sul pulsante Studia adesso e Anki ti mostrerà le carte da ripetere una alla volta, fino all'esaurimento di quelle previste per oggi.
Durante la sessione di studio, puoi tornare alla panoramica premendo il tasto s.
Domande
Quando viene mostrata una carta, inizialmente è visibile soltanto la domanda. Dopo aver riflettuto sulla risposta, puoi fare clic sul pulsante Mostra risposta o premere la barra spaziatrice. A questo punto ti verrà mostrata la risposta. Non preoccuparti se ci vuole un po' di tempo per ricordare la risposta, ma come regola generale, se non riesci a rispondere entro circa 10 secondi, è probabilmente meglio mostrare la risposta anziché continuare a sforzarti di ricordarla.
Una volta mostrata la risposta, puoi confrontarla con quella a cui avevi pensato e comunicare ad Anki quanto bene l'hai ricordata. Se non sei sicuro di poter fare un confronto accurato, puoi far sì che Anki ti richieda di digitare la risposta anziché mostrartela soltanto.
Carte in apprendimento/riapprendimento
Quando apprendi nuove carte o riapprendi quelle dimenticate, Anki mostra le carte una o più volte per aiutarti a memorizzarle. Ciascuna di queste presentazioni è chiamata "passo di apprendimento" e, per impostazione predefinita, sono presenti due passi di apprendimento: 1 minuto e 10 minuti. Puoi modificare il numero di passi e l'intervallo tra di essi nelle opzioni del mazzo.
Durante una sessione di studio sono presenti quattro pulsanti di valutazione:
-
Ripeti fa tornare la carta al primo passo.
-
Difficile ripete il passo attuale.
- Se la carta si trova sul primo (e unico) passo, l'intervallo è incrementato del 50%, ma mai superiore ad un giorno, rispetto al passo.
- Se la carta si trova sul primo passo e ne hai configurati più di uno, l'intervallo è la media tra Ripeti e Normale, ovvero la media dei primi due passi.
- Se la carta si trova su un qualsiasi passo successivo, Difficile ripete l'intervallo precedente.
-
Normale sposta la carta al passo successivo. Se la carta si trovava sul passo finale, viene convertita in una "carta di ripasso" (viene "promossa"). Per impostazione predefinita, dopo aver raggiunto il passo di apprendimento finale, la carta viene mostrata nuovamente il giorno successivo e poi a intervalli sempre più lunghi (vedi la sezione successiva).
-
Facile converte immediatamente la carta in una carta di ripasso, anche se non sono stati completati tutti i passi. Per impostazione predefinita la carta viene mostrata nuovamente dopo 4 giorni e poi a intervalli sempre più lunghi. Con il pianificatore v1, il pulsante "Facile" non viene mostrato in modalità di riapprendimento poiché avrebbe lo stesso intervallo di "Normale", mentre con il pianificatore v2+ (inglese) incrementa l'intervallo di 1 giorno.
Quando le carte vengono visualizzate per la prima volta, iniziano dal primo passo. Questo significa che rispondere con Normale ad una carta per la prima volta la mostrerà ancora una volta entro 10 minuti, saltando il passo iniziale di 1 minuto. Se invece rispondi con Ripeti, la carta si ripresenterà dopo 1 minuto.
Puoi usare i tasti 1, 2, 3 e 4 sulla tastiera per selezionare un pulsante specifico, dove 1 corrisponde a Ripeti. Premendo la Barra spaziatrice o Invio si seleziona il pulsante Normale.
Se non ci sono altre carte da mostrare, Anki mostrerà nuovamente le carte da ripetere anche se il loro intervallo non è trascorso del tutto. Se preferisci attendere il completamento dell'intervallo puoi modificare tale comportamento accedendo a Preferenze>Ripetizioni>Limite di studio anticipato.
Carte di ripasso
Quando una carta già appresa è pronta per essere ripassata, sono presenti quattro pulsanti che ti permettono di valutare la tua risposta:
-
Ripeti indica che la tua risposta è errata e fa sì che in futuro la carta venga mostrata più frequentemente. Questo tipo di carta viene considerata una carta "con errore". Consulta la sezione errori per maggiori informazioni su come viene gestita tale carta.
-
Difficile per impostazione predefinita mostra la carta con un intervallo leggermente più lungo rispetto alla volta precedente e fa sì che in futuro venga mostrata più frequentemente.
-
Normale comunica che l'intervallo precedente era corretto e che la facilità della carta non necessita di modifiche. Con la facilità iniziale predefinita la carta verrà mostrata nuovamente circa 2 volte e mezzo più tardi rispetto alla volta precedente, per cui se in precedenza hai atteso 10 giorni per rivedere la carta, il prossimo intervallo sarà di circa 25 giorni.
-
Facile comunica che l'intervallo è troppo breve. La carta verrà pianificata molto più avanti nel futuro rispetto a "Normale" e mostrata meno frequentemente in futuro. Poiché "Facile" aumenta rapidamente l'intervallo, è consigliabile utilizzarlo solo per le carte più facili; in generale dovresti tendere a rispondere "Normale".
Come per le carte in apprendimento, puoi utilizzare i tasti 1, 2, 3 e 4 sulla tastiera per selezionare una risposta. Premendo la Barra spaziatrice o Invio si seleziona il pulsante Normale.
Per saperne di più sul funzionamento dell'algoritmo, consulta la sezione Opzioni del mazzo e la FAQ (inglese).
Conteggi delle carte programmate
Quando viene mostrata solo la domanda, nella parte inferiore della schermata sono presenti tre numeri, come ad esempio 6 + 9 + 59. Questi indicano rispettivamente le carte nuove (blu), quelle in apprendimento (arancione) e quelle di ripasso (verde). Se preferisci non vedere questi numeri, puoi disattivarli nelle preferenze.
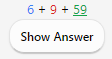
Con il pianificatore v1, i numeri indicano le ripetizioni necessarie per completare tutte le carte in quella coda e non il numero di carte. Se hai configurato più di un passo per le carte "con errori", il numero aumenta di più di uno quando sbagli una ripetizione, poiché tale carta necessita di essere mostrata più volte.
A partire dal pianificatore v2 (inglese), invece, i numeri indicano il conteggio delle carte, quindi il numero aumenta sempre di uno indipendentemente dai passi rimanenti.
Quando viene mostrata la risposta, sopra ciascun pulsante appare una stima della prossima data di presentazione della carta. Se preferisci non vedere queste stime, puoi disattivarle nelle preferenze.
Fattore di sfumatura
Selezionando un pulsante di facilità su una carta di ripasso, viene applicata una piccola quantità di "sfumatura" casuale. Lo scopo è evitare che le carte aggiunte contemporaneamente e valutate in maniera simile rimangano aggreggate e vengano mostrate nello stesso giorno. Questa sfumatura è visibile sui pulsanti di valutazione quando è abilitato il pianificatore v3 (inglese), per cui se utilizzi una versione precedente e noti una leggera discrepanza tra la tua selezione e gli intervalli effettivi delle carte, la causa è probabilmente questa.
Anche alle carte in apprendimento viene applicato un intervallo supplementare fino a 5 minuti per evitare che vengano mostrate nello stesso ordine, ma ciò non è visibile sui pulsanti di valutazione. Non è possibile disattivare questa funzionalità.
Modifica e altro
In basso a sinistra è presente un pulsante chiamato Modifica che ti permette di modificare la nota attuale. Una volta terminata la modifica ritorni alla sessione di studio. La schermata di modifica è molto simile a quella di aggiunta delle note.
In basso a destra, invece, è presente un pulsante chiamato Altro, che permette di effettuare operazioni aggiuntive sulla carta o nota attuale:
-
Assegna bandiera alla carta: Aggiunge un contrassegno colorato (bandiera) alla carta o lo disattiva. Le bandiere appaiono durante lo studio e le carte contrassegnate con una bandiera possono essere ricercate nella schermata Sfoglia. Questa funzionalità è utile quando vuoi intraprendere una qualche azione sulla carta in un secondo momento, come ad esempio la ricerca di una parola una volta tornato a casa. Se utilizzi Anki 2.1.45 o versioni successive, puoi anche rinominare le bandiere dalla schermata Sfoglia.
-
Seppellisci carta / nota: Nasconde una carta o tutte le carte della nota, escludendole dalla ripetizione fino al giorno successivo (se desideri disseppellire le carte prima di allora, puoi fare clic sul pulsante "Disseppellisci" nella schermata panoramica del mazzo). Questa funzionalità è utile se al momento non riesci a rispondere alla carta o se preferisci tornarci in un altro momento. La sepoltura può anche avvenire automaticamente per carte della stessa nota.
Con il vecchio pianificatore, se le carte erano in fase di apprendimento quando venivano seppellite, le stesse venivano spostate nuovamente nella coda delle nuove carte o nella coda di ripasso prima di essere sepolte.
Con la versione 2.1 del pianificatore (inglese) seppellire le carte non reimposta i passi di apprendimento di una carta.
-
Dimentica carta: Sposta la carta attuale alla fine della coda delle carte nuove.
A partire da Anki 2.1.50, l'ordine originale di una nuova carta viene memorizzato quando la si studia per la prima volta con il pianificatore v3. L'opzione "Ripristina posizione originale" ti consente di ripristinare la carta alla sua posizione originale quando la dimentichi.
L'opzione "Azzera conteggio di ripetizioni ed errori", se abilitata, azzera il conteggio delle ripetizioni ed errori della carta, ma non rimuove la cronologia delle ripetizioni mostrata in basso nella schermata delle informazioni sulla carta.
-
Imposta data di scadenza: Inserisce le carte nella coda di ripasso e le programma per essere riviste in una data specifica.
-
Sospendi carta / nota: Nasconde una carta o tutte le carte della nota, escludendole dalla ripetizione fino a quando non le rimuovi manualmente dalla sospensione (facendo clic sul pulsante "sospendi" nella schermata Sfoglia). Utile se vuoi evitare di ripassare la nota per un po' di tempo ma non vuoi eliminarla. Con il vecchio pianificatore, se le carte erano in fase di apprendimento quando venivano sospese, le stesse venivano spostate nuovamente nella coda delle nuove carte o nella coda di ripasso prima di essere sospese.
Con la versione 2.1 del pianificatore (inglese) la sospensione delle carte non reimposta i passi di apprendimento di una carta.
-
Opzioni: Modifica le opzioni per il mazzo attuale.
-
Info carta: Mostra le statistiche sulla carta.
-
Info carta precedente: Mostra le statistiche sulla carta precedente.
-
Contrassegna nota: Aggiunge l'etichetta "marked" (contrassegnato/a) alla nota attuale, permettendoti di trovarla facilmente nella schermata Sfoglia. Questa funzionalità è simile all'assegnazione di bandiere alle singole carte, ma utilizza un'etichetta, per cui se la nota contiene più carte, una ricerca con l'etichetta in questione mostrerà tutte le carte che la possiedono. Per la maggior parte degli utenti è preferibile utilizzare le bandiere.
-
Crea copia: Crea e apre un duplicato della nota attuale nella schermata di modifica, che può quindi essere modificata per creare variazioni di una determinata carta. Per impostazione predefinita, la carta duplicata, o copia, viene creata nello stesso mazzo della nota originale.
-
Elimina nota: Elimina la nota e tutte le sue carte.
-
Ripeti audio: Se la carta contiene una traccia audio sul lato frontale o sul retro, la riproduce nuovamente.
-
Metti audio in pausa: Mette in pausa l'audio in riproduzione.
-
Audio -5s / +5s: Consente di andare indietro o avanti di 5 secondi nell'audio in riproduzione.
-
Registra voce: Registra la tua voce con il microfono al fine di controllare la tua pronuncia. La registrazione è temporanea e viene eliminata quando passi alla carta successiva. Se desideri aggiungere una traccia audio a una carta in modo permanente, puoi farlo nella schermata di modifica.
-
Riproduci voce: Riproduce la registrazione precedente della tua voce (presumibilmente dopo aver mostrato la risposta).
Ordine di presentazione
Durante lo studio vengono presentate le carte del mazzo selezionato e di eventuali sottomazzi in esso contenuti. Pertanto, se selezioni il mazzo "Francese", ti verranno mostrati anche i sottomazzi "Francese::Vocabolario" e "Francese::Il mio libro di testo::Lezione 1".
Il modo in cui Anki recupera le carte dai mazzi dipende dal pianificatore utilizzato:
-
Con il pianificatore v1, quando un mazzo contiene dei sottomazzi, le carte vengono recuperate a turno da ciascun mazzo.
-
Con il pianificatore v2 (inglese), quando un mazzo contiene dei sottomazzi, le carte vengono recuperate da tutti i sottomazzi contemporaneamente. Il limite di ripetizione dei sottomazzi viene ignorato; si applica solo il limite del mazzo che hai selezionato.
-
Con il pianificatore v3 (inglese) viene applicato anche il limite di ciascun sottomazzo e non è necessario che le carte vengano presentate in ordine di mazzo. Consulta la sezione opzioni del mazzo per maggiori informazioni.
Per impostazione predefinita, le carte nuove vengono recuperate dai mazzi in ordine alfabetico. Nell'esempio sopracitato, quindi, verrebbero recuperate prima le carte dal mazzo "Francese", poi dal mazzo "Il mio libro di testo", e infine dal mazzo "Vocabolario". Puoi sfruttare questa peculiarità per controllare l’ordine di presentazione delle carte, posizionando quelle ad alta priorità in mazzi che appaiono più in alto nella lista. Quando i computer ordinano il testo in ordine alfabetico, il carattere "-" precede i caratteri alfabetici, e "~" li segue. Potresti quindi chiamare il mazzo "-Vocabolario" per far sì che le carte in esso contenute appaiano per prime e chiamare l'altro mazzo "~ Il mio libro di testo" per forzare le carte in esso contenute ad apparire dopo tutto il resto.
Le carte nuove e di ripasso vengono recuperate separatamente, senza aspettare che entrambe le code siano vuote prima di passare al mazzo successivo, per cui è possibile che ti vengano mostrate carte nuove da un mazzo mentre studi le carte di ripasso da un altro mazzo o viceversa. Se non lo desideri, puoi fare clic direttamente sul mazzo che vuoi studiare invece che su uno dei mazzi genitore.
Poiché le carte in apprendimento hanno una certa urgenza temporale, vengono recuperate da tutti i mazzi contemporaneamente e presentate nell'ordine in cui sono programmate.
Per controllare l'ordine di presentazione delle ripetizioni di un determinato mazzo o per cambiare la presentazione delle carte nuove da ordinata a casuale, consulta le opzioni del mazzo. Per un ordinamento più preciso delle carte nuove puoi cambiare l'ordine nella schermata Sfoglia.
Carte sorelle e sepoltura
Come ricorderai dalle basi, per ogni informazione che aggiungi può venire creata più di una carta, come per esempio una carta fronte→retro e una retro→fronte, oppure due diverse cancellazioni dallo stesso testo. Queste carte correlate vengono chiamate "sorelle".
Quando rispondi a una carta che ha delle sorelle, puoi impedire che le sue sorelle vengano mostrate nella stessa sessione di studio "seppellendole" automaticamente. Le carte sepolte restano escluse dalla ripetizione fino all'inizio del giorno successivo oppure fino a quando non le disseppellisci manualmente usando il pulsante "Disseppelisci" presente in fondo alla schermata Panoramica dello studio. La sepoltura delle sorelle avviene anche se queste non si trovano nello stesso mazzo (ad esempio, se utilizzi la funzionalità Sovrascrivi mazzo).
Puoi attivare la sepoltura dalla schermata Opzioni del mazzo; sono presenti impostazioni separate per le carte nuove e per quelle di ripasso.
Soltanto le sorelle che sono carte nuove o di ripasso vengono seppellite, mentre le carte in apprendimento non vengono nascoste, poiché per queste il tempo è un fattore critico. D'altra parte, quando studi una carta in apprendimento, eventuali sorelle nuove o di ripasso vengono sepolte.
N.B.: Una carta non può essere sepolta e sospesa contemporaneamente. Sospendere una carta sepolta la disseppellisce. Da Anki 2.1.49 in poi, non è possibile seppellire una carta sospesa, mentre nelle versioni precedenti viene annullata la sospensione.
Scorciatoie da tastiera
La maggior parte delle operazioni comuni in Anki è associata a delle scorciatoie da tastiera, spesso individuabili nell'interfaccia: le voci di menù mostrano le scorciatoie accanto al loro nome e posizionando il cursore del mouse su un pulsante, generalmente mostra la relativa scorciatoia in un riquadro.
Durante lo studio, sia il tasto Barra spaziatrice che Invio mostrano la risposta. Una volta visualizzata la risposta, puoi utilizzare la Barra spaziatrice o Invio per selezionare il pulsante "Normale". I tasti da 1 a 4 permettono di selezionare un pulsante di valutazione specifico. Molti utenti trovano conveniente rispondere alla maggior parte delle carte con la Barra spaziatrice e tenere un dito su 1 per quando si dimenticano.
La voce "Studia mazzo" nel menù Strumenti consente di passare rapidamente ad un mazzo utilizzando la tastiera e puoi anche attivarla premendo il tasto "/". Una volta aperta, mostra tutti i tuoi mazzi e un filtro nella parte superiore. Man mano che digiti i caratteri, vengono mostrati soltanto i mazzi che contengono i caratteri digitati. Puoi aggiungere uno spazio per separare più termini di ricerca e verranno mostrati soltanto i mazzi che corrispondono a tutti i termini, per cui sia "gia 1" che "one1 gia" corrisponderebbero ad un mazzo chiamato "Giapponese::Lezione1".
Restare indietro
Se resti indietro nelle ripetizioni, viene data priorità alle carte in attesa da più tempo, mostrandole in ordine casuale fino al raggiungimento del limite giornaliero di ripetizioni. Tale ordinamento assicura che nessuna carta venga trascurata a tempo indeterminato, ma implica che se aggiungi nuove carte queste non verranno visualizzate finché non avrai smaltito l'arretrato.
Per modificare l'ordine delle ripetizioni scadute puoi creare un mazzo filtrato.
Quando rispondi a carte in attesa da molto tempo, il ritardo viene preso in considerazione per determinare il momento successivo in cui mostrare una carta. Per maggiori informazioni, consulta la sezione sull'algoritmo di ripetizione dilazionata di Anki.
Aggiunta/Modifica
- Aggiunta di carte e di note
- Aggiunta di un tipo di nota
- Personalizzazione dei campi
- Cambiare il mazzo o il tipo di nota
- Organizing Content
- Editing Features
- Cloze Deletion
- Image Occlusion
- Editing IO notes
- Inputting Foreign Characters and Accents
- Unicode Normalization
Aggiunta di carte e di note
Ricorderai dalle basi che in Anki si aggiungono note e non carte, le quali vengono invece generate da Anki. Fai clic sul pulsante "Aggiungi" nella schermata principale e si aprirà la schermata "Aggiungi Note".
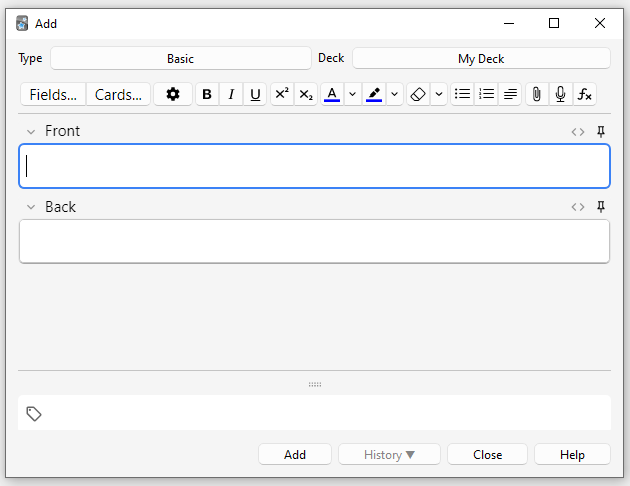
Nella parte superiore sinistra della schermata viene mostrato il tipo di nota attuale. Se non riporta "Basilare", potresti aver aggiunto dei tipi di nota importando un mazzo condiviso. Il testo che segue presuppone che sia selezionato "Basilare".
Nella parte superiore destra della schermata viene mostrato il mazzo a cui verranno aggiunte le carte. Se desideri aggiungere le carte ad un nuovo mazzo, fai clic sul pulsante del nome del mazzo e quindi su "Aggiungi".
Sotto il tipo di nota sono presenti alcuni pulsanti e due aree chiamate rispettivamente "Fronte" e "Retro". Fronte e Retro sono chiamati campi e puoi aggiungerli, rimuoverli e rinominarli facendo clic sul pulsante "Campi..." soprastante.
Sotto i campi è presente un'altra area chiamata "Etichette". Le etichette sono termini che puoi associare alle note per facilitarne l'organizzazione e la ricerca. Puoi lasciare tale area vuota se lo desideri, oppure aggiungerne una o più, separate da uno spazio. Se l'area contiene
vocabolario controlla_con_insegnante
...significa che la nota che aggiungerai avrà due etichette.
Una volta inserito del testo nel fronte e nel retro, puoi fare clic sul pulsante "Aggiungi" o premere Ctrl+Invio (Comando+Invio su Mac) per aggiungere la nota alla tua collezione. Eseguendo questa operazione verrà creata anche una carta e inserita nel mazzo scelto. Se desideri modificare una carta aggiunta recentemente, fai clic sul pulsante "Cronologia" per cercarla nella schermata Sfoglia.
Per ulteriori informazioni sui pulsanti che si trovano tra il tipo di nota e i campi, consulta la sezione modifica.
Controllo dei duplicati
Anki verifica l'unicità del primo campo, segnalandoti eventuali duplicati quando aggiungi due o più carte con lo stesso valore nel campo "Fronte", come ad esempio "mela". Questo controllo è limitato al tipo di nota attuale, pertanto se studi diverse lingue, due carte con lo stesso valore per il campo "Fronte" non verranno segnalate come duplicate purché il tipo di nota sia differente.
Per motivi di efficienza tale controllo non avviene in maniera automatica, ma la schermata Sfoglia dispone di una funzionalità chiamata "Trova duplicati" di cui puoi fare uso periodicamente.
Apprendimento efficace
Le modalità di ripasso preferite variano da individuo a individuo, ma esistono alcuni concetti generali da tenere a mente. Un'introduzione eccellente è fornita da questo articolo presente sul sito di SuperMemo. In particolare è consigliato:
-
Privilegiare la semplicità: Carte più concise risultano più facili da ripassare. Sebbene tu possa essere tentato di includere molte informazioni "per sicurezza", il ripasso rischierebbe di diventare eccessivamente pesante.
-
Evitare di memorizzare senza capire: Se stai studiando una lingua, cerca di evitare lunghe liste di parole. Il modo migliore per apprendere le lingue è nel contesto, il che significa vedere le parole utilizzate all'interno di una frase. Allo stesso modo, immagina di seguire un corso di informatica: qualora tentassi di memorizzare una montagna di acronimi, troveresti molto difficile fare progressi. Al contrario, dedicare tempo alla comprensione dei concetti sottesi agli acronimi ne facilita l'apprendimento.
Aggiunta di un tipo di nota
Mentre i tipi di nota basilari sono sufficienti per carte semplici che contengono una sola parola o una sola frase per lato, nel momento in cui ritieni di voler includere più di una informazione sul fronte o sul retro, è consigliabile suddividerle in più campi.
Potresti pensare "ma io voglio creare soltanto una carta, perché non posso semplicemente includere la traccia audio, l'immagine, il suggerimento e la traduzione nel campo Fronte?". Se preferisci farlo, nessun problema. Tuttavia lo svantaggio di questo approccio è che tutte le informazioni saranno aggregate. Se volessi ordinare le carte per suggerimento, non saresti in grado di farlo in quanto questi sono mischiati con gli altri contenuti. Inoltre, non saresti in grado di fare cose come spostare la traccia audio da Fronte a Retro, se non copiandola e incollandola manualmente per ogni nota. Separando i contenuti in campi distinti, renderai molto più facile modificare il layout delle tue carte in futuro.
Per creare un nuovo tipo di nota, seleziona "Strumenti → Gestisci tipi di nota" dalla schermata principale di Anki, quindi fai clic su "Aggiungi" per aggiungere il nuovo tipo di nota. Si aprirà una nuova schermata che ti darà la possibilità di scegliere un tipo di nota su cui basare quello nuovo. "Aggiungi" significa basare il nuovo tipo su uno di quelli predefiniti fornito da Anki. "Clona" significa basarlo su uno già presente nella collezione. Se per esempio hai già creato un tipo di nota per il vocabolario francese, potresti clonarlo durante la creazione di un tipo di nota per il vocabolario tedesco.
Dopo aver selezionato "OK", ti verrà chiesto di dare un nome al nuovo tipo. In questo caso il nome del materiale che stai studiando è una buona scelta: "Giapponese", "Cultura generale" e così via. Una volta scelto un nome, chiudi la schermata "Tipi di Note" e tornerai alla schermata Aggiungi Note.
Personalizzazione dei campi
Per personalizzare i campi, fai clic sul pulsante "Campi..." quando aggiungi o modifichi una nota, oppure quando il tipo di nota è selezionato nella schermata "Gestisci tipi di nota".
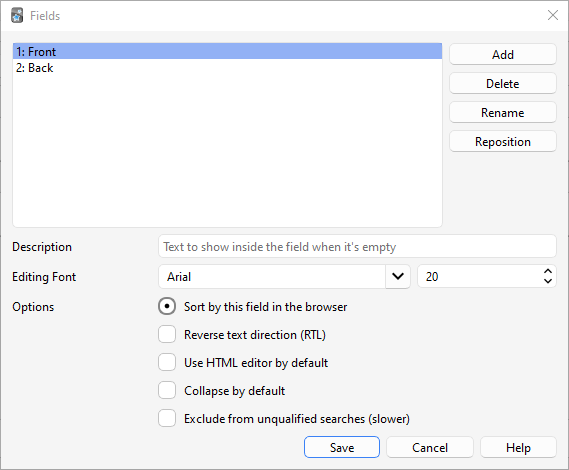
Puoi aggiungere, eliminare o rinominare i campi facendo clic sui pulsanti corrispondenti. Per modificare l'ordine in cui appaiono i campi in questa finestra e nella finestra di aggiunta delle note, utilizza il pulsante "Riposiziona". Una volta che hai selezionato tale pulsante, inserisci la posizione numerica desiderata per il campo in questione. Ad esempio, per spostare un campo in prima posizione, immetti "1".
Sebbene la probabilità che tu crei campi in inglese sia più bassa, è importante sottolineare l'importanza di evitare l'utilizzo di nomi come "Tags", "Type", "Deck", "Card" o "FrontSide" per i campi in quanto si tratta di campi speciali e non funzionerebbero correttamente.
Le opzioni presenti in fondo alla schermata consentono di modificare diverse proprietà dei campi utilizzati quando aggiungi e modifichi le carte. Non è in questa sezione che personalizzi ciò che appare sulle carte durante la ripetizione; per quello consulta la sezione modelli.
-
Modifica carattere ti consente di personalizzare il carattere e la dimensione utilizzati durante la modifica delle note. Questo è utile se vuoi ridurre la dimensione di informazioni di minore importanza o aumentare quella di caratteri stranieri difficili da leggere. Le modifiche apportate qui non influiscono su come le carte appaiono in fase di ripetizione: consulta la sezione modelli se desideri farlo. Se hai abilitato la funzionalità "scrivi la risposta", il testo digitato utilizzerà la dimensione del carattere definita qui. (Per informazioni su come modificare il carattere effettivo durante la digitazione della risposta, consulta la sezione verifica della risposta).
-
Ordina in base a questo campo… mostra questo campo nella colonna "Campo ordinamento" della schermata Sfoglia. Puoi utilizzarlo per ordinare le carte in base a quel campo, ma soltanto un campo alla volta può essere utilizzato per l'ordinamento.
-
Inverti direzione testo è utile se studi lingue che mostrano il testo da destra a sinistra (RTL) come l'arabo o l'ebraico. Attualmente questa impostazione si applica soltanto alla modifica; per assicurarti che il testo venga visualizzato correttamente durante la ripetizione devi modificare il modello.
-
Utilizza di default l'editor HTML è utile se preferisci modificare i campi in HTML.
-
Comprimi di default. permette di mantenere i campi compressi per impostazione predefinita. L'animazione può essere disabilitata nelle preferenze.
-
Escludi da ricerche non qualificate (più lento) può essere utilizzato se non vuoi che il contenuto di un determinato campo appaia nelle ricerche non qualificate (non limitate a un campo specifico).
Dopo aver aggiunto i campi, probabilmente vorrai aggiungerli al fronte o al retro delle carte; per maggiori informazioni su come farlo, consulta la sezione modelli.
Cambiare il mazzo o il tipo di nota
Durante l'aggiunta di una nota, puoi cambiare il tipo di nota o il mazzo utilizzato facendo clic rispettivamente sui pulsanti in alto a sinistra e a destra. La schermata che si apre ti permette non solo di selezionare un mazzo o un tipo di nota esistente ma anche di aggiungere nuovi mazzi e gestire i tipi di nota già esistenti.
Organizing Content
Using Decks Appropriately
Decks are designed to divide your content up into broad categories that you wish to study separately, such as English, Geography, and so on. You may be tempted to create lots of little decks to keep your content organized, such as "my geography book chapter 1", or "food verbs", but this is not recommended, for the following reasons:
-
Lots of little decks may mean you end up seeing cards in a recognizable order. On older scheduler versions, new cards can only be introduced in deck order. And if you were planning to click on each deck in turn (which is slow), you will end up seeing all the "chapter 1" or "food verb" reviews together. This makes it easier to answer the cards, as you can guess them from the context, which leads to weaker memories. When you need to recall the word or phrase outside Anki, you won't always have the luxury of being shown related content first!
-
While less of a problem than it was in earlier Anki versions, adding hundreds of decks may cause slowdowns, and very large deck trees with thousands of items can actually break the display of the deck list in Anki versions before 2.1.50.
Using Tags
Instead of creating lots of little decks, it's a better idea to use tags and/or fields to classify your content. Tags are a useful way to boost search results, find specific content, and keep your collection organized. There are many ways of using tags and flags effectively, and thinking in advance about how you want to use them will help you decide what will work best for you.
Some people prefer using decks and subdecks to keep their cards organized, but using tags have a big advantage over decks for that: you can add several tags to a single note, but a single card can only belong to one deck, which makes tags a more powerful and flexible categorization system than decks in most cases. You can also organize tags in trees in the same way as you can do for decks.
For example, instead of creating a "food verbs" deck, you could add those cards to your main language study deck, and tag the cards with "food" and "verb". Since each card can have multiple tags, you can do things like search for all verbs, or all food-related vocabulary, or all verbs that are related to food.
You can add tags from the Edit window and from the Browser, and you can also add, delete, rename, or organize tags there. Please note that tags work at note level, which means that when you tag a card that has siblings, all the siblings will be tagged as well. If you need to tag a single card, but not its siblings, you should consider using flags instead.
Using Flags
Flags are similar to tags, but they will appear during study in the review window, showing a colored flag icon on the upper right area of the screen. You can also search for flagged cards in the Browse screen, rename flags from the browser and create filtered decks from flagged cards, but unlike tags, a single card can have only one flag at a time. Another important difference is that flags work at card level, so flagging a card that has siblings won't have any effect on the card's siblings.
You can flag / unflag cards directly while in review mode (by pressing CTRL + 1-7 on Windows or CMD + 1-7 on Mac) and from the Browser.
The "Marked" Tag
Anki treats a tag called "marked" specially. There are options in the review screen and browse screen to add and remove the "marked" tag. The review screen will show a star when the current card's note has that tag. And cards are shown in a different color in the browse screen when their note is marked.
Note: Marking is mainly left around for compatibility with older Anki versions; most users will want to use flags instead.
Using Fields
For those who like to stay very organized, you can add fields to your
notes to classify your content, such as "book", "page", and so on. Anki
supports searching in specific fields, which means you can do a search
for "book:my book" page:63 and immediately find what you're looking
for.
Custom Study and Filtered Decks
Using custom study and filtered deck you can create temporary decks out of search terms. This allows you to review your content mixed together in a single deck most of the time (for optimum memory), but also create temporary decks when you need to focus on particular material, such as before a test. The general rule is that if you always want to be able to study some content separately, it should be in a normal deck; if you only occasionally need to be able to study it separately (for a test, when under a backlog, etc.), then filtered decks created from tags, flags, marks or fields are better.
Editing Features
The editor is shown when adding notes, editing a note during reviews, or browsing.
![]()
On the top left are two buttons, which open the fields and cards windows.
On the right are buttons that control formatting. Bold, italic and underline work like they do in a word processing program. The next two buttons allow you to subscript or superscript text, which is useful for chemical compounds like H2O or simple mathematical equations like x2. Then, there are two buttons to allow you to change text colour.
The rubber eraser button clears any formatting in the currently selected text — including the colour of the text, whether the selected text is bold, etc. The next three buttons allow creating lists, text alignment and text indent.
You can use the paper-clip button to select audio, images, and videos from your computer's hard drive and attach them to your notes. Alternatively, you can copy the media onto your computer's clipboard (for instance, by right-clicking an image on the web and choosing 'Copy Image') and paste it into the field that you want to place it in. For more information about media, please see the media section.
The microphone icon allows you to record from your computer's microphone and attach the recording to the note.
The Fx button shows shortcuts to add MathJax or LaTeX to your notes.
The […] buttons are visible when a cloze note type is selected.
![]()
The </> button allows editing the underlying HTML of a field.
![]()
Anki 2.1.45+ supports adjusting sticky fields directly from the editing screen. If you click on the pin icon on the right of a field, Anki will not clear out the field's content after a note is added. If you find yourself entering the same content into multiple notes, you may find this useful. On previous Anki versions, sticky fields were toggled from the Fields screen.
![]()
Most of the buttons have shortcut keys. You can hover the mouse cursor over a button to see its shortcut.
When pasting text, Anki will keep most formatting by default. If you hold down the Shift key while pasting, Anki will strip most of the formatting. Under Preferences, you can toggle "Paste without shift key strips formatting" to modify the default behaviour.
Cloze Deletion
'Cloze deletion' is the process of hiding one or more words in a sentence. For example, if you have the sentence:
Canberra was founded in 1913.
…and you create a cloze deletion on "1913", then the sentence would become:
Canberra was founded in [...].
Sometimes sections that have been removed in this fashion are said to be 'occluded'.
For more information on why you might want to use cloze deletion, see Rule 5 here.
Anki provides a special cloze deletion type of note, to make creating clozes easy. To create a cloze deletion note, select the Cloze note type, and type some text into the "Text" field. Then drag the mouse over the text you want to hide to select it, and click the […] button. Anki will replace the text with:
Canberra was founded in {{c1::1913}}.
The "c1" part means that you have created one cloze deletion on the sentence. You can create more than one deletion if you'd like. For example, if you select Canberra and click […] again, the text will now look like:
{{c2::Canberra}} was founded in {{c1::1913}}.
When you add the above note, Anki will create two cards. The first card will show:
Canberra was founded in [...].
…on the question, with the full sentence on the answer. The other card will have the following on the question:
[...] was founded in 1913.
You can also elide multiple sections on the same card. In the above example, if you change c2 to c1, only one card would be created, with both Canberra and 1913 hidden. If you hold down Alt (Option on a Mac) while creating a cloze, Anki will automatically use the same number instead of incrementing it.
Cloze deletions don't need to fall on word boundaries, so if you select "anberra" rather than "Canberra" in the above example, the question would appear as "C[…] was founded in 1913", giving you a hint.
You can also give yourself hints that don't match the text. If you replace the original sentence with:
Canberra::city was founded in 1913
…and then press […] after selecting "Canberra::city", Anki will treat the text after the two colons as a hint, changing the text into:
{{c1::Canberra::city}} was founded in 1913
When the card comes up for review, it will appear as:
[city] was founded in 1913.
For information on testing your ability to type in a cloze deletion correctly, please see the section on typing answers.
From version 2.1.56, nested cloze deletions are supported. For example, the following is valid:
{{c1::Canberra was {{c2::founded}}}} in 1913
The inner cloze is entirely nested within the outer. There is no support for partial overlaps, such as:
[...] founded in 1913 -> Canberra was
Canberra [...] in 1913 -> was founded
with the word "was" appearing in both deletions.
Prior to version 2.1.56, if you need to create clozes from overlapping text, add another Text field to your cloze, add it to the template, and then when creating notes, paste the text into two separate fields, like so:
Text1 field: {{c1::Canberra was founded}} in 1913

Text2 field: {{c2::Canberra}} was founded in 1913
The default cloze note type has a second field called Extra, that is shown on the answer side of each card. It can be used for adding some usage notes or extra information.
The cloze note type is treated specially by Anki, and cannot be created based on a regular note type. If you wish to customize it, please make sure to clone the existing Cloze type instead of another type of note. Things like formatting can be customized, but it is not possible to add extra card templates to the cloze note type.
Image Occlusion
Anki 23.10+ supports Image Occlusion cards natively. An Image Occlusion (IO) note is a special case of cloze deletion based on images instead of text, and allows you to create cards that hide some parts of an image, testing your knowledge of that hidden information.
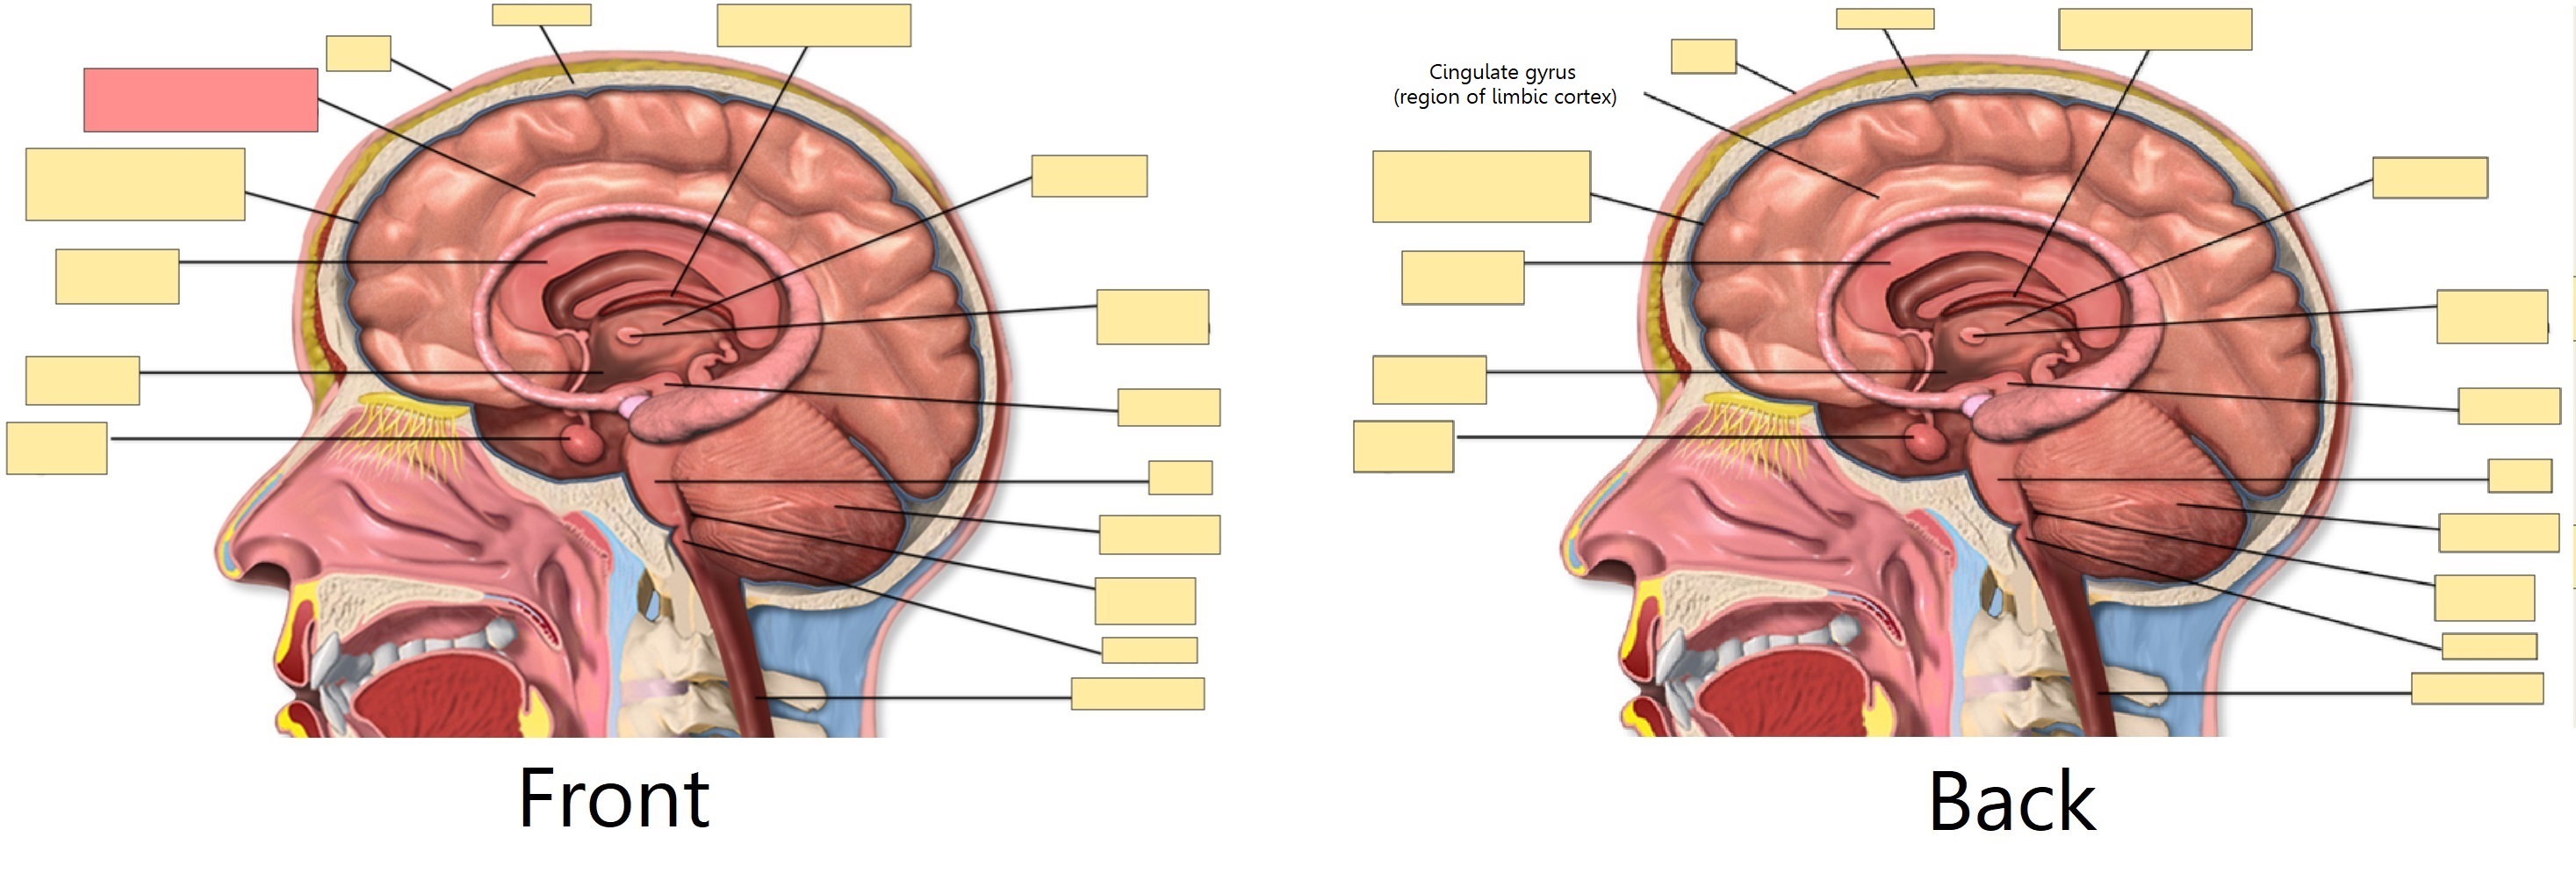
Adding an image
To add IO cards to your collection, open the Add screen, click on "Type" and choose "Image Occlusion" from the list of built-in note types. Then, click on "Select Image" to load an image file saved on your computer's hard drive, or on "Paste image from clipboard" if you have an image copied to the clipboard.
Adding IO cards
After loading an image, the IO editor will open. Click on the icons on the left to add as many areas to your image as you want. There are three basic shapes to choose from:
- Rectangle
- Ellipse
- Polygon
You can also choose between two different IO modes for each note:
- Hide All, Guess One: All areas are hidden and only one area at a time is revealed while learning.
- Hide One, Guess One: Only one area at a time is hidden and will be revealed during learning. The other areas will be visible.

Once you're done, click on the "Add" button, at the bottom of the screen. Anki will add a card for each shape or group of shapes you added in the previous step, and you can start reviewing them normally.
Editing IO notes
You can edit your IO notes by clicking on "Edit" while reviewing, or directly from the browser. There are several tools that you can use. Of note:
- Select: It allows you selecting one or more shapes to move, resize, delete or group them.
- Zoom: You can freely move the image and zoom in or out using the mouse wheel.
- Shapes (Rectangle, Ellipse or Polygon): Use them to add new shapes / cards.
- Text: It adds text areas to your image. These text areas can be moved, resized or deleted, but no card will be created when you use this tool.
- Undo / Redo.
- Zoom In / Out - Reset zoom.
- Toggle Translucency: Use this tool to temporarily view the hidden areas.
- Delete: Use this tool to delete selected shapes and text areas. Please note that deleting a shape won't delete its associated card automatically; you will need to use Tools>Empty Cards afterwards, the same as with regular cloze deletions.
- Duplicate.
- Group selection: Use this tool to create a cluster of shapes, which will allow you to move, resize or delete them simultaneously. Please note that two or more single shapes will create only one card once grouped.
- Ungroup selection: Select a group and then click this button to make each shape independent again.
- Alignment: This tool can be used to align your shapes / text areas as desired.
While reviewing IO Cards a "Toggle Masks" button will appear just below the image. This button will temporary clear all shapes of the note when using "Hide All, Guess One" mode.
Inputting Foreign Characters and Accents
All modern computers have built-in support for typing accents and foreign characters, and multiple ways to go about it. The method we recommend is by using a keyboard layout for the language you want to learn.
Languages with a separate script like Japanese, Chinese, Thai, and so on, have their own layouts specific to that language.
European languages that use accents may have their own layout, but can often be typed on a generic "international keyboard" layout. These work by typing the accent, then the character you want accented - e.g. an apostrophe (') then the letter a (a) gives á.
To add the international keyboard on Windows machines, please see https://thegeekpage.com/how-to-add-us-international-keyboard-in-windows-10/
To add it on Macs, please see http://www.macworld.com/article/1147039/os-x/accentinput.html
Keyboards for a specific language are added in a similar way, but we can not cover them all here. For more information, please try searching Google for "input Japanese on a mac", "type Chinese on Windows 10", and so on.
If you are learning a right-to-left language, there are lots of other things to consider. Please see this page for more information.
The toolkit on which Anki is built has trouble dealing with a few input methods, such as holding down keys to select accented characters on macOS, and typing characters by holding down the Alt key and typing a numeric code on Windows.
Unicode Normalization
Text like á can be represented in multiple ways on a computer, such as
using a specific code for that symbol, or by using a standard a and then
another code for the accent on top. This causes problems when mixing input
from different sources, or using different computers - if your computer
handles keyboard input in one form, but the content is stored in a different
form, it will not match when searching, even though the end result appears
identical.
To ensure content can easily be found in searches, Anki normalizes the text to a standard form. For most users this process is transparent, but if you are studying certain material like archaic Japanese symbols, the normalization process can end up converting them to a more modern equivalent.
If you want character variants preserved, the following in the debug console will turn off normalization:
mw.col.conf["normalize_note_text"] = False
Any content added after that will remain untouched. The trade-off is that you may find it difficult to search for the content if you're switching between operating systems, or pasting content from mixed sources.
Card Templates
Card templates tell Anki which fields should appear on the front and back of your card, and control which cards will be generated when certain fields have text in them. By adjusting your card templates, you can alter the design and styling of many of your cards at once.
Card templates are covered in some of the intro videos:
The Templates Screen
You can modify card templates by clicking the "Cards..." button inside the editing screen.
For older Anki versions, on the top left is the front template, on the bottom left is the back template, and in between them is the card styling section. For Anki versions 2.1.28+ the front, back, and styling are no longer shown at the same time. You can switch between them with Ctrl+1, Ctrl+2, and Ctrl+3.
In Anki, templates are written in HTML, which is the language that web pages are written in. The styling section is CSS, which is the language used for styling web pages.
On the right is a preview of the front and back of the currently selected card. If you opened the window while adding notes, the preview will be based on the text you had typed into the Add Notes window. If you opened the window while editing a note, the preview will be based on the content of that note. If you opened the window from Tools → Manage Note Types, Anki will display each field’s name in parentheses in place of content.
At the top right of the window is an Options button that gives you options to rename or reorder the cards, as well as the following two options:
-
The 'Deck Override' option allows you to change the deck that cards generated from the current card type will be placed into. By default, cards are placed into the deck you provide in the Add Notes window. If you set a deck here, that card type will be placed into the deck you specified, instead of the deck listed in the Add Notes window. This can be useful if you want to separate cards into different decks (for instance, when studying a language, to put production cards in one deck and recognition cards in another). You can check which deck the cards are currently going to by choosing Deck Override again.
-
The 'Browser Appearance' option allows you to set different (perhaps simplified) templates for display in the Question and Answer columns of the browser; see browser appearance for more information.
Field Replacements
- Basic Replacements
- Newlines
- Text to Speech for individual fields
- Text to Speech for multiple fields and static text
- Special Fields
- Hint Fields
- Dictionary Links
- HTML Stripping
- Right To Left Text
- Ruby Characters
- Media & LaTeX
- Checking Your Answer
Basic Replacements
The most basic template looks something like this:
{{Front}}
When you place text within curly brackets, Anki looks for a field by that name, and replaces the text with the actual content of the field.
Field names are case sensitive. If you have a field named Front,
writing {{front}} will not work properly.
Your templates are not limited to a list of fields. You can also include arbitrary text on your templates. For example, if you’re studying capital cities, and you’ve created a note type with a “Country” field, you might create a front template like this:
What's the capital city of {{Country}}?
The default back template will look something like this:
{{FrontSide}}

<hr id=answer>

{{Back}}
This means “show me the text that’s on the front side, then a divider line, and then the Back field”.
The 'id=answer' part tells Anki where the divider is between the question and the answer. This allows Anki to automatically scroll to the spot where the answer starts when you press 'show answer' on a long card (especially useful on mobile devices with small screens). If you don’t want a horizontal line at the beginning of the answer, you can use another HTML element such as a paragraph or div instead.
Newlines
Card templates are like web pages, which means a special command is required to create a new line. For example, if you wrote the following in the template:
one
two
In the preview, you’d actually see:
one two
To add a new line, you need to add a <br> code to the end of a line, like so:
one<br>
two
The br code stands for "(line) br(eak)".
The same applies for fields. If you want to display two fields, one on each line, you would use
{{Field 1}}<br>
{{Field 2}}
Text to Speech for individual fields
This feature requires Anki 2.1.20, AnkiMobile 2.0.56 or AnkiDroid 2.17.
To have Anki read the Front field in a US English voice, you can place the following in your card template:
{{tts en_US:Front}}
On Windows, macOS, and iOS, Anki will use the OS’s built in voices. On Linux, no voices are built in, but voices can be provided by add-ons, such as this one.
To see a list of all available languages/voices, place the following on your card template:
{{tts-voices:}}
If there are multiple voices that support your chosen language, you can specify desired voices in a list, and Anki will choose the first available voice. For example:
{{tts ja_JP voices=Apple_Otoya,Microsoft_Haruka:Field}}
This would use Otoya when on an Apple device, and Haruka when on a Windows PC.
Specifying a different speed is possible in some TTS implementations:
{{tts fr_FR speed=0.8:SomeField}}
Both speed and voices are optional, but the language must be included.
On a Mac, you can customize the available voices:
-
Open the System Preferences screen.
-
Click on Accessibility.
-
Click on Speech.
-
Click on the system voice dropdown, and choose Customize.
Some voices sound better than others, so experiment to choose the one you prefer. Please note that the Siri voice can only be used by Apple apps. Once you’ve installed new voices, you’ll need to restart Anki for the new voices to become available.
On Windows, some voices like Cortana can not be selected, as Microsoft does not make those voices available to other applications.
On a cloze note type, you can make Anki read only the elided sections
using the cloze-only filter, like so:
{{tts en_US:cloze-only:Text}}
The cloze-only filter is supported in Anki 2.1.29+, AnkiMobile 2.0.65+, and AnkiDroid 2.17+.
Text to Speech for multiple fields and static text
This feature requires Anki 2.1.50+, AnkiMobile 2.0.84+, or AnkiDroid 2.17+.
If you want TTS to read multiple fields or static text included in the template, you can use the following:
[anki:tts lang=en_US] This text should be read. Here is {{Field1}} and {{Field2}}[/anki:tts]

This is other text on the template. It is outside of the tags so it should not be read.
Special Fields
There are some special fields you can include in your templates:
The note's tags: {{Tags}}

The type of note: {{Type}}

The card's deck: {{Deck}}

The card's subdeck: {{Subdeck}}

The card's flag: {{CardFlag}}

The type of card ("Forward", etc): {{Card}}

The content of the front template
(only valid in back template): {{FrontSide}}
FrontSide will not automatically play any audio that was on the front side of the card. If you wish to have the same audio play automatically on both the front and back of the card, you’ll need to manually include the audio fields on the back as well.
As with other fields, special field names are case sensitive - you must use
{{Tags}} rather than {{tags}} for example.
Hint Fields
It’s possible to add a field to the front or back of a card, but make it hidden until you explicitly show it. We call this a 'hint field'. Before adding a hint, please bear in mind that the easier you make it to answer a question in Anki, the less likely you are to remember that question when you encounter it in real life. Please have a read about the 'minimum information principle' on https://super-memory.com/articles/20rules.htm before proceeding.
First, you’ll need to add a field to store the hint in if you have not already. Please see the fields section if you’re not sure how to do this.
Assuming you’ve created a field called MyField, you can tell Anki to include it on the card but hide it by default by adding the following to your template:
{{hint:MyField}}
This will show a link labeled “show hint”; when you click it, the content of the field will be displayed on the card. (If MyField is empty, nothing will be shown.)
If you show the hint on the question and then reveal the answer, the
hint will be hidden again. If you want to have the hint always revealed
when the answer is shown, you will need to remove {{FrontSide}} from
your back template and manually add the fields you wish to appear.
It is not currently possible to use a hint field for audio — the audio will play regardless of whether you’ve clicked on the hint link.
If you want to customize the appearance or behaviour, you’ll need to implement the hint field yourself. We can not provide any support for doing so, but the following code should get you started:
{{#Back}}
<a class=hint href="#"
onclick="this.style.display='none';document.getElementById('hint4753594160').style.display='inline-block';return false;">
Show Back</a><div id="hint4753594160" class=hint style="display: none">{{Back}}</div>
{{/Back}}
Dictionary Links
You can also use field replacement to create dictionary links. Imagine you’re studying a language and your favourite online dictionary allows you to search for text using a web URL like:
http://example.com/search?q=myword
You could add an automatic link by doing the following in your template:
{{Expression}}

<a href="http://example.com/search?q={{Expression}}">check in dictionary</a>
The template above would allow you to search for each note’s expression by clicking on the link while reviewing. There is a caveat however, so please see the next section.
HTML Stripping
Like templates, fields are stored in HTML. In the dictionary link example above, if the expression contained the word "myword" without any formatting, then the HTML would be the same: "myword". But when you include formatting in your fields, extra HTML is included. If "myword" was bolded for example, the actual HTML would be "<b>myword</b>".
This can present a problem for things like dictionary links. In the above example, the dictionary link would end up being:
<a href="http://example.com/search?q=<b>myword</b>">check in dictionary</a>
The extra characters in the link would likely confuse the dictionary site, and you’re likely not to get any matches.
To solve this, Anki provides the ability to strip formatting from fields when they are replaced. If you prefix a field name with text:, Anki will not include any formatting. So a dictionary link that worked even with formatted text would be:
<a href="http://example.com/search?q={{text:Expression}}">check in dictionary</a>
Right To Left Text
If you’re using a language that reads from right to left, you’ll need to adjust the template like so:
<div dir=rtl>{{FieldThatHasRTLTextInIt}}</div>
Ruby Characters
Some languages commonly use annotations above the text to display the pronunciation of characters. These annotations are known as ruby characters. In Japanese, these are known as furigana.
In Anki, you can display ruby characters by using the following syntax:
Text[Ruby]
Suppose the text above is written in MyField. By default, if you simply use
{{Myfield}}, the field will be displayed as is. To properly position the
ruby characters above the text, use the furigana filter in the templates
like so:
{{furigana:MyField}}
Here are some examples:
| Raw Text | Rendered Text |
|---|---|
Text[Ruby] | |
日本語[にほんご] | |
世[よ]の 中[なか] | |
世[よ]の中[なか] |
Notice how the third example has a space before the 中 character. This is necessary to specify that the ruby text applies only to that character. If there was no space, the ruby text will be misplaced above the の character, as shown in the fourth example.
Additional Ruby Character Filters
In addition to the furigana filter, you can also only show certain parts
of the ruby text, with the kana and kanji filters. The kana filter will
only show the ruby text, while the kanji filter removes the ruby text
entirely.
| Raw Text | Field Filter | Rendered Text |
|---|---|---|
日本語[にほんご] | {{furigana:MyField}} | |
日本語[にほんご] | {{kana:MyField}} | にほんご |
日本語[にほんご] | {{kanji:MyField}} | 日本語 |
These names are, again, borrowed from Japanese. The term kana represents the phonetic system used to describe how words are pronounced, whereas the term kanji represents its Chinese characters.
Media & LaTeX
Anki does not scan templates for media references, because it is slow to do so. This has implications for including media on the template.
Static Sounds/Images
If you wish to include images or sounds on your cards that are the same for every card (eg, a company logo at the top of each card):
-
Rename the file so it starts with an underscore, e.g "_logo.jpg". The underscore tells Anki that the file is used by the template and it should be exported when sharing the deck.
-
Add a reference to the media on your front or back template, like:
<img src="_logo.jpg">
Field References
Media references to fields are not supported. They may or may not display during review, and will not work when checking for unused media, importing/exporting, and so on. Examples that won’t work:
<img src="{{Expression}}.jpg">

[sound:{{Word}}]

[latex]{{Field 1}}[/latex]
Instead, you should include the media references in the field. Please see the importing section for more information.
Checking Your Answer
You can watch a video about this feature on YouTube.
The easiest way to check your answer is to click "Basic" at the top left of the card adding screen, and select "Basic (type in the answer)".
If you have downloaded a shared deck and would like to type in the answer with it, you can modify its card template. If it has a template like:
{{Native Word}}

{{FrontSide}}

<hr id=answer>

{{Foreign Word}}
To type in the foreign word and check if you are correct, you need to edit your front template so that it looks like this:
{{Native Word}}
{{type:Foreign Word}}
Note that we have added type: in front of the field we want to
compare. Since FrontSide is on the back of the card, the type answer box
will appear on the back as well.
When reviewing, Anki will display a text box where you can type in the answer, and upon hitting Enter or showing the answer, Anki will show you which parts you got right and which parts you got wrong. The text box’s font size will be the size you configured for that field (via the “Fields” button when editing).
This feature does not change how the cards are answered, so it’s still up to you to decide how well you remembered or not.
Only one typing comparison can be used on a card. If you add the above text multiple times, it will not work. It also only supports a single line, so it is not useful for comparing against a field that is comprised of multiple lines.
Anki uses a monospaced font for the answer comparison so that the “provided” and “correct” sections line up. If you wish to override the font for the answer comparison, you can put the following at the bottom of your styling section:
code#typeans { font-family: "myfontname"; }
Which will affect the following HTML for the answer comparison:
<code id=typeans>...</code>
Advanced users can override the default type-answer colors with the css classes 'typeGood', 'typeBad' and 'typeMissed'. AnkiMobile supports 'typeGood' and 'typeBad', but not 'typeMissed'.
If you wish to override the size of the typing box and don’t want to
change the font in the Fields dialog, you can override the default
inline style using !important, like so:
#typeans { font-size: 50px !important; }
It is also possible to type in the answer for cloze deletion cards. To
do this, add {{type:cloze:Text}} to both the front and back
template, so the back looks something like this:
{{cloze:Text}}
{{type:cloze:Text}}
{{Extra}}
Note that since the cloze type does not use FrontSide, this must be added to both sides on a cloze note type.
If there are multiple sections elided, you can separate the answers in the text box with a comma.
Type answer boxes will not appear in the "preview" dialog in the browser. When you review or look at the preview in the card types window, they will display.
Type answer boxes will not be displayed when you review your cards on ankiweb.net.
Card Generation
- Reverse Cards
- Card Generation & Deletion
- Selective Card Generation
- Conditional Replacement
- Blank Back Sides
- Limitations in Older Anki Versions
- Adding Empty Notes
- Cloze Templates
Reverse Cards
You can watch a video about reversing cards on YouTube.
If you want to create cards that go in both directions (e.g., both “ookii”→“big” and “big”→“ookii”), you have several options. The simplest is to select the “Basic (and reversed card)” built-in note type. This will generate two cards, one in each direction.
If you want to generate reverse cards for only some of your material (perhaps you only want to take the time to study reverses for the most important material, or some of your cards don’t make sense reversed), you can select the “Basic (optional reversed card)” note type. This note type generates a forward-only card when you fill in only the first two fields; if you additionally enter something in the “Add Reverse” field (like a 'y'), Anki will generate a reverse card as well. The contents of this field will never be displayed on a card.
Card Generation & Deletion
Anki will not create cards with empty front sides. Thus if “My Field” was empty, and one card’s front template included only that field, the card would not be created.
When you edit a previously added note, Anki will automatically create extra cards if they were previously blank but no longer are. If your edits have made some cards blank when they previously were not, however, Anki will not delete them immediately, as that could lead to accidental data loss. To remove the empty cards, go to Tools → Empty Cards in the main window. You will be shown a list of empty cards and be given the option to delete them.
Because of the way that card generation works, it is not possible to manually delete individual cards, as they would just end up being recreated the next time the note was edited. Instead, you should make the relevant conditional replacement fields empty and then use the Empty Cards option.
Anki does not consider special fields or non-field text for the purposes of card generation. Thus if your front template looked like the following, no card would be generated if Country was empty:
Where is {{Country}} on the map?
Selective Card Generation
Sometimes you may want to generate extra cards for only some of your material, such as testing your ability to recall the most important words of a set. You can accomplish this by adding an extra field to your note, and adding some text into it (such as "1") on the notes you want the extra card. Then in the card template, you can make the card’s creation depend on that field being non-empty. For more information on this, please see the conditional replacement section below.
Conditional Replacement
It is possible to include certain text, fields, or HTML on your cards only if a field is empty or not empty. An example:
This text is always shown.

{{#FieldName}}
    This text is only shown if FieldName has text in it
{{/FieldName}}

{{^FieldName}}
    This text is only shown if FieldName is empty
{{/FieldName}}
A real life example is only showing a label if the field is not empty:
{{#Tags}}
    Tags: {{Tags}}
{{/Tags}}
Or say you want to display a specific field in blue on the front of your card if there are extra notes on the back (perhaps the fact that there are notes serves as a reminder that you should spend more time thinking about the answer). You can style the field as follows:
{{#Notes}}
    <span style="color:blue;">
{{/Notes}}

{{FieldToFormat}}

{{#Notes}}
    </span>
{{/Notes}}
You can also use conditional replacement to control which cards are generated. This works since Anki will not generate cards which would have a blank front side. For example, consider a card with two fields on the front:
{{Expression}}
{{Notes}}
Normally a card would be generated if either the expression or notes field had text in it. If you only wanted a card generated if expression was not empty, then you could change the template to this:
{{#Expression}}
    {{Expression}}
    {{Notes}}
{{/Expression}}
And if you wanted to require both fields, you could use two conditional replacements:
{{#Expression}}
    {{#Notes}}
        {{Expression}}
        {{Notes}}
    {{/Notes}}
{{/Expression}}
Keep in mind that this only works when you place the conditional replacement code on the front of the card; if you do this on the back, you will simply end up with cards with a blank back side. Similarly, since this works by checking if the front field would be empty, it is important to make sure you wrap the 'entire' front side in the conditional replacement; for instance, the following would not work as expected:
{{#Expression}}
    {{Expression}}
{{/Expression}}
{{Notes}}
Blank Back Sides
Card generation only looks at the front side of the card. For example, if you have a front template:
{{Field 1}}
and a back template:
{{Field 2}}
Then a card will be generated if Field 1 is non-empty. If Field 2 is empty, the card will still be generated, and you will get a blank back side.
If you wish to avoid a blank back side, you will need to place a required field on the front template as a conditional, like so:
{{#Field 2}}
    {{Field 1}}
{{/Field 2}}
This will ensure the card is generated only if both Field 2 and Field 1 are non-empty.
Limitations in Older Anki Versions
The following limitations do not apply to Anki 2.1.28+ and AnkiMobile 2.0.64+.
Older Anki versions cannot use negated conditionals for card generation. For example, on Anki 2.1.28, the following would add a card if a field called AddIfEmpty is empty, and Front is non-empty:
{{^AddIfEmpty}}
    {{Front}}
{{/AddIfEmpty}}
On earlier Anki versions, the negated conditional is ignored, and card generation will depend only on Front being non-empty.
Mixing AND and OR conditions can also cause problems on older versions. For example, the following ("add the card if A OR B OR C is non-empty") is fine:
{{A}}
{{B}}
{{C}}
And the following ("add the card if A AND B AND C are non-empty") is fine:
{{#A}}
    {{#B}}
        {{#C}}
            {{A}}
        {{/C}}
    {{/B}}
{{/A}}
But the following ("add the card if A OR (B AND C) are non-empty") will not work properly:
{{A}}
{{#B}}
    {{#C}}
        {{B}}
    {{/C}}
{{/B}}
Adding Empty Notes
When you add a new note in Anki 2.1.28+ and AnkiMobile 2.0.64+, if the card templates and note fields combine to produce no cards, a blank card will be created using the first template. This allows you to add material even if it's incomplete, and modify it or the template later to make it valid. If you don't wish to keep an empty note, you can remove it with the Empty Cards function.
On older Anki versions, Anki refuses to add or import a note if no cards would be generated.
Cloze Templates
Please see the cloze deletion section for background info.
The cloze note type functions differently from regular note types. Instead of a customizable number of card types, it has a single type which is shared by all cloze deletions on a note.
As mentioned in the card generation section above, generation of regular cards depends on one or more fields on the question being non-empty. Cloze deletion note types are generated differently:
-
Anki looks on the front template for one or more cloze replacements, like {{cloze:FieldName}}.
-
It then looks in the FieldName field for all cloze references, like {{c1::text}}.
-
For each separate number, a card will be generated.
Because card generation functions differently for cloze deletion cards, {{cloze:…}} tags can not be used with a regular note type - they will only function properly when used with a cloze note type.
Conditional generation provides a special field so you can check which card you are rendering. If you wanted to display the "hint1" field on the first cloze, and "hint2" field on the second cloze for example, you could use the following template:
{{cloze:Text}}

{{#c1}}
    {{Hint1}}
{{/c1}}

{{#c2}}
    {{Hint2}}
{{/c2}}
Styling & HTML
- Card Styling
- Image Resizing
- Field Styling
- Audio Replay Buttons
- Text Direction
- Other HTML
- Browser Appearance
- Platform-Specific CSS
- Installing Fonts
- Night Mode
- Fading and Scrolling
- Javascript
Card Styling
You can watch a video about styling cards on YouTube. The video shows Anki 2.0’s interface, but the concepts are largely the same.
The styling section of the Cards screen can be accessed by clicking the "Styling" button next to the "Back Template" button. In that section, you can change the background color of the card, the default font, the text alignment, and so on.
The standard options available to you are:
font-family
The name of the font to use on the card. If your font has spaces in it
like "MS Unicode", then you need to surround the font name in double
quotes as in this sentence. It is also possible to use multiple fonts on
one card; for information on that, please see below.
font-size
The size of the font in pixels. When changing it, make sure you leave px
at the end.
text-align
Whether the text should be aligned in the center, left, or right.
color
The color of the text. Simple color names like 'blue', 'lightyellow',
and so on will work, or you can use HTML color codes to select arbitrary
colors. Please see this webpage for more
information.
background-color
The color of the card background.
Any CSS can be placed in the styling section – advanced users may wish to do things like add a background image or gradient, for example. If you’re wondering how to get some particular formatting, please search the web for information about how to do it in CSS, as there is a great deal of documentation available.
The styling is shared between all cards, which means that when you make an adjustment it will affect all cards for that note type. It is also possible to specify card-specific styling, however. The following example will use a yellow background on all cards except the first one:
.card {
  background-color: yellow;
}
.card1 {
  background-color: blue;
}
Image Resizing
Anki shrinks images to fit the screen by default. You can change this by adding
the following to the bottom of your styling section (outside of the default
.card { ... }):
img {
  max-width: none;
  max-height: none;
}
AnkiDroid sometimes has trouble scaling images to fit the
screen. Setting maximum
image dimensions using css should fix this, but seems to be ignored as of
AnkiDroid 2.9. A fix is to append !important to each style directive, for
example:
img {
  max-width: 300px !important;
  max-height: 300px !important;
}
If you try to change the style for images and find that the star that appears on marked cards is affected (for instance, it becomes way too large), you can target it with the following:
img#star {
  ...;
}
You can explore the styling of cards interactively by using Chrome:
https://addon-docs.ankiweb.net/porting2.0.html#webview-changes
Anki 2.1.50+ supports image resizing within the editor natively.
Field Styling
The default styling applies to the whole card. You can also make certain fields or part of the card use a different font, color, and so on. This is particularly important when studying foreign languages, as Anki will sometimes be unable to correctly display characters unless an appropriate font has been chosen.
Say you have an “Expression” field, and you want to give it the OSX Thai font “Ayuthaya”. Imagine your template already reads:
What is {{Expression}}?

{{Notes}}
What we need to do is wrap the text we want to style in some HTML. We will put the following in front of the text:
<div class=mystyle1>
And the following behind it:
</div>
By wrapping the text like the above, we tell Anki to style the wrapped text with a custom style called “mystyle1”, which we will create later.
Thus if we wanted the entire “What is …?” expression to use the Thai font, we would use:
<div class=mystyle1>What is {{Expression}}?</div>

{{Notes}}
And if we wanted only the expression field itself to use the Thai font, we’d use:
What is <div class=mystyle1>{{Expression}}</div>?

{{Notes}}
After we’ve edited the template, we now need to move to the Styling section between the templates. Before editing it, it should look something like:
.card {
  font-family: arial;
  font-size: 20px;
  text-align: center;
  color: black;
  background-color: white;
}
Add your new style to the bottom, so it looks like:
.card {
  font-family: arial;
  font-size: 20px;
  text-align: center;
  color: black;
  background-color: white;
}

.mystyle1 {
  font-family: ayuthaya;
}
You can include any styling you want in the style. If you wanted to increase the font size too, you’d change the mystyle1 section to look like:
.mystyle1 {
  font-family: ayuthaya;
  font-size: 30px;
}
It’s also possible to bundle custom fonts with your deck, so you don’t need to install them on your computer or mobile device. Please see the installing fonts section for more info.
Audio Replay Buttons
When audio or text to speech is included on your cards, Anki will show buttons you can click on to replay the audio.
If you prefer not to see the buttons, you can hide them in the preferences screen.
You can customize their appearance in your card styling, for example, to make them smaller and colored, you could use the following:
.replay-button svg {
  width: 20px;
  height: 20px;
}
.replay-button svg circle {
  fill: blue;
}
.replay-button svg path {
  stroke: white;
  fill: green;
}
Text Direction
If you use a language that is written right-to-left, such as Arabic or Hebrew,
you can add the CSS direction property to the .card section for correct display during review:
.card {
  direction: rtl;
}
This will change the direction of the entire card. You can change the direction of only certain fields by wrapping their references in some HTML:
<div dir="rtl">{{Front}}</div>
To change the direction of fields in the editor, please see the editing section.
Other HTML
Your templates can contain arbitrary HTML, which means that all the layout possibilities used on internet web pages can also be used on your cards. Things like tables, lists, images, links to external pages and so on are all supported. With tables for example, you could change the layout so that the front and back of a card appear on the left and right instead of the top and bottom.
Covering all of HTML’s features is outside the scope of this manual, but there are plenty of good introductory guides to HTML available on the web if you’d like to learn more.
Browser Appearance
If your card templates are complex, it may be difficult to read the question and answer columns (called "Front" and "Back") in the card list. The "browser appearance" option allows you to define a custom template to be used only in the browser, so you can include only the important fields and change the order if you desire. The syntax is the same as in standard card templates.
Platform-Specific CSS
Anki defines some special CSS classes that allow you to define different styling for different platforms. The example below shows how to vary the font depending on where you’re reviewing:
/* Windows */
.win .example {
  font-family: "Example1";
}
/* macOS */
.mac .example {
  font-family: "Example2";
}
/* Linux desktops */
.linux:not(.android) .example {
  font-family: "Example3";
}
/* both Linux desktops, and Android devices */
.linux .example {
  font-family: "Example4";
}
/* both Android and iOS */
.mobile .example {
  font-family: "Example5";
}
/* iOS */
.iphone .example,
.ipad .example {
  font-family: "Example6";
}
/* Android */
.android .example {
  font-family: "Example7";
}
And in the template:
<div class="example">{{Field}}</div>
You can also use properties like .gecko, .opera, and .ie to select particular browsers when using AnkiWeb. Please see http://rafael.adm.br/css_browser_selector/ for a full list of options.
Installing Fonts
If you’re using Anki on a work or school computer where you don’t have permission to install new fonts, or you’re using Anki on a mobile device, it’s possible to add fonts directly to Anki.
To add a font to Anki, it must be in the TrueType format. TrueType fonts have a filename ending in .ttf, such as "Arial.ttf". Once you’ve located a TrueType font, we’ll need to add it to the media folder:
-
Rename the file, adding an underscore at the start, so it becomes like "_arial.ttf". Adding an underscore will tell Anki that this file will be used on a template, and should not be deleted when checking for unused media.
-
In your computer’s file browser, go to your Anki Folder, and then a folder called "User 1" (or your profile name if you’ve renamed/added profiles).
-
Inside the folder, you should see a folder called collection.media. Drag the renamed file to that folder.
After that, we need to update the template:
-
Click Add at the top of the main screen, and then select the note type you want to change with the top left button.
-
Click Cards.
-
In the styling section, add the following text to the bottom (after the last "}" character), replacing "_arial.ttf" with the name of the file you copied into your media folder:
@font-face {
  font-family: myfont;
  src: url("_arial.ttf");
}
Only change the "arial" part, not the "myfont" part.
After that, you can either change the font for the entire card, or for individual fields. To change the font for the entire card, simply locate the font-family: line in the .card section and change the font to "myfont". To change the font for only certain fields, please see the Field Styling instructions above.
Please make sure the filenames match exactly. If the file is called arial.TTF and you write arial.ttf in your card templates, it will not work.
Night Mode
You can customize the way templates appear when night mode is enabled in the preferences screen.
If you wanted a lighter grey background, you could use something like:
.card.nightMode {
  background-color: #555;
}
If you have a 'myclass' style, the following would show the text in yellow when night mode is enabled:
.nightMode .myclass {
  color: yellow;
}
Fading and Scrolling
Anki will automatically scroll to the answer by default. It looks for an HTML element with id=answer, and scrolls to that. You can place the id on a different element to adjust the scrolling position, or remove the id=answer to turn off scrolling.
The question side of a card fades in by default. If you wish to adjust this delay, you can place the following at the top of your front card template:
<script>
  qFade = 100;
  if (typeof anki !== "undefined") anki.qFade = qFade;
</script>
100 (milliseconds) is the default; set to 0 to disable fading.
Javascript
As Anki cards are treated like webpages, it is possible to embed some Javascript on your cards via the card template. For a good reference please read this post in the forums.
Because Javascript is an advanced feature and so many things can go wrong, Javascript functionality is provided without any support or warranty. We can not provide any assistance with writing Javascript, and can not guarantee any code you have written will continue to work without modification in future Anki updates. If you are not comfortable addressing any issues you encounter on your own, then please avoid using Javascript.
Each Anki client may implement card display differently, so you will need to test the behaviour across platforms. A number of clients are implemented by keeping a long running webpage and dynamically updating parts of it as cards are reviewed, so your Javascript will need to update sections of the document using things like document.getElementById() rather than doing things like document.write().
Functions like window.alert may not be available. Anki will write javascript errors to the terminal, so you'll need to [view the console] (https://addon-docs.ankiweb.net/console-output.html#console-output) to see them. To debug issues with JavaScript, you can use Chrome's inspector.
Checks and Errors
When you save changes to a notetype or export a deck, Anki 2.1.45+ checks for some common errors. These errors will cause issues later on when anyone studies the affected cards, so Anki won't let you proceed before you have fixed them.
Basics
Please see Key Concepts before reading further.
Most of the errors below will require you to modify your notetype/card template. To do so:
- Open the Browse screen, and look at the items on the left.
- Locate the notetype mentioned in error message. You can use the search bar at the top left if necessary.
- Click on the notetype, to show its cards/notes on the right.
- Click the Cards... button at the top of the editing area to open the templates screen.
Specific Issues
Template Syntax Error
This kind of error indicates an incorrect usage of the field replacement syntax. Visit the templates screen for the reported note and card type, and look at the preview area for more information. Some more information about template problems is available.
Identical Front Sides
You have Anki configured to create two identical questions for each input. This can happen if you add a new card type without making any adjustments to it. Identical cards double your workload, and make Anki's scheduling less effective.
To fix this, open the templates screen, and select one of the duplicates at the top. Then use the button on the top right to remove the selected card type. This will delete all the duplicate cards/notes that were using the card type as well.
No Field Replacement on Front Side
If you don't use a field replacement in the front template of a card type, every card created from it will look the same on the question side, regardless of its note. It would then be impossible to answer the card, as you wouldn't know what answer is expected.
To resolve the issue, open the templates screen, and click the Add Field button to add one or more fields to the front.
Cloze Filter Outside Cloze Notetype
The cloze filter (as in {{cloze:Some Field}})
may only be used on the cloze notetype, and on those created by cloning it.
If you get this error, you can remove the cloze filter from the template.
If you have notes with cloze deletions that are using that notetype, you can select them in the Browse screen, and use the Change Notetype action to assign them to a standard Cloze notetype instead.
Older Anki versions did not complain when you attempted to use cloze deletions on a normal notetype, but this was never a use case that was intended to be supported. If you want to combine cloze deletions with regular cards, you may find an add-on like the Closet add-on provides some alternatives.
No Cloze Filter on Cloze Notetype
A Cloze notetype's front and back templates should have a cloze filter. If one is missing, you will need to add it back so that Anki can create cloze cards correctly.
Preferences
The preferences are available from the Tools menu on Windows/Linux, or the Anki menu on a Mac.
Appearance
General
Language
Change your display language. You can help to improve translations here
User Interface
Theme
Dark (night) mode will make Anki's interface dark, and will cause cards to be shown as white text on a
black background. Some card templates may need to be modified to work
properly with this option enabled - please see night mode styling for more information.
From 2.1.50+ there is an option to switch to day or night mode automatically.
User interface size
If you find that the interface elements are too small for you, you can
try to increase this setting.
Reset Windows Sizes
This will reset all windows sizes and locations to the default settings.
Video driver
Anki's libraries need a video driver to draw content on the screen.
Due to different hardware and software configurations, the driver that
works best on your machine may vary. ANGLE and OpenGL will perform better
than the software option, but they may not function correctly on some
systems. On Macs, you will almost always want to use the OpenGL option.
Note: If you're using 2.1.50+ (Qt6), please, check this page.
Distractions
These options allow you to remove some unnecessary elements from the screen during reviews. You can:
- Hide the top and bottom bar during reviews.
- Enable the "minimalist" mode, making the interface more compact/less fancy.
- Reduce motion, to disable some transitions/animations.
- Switching between native styling and the Anki theme (only on Mac/Linux).
Review
Scheduler
v3 Scheduler
Using the Anki v3 scheduler is recommended if you don't use AnkiDroid. It's documented here:
https://faqs.ankiweb.net/the-2021-scheduler.html
Show learning cards with larger steps before
Only shown when the 2.1 scheduler is enabled. Normally learning cards with a 1+
day delay are shown after normal reviews. If checked, Anki will show them before
normal reviews instead.
Legacy timezone handling
Please see here:
https://faqs.ankiweb.net/timezone-handling-changes.html
Next day starts at
Controls when Anki should start showing the next day’s cards. The default
setting of 4AM ensures that if you’re studying around midnight, you won’t have
two days' worth of cards shown to you in one session. If you stay up very late
or wake up very early, you may want to adjust this to a time you’re usually
sleeping. Note that the start of the next day is relative to your current timezone.
Also note that any cards that cross a day boundary will appear at the start of
the day they are scheduled for, just like review cards do.
Learn ahead limit
Tells Anki how to behave when there is nothing left to study in the current deck
but cards in learning. The default setting of 20 minutes tells Anki that cards
should be shown early if they have a delay of less than 20 minutes and there’s
nothing else to do. If you set this to 0, Anki will always wait the full delay,
showing the congratulations screen until the remaining cards are ready to be
reviewed.
Timebox time limit
Timeboxing is a technique to help you focus by dividing a longer activity (such
as a 30 minute study session) into smaller blocks. If you set the timebox time
limit to a non-zero number of minutes, Anki will periodically show you how many
cards you’ve managed to study during the prescribed time limit.
Mix new cards and reviews: Only shown when the v1/v2 schedulers are enabled. This drop-down box controls when new cards are shown: either mixed with, before, or after all reviews.
Review
Show play buttons on cards with audio
Whether a clickable (re)play button will be shown in the review screen
for cards with audio.
Interrupt current audio when answering
Whether a currently playing audio file should be stopped when answering
a card.
Show remaining card count
Disable this option to hide the card count at the bottom of the screen.
Show next review time above answer buttons
Useful to know how far in the future your cards are being pushed.
Editing
Editing
Paste clipboard images as PNG
By default Anki pastes images on the clipboard as JPG files, to save disk space.
You can use the option to paste as PNG images instead. PNG images support
transparent backgrounds and are lossless, but they usually result in much larger
file sizes.
Paste without Shift strips formatting
By default, formatting like bold and colors are kept when pasting,
unless the Shift key is held down. This option reverses the behaviour.
Default deck
Controls how note types and decks interact. The default of "When adding, default
to current deck" means that Anki saves the last-used note type for each deck and
selects it again then next time you choose the deck (and, in addition, will
start with the current deck selected when choosing Add from anywhere). The other
option, "Change deck depending on note type," saves the last-used deck for each
note type (and opens the add window to the last-used note type when you choose
Add). This may be more convenient if you always use a single note type for each
deck.
The last used deck/notetype is updated when you add a card. If you change the deck and close the add window without adding a card, it won't be saved.
Browsing
Default search text
Allows you to customize the starting search text in the browser (eg, to start
with "deck:current").
Ignore accents in search (slower)
When enabled, simple text searches automatically ignore accents.
Import/Export
Legacy import/export handling
If enabled, legacy (pre 2.1.55) import / export code will be used. It is recommended to deactivate this option.
Syncing
This tab contains options related to syncing with AnkiWeb.
Synchronisation
Synchronize audio and images too
When enabled, media will also be synced with AnkiWeb.
Automatically sync on profile open/close
Disable this if you don't want an automatic sync with AnkiWeb when opening / closing a profile.
Periodically sync media
On next sync, force changes on one direction
When this option is enabled, the next sync will
ask you whether you wish to upload or download. This is useful if
you have made some changes accidentally, and wish to overwrite them
with an older version that is on AnkiWeb.
AnkiWeb Account
When logged in, clicking on Log Out will log you out.
Self-hosted Sync Server
For info on the custom sync server option, see this section.
Backups
Please see this section of the manual.
Deck Options
- Presets
- Subdecks
- Daily Limits
- New Cards
- Lapses
- Display Order
- Timer
- Auto Advance
- Burying
- Audio
- Advanced
- Custom Scheduling
Deck options primarily control the way Anki schedules cards. It is recommended that you spend a few weeks with the defaults to get a feel for how Anki works before you start adjusting options. Please make sure you understand the options before changing them, as mistakes could reduce Anki's effectiveness.
Deck options are accessed by:
- Clicking the gear icon on the
Decksscreen. - Selecting a deck on the
Decksscreen, and then clickingOptionsat the bottom of the screen. - Clicking on
More>Optionswhile in review mode. - Pressing
owhile in review mode.
This page describes the options shown in Anki 2.1.45+, when you have the v2 or v3 scheduler enabled. On older versions, some options will not be available, or will appear in a different section. Please keep in mind that the v1 scheduler is no longer supported in Anki 2.1.50+. If you have not yet updated to v2 or v3, you will be prompted to update when you attempt to review cards in 2.1.50+.
For more info on deck options, please check:
Presets
Anki allows you to share options between different decks, to make it easy to update options in many decks at once. To do this, options are grouped into presets. By default, all newly created decks use the same preset.
If you’d like to alter the settings on one deck but not other decks, click the arrow icon in the top right of the Deck Options window. The options are:
- Save: Saves all modifications you've made since opening the deck options screen.
- Add: Add a new preset, with the default options.
- Clone: Clone your current present, which is useful if you just want to modify certain options, keeping the rest as they are.
- Rename Changes the name of the current preset.
- Delete Deletes the current preset. This will require that the next sync is a one-way sync.
- Save to all subdecks. Like Save, but also assigns the selected preset to all subdecks of the currently selected deck.
- Optimize all presets. When FSRS is enabled, this allows you to optimize parameters of all presets at once.
Deck Options are not retroactive. For example, if you change an option that controls the delay after failing a card, cards that you failed prior to changing the option will have the old delay, not the new one.
Subdecks
If your deck has subdecks, each deck can optionally be assigned a different preset. When Anki shows a card, it will check which subdeck the card is in, and use the options for that deck. There are some exceptions:
- The new cards/day and reviews/day limits behave differently depending on the scheduler version you have selected.
- The display order options in the v3 scheduler are taken from the deck you select to study, not the deck of the current card.
For example, let's say you have this collection:
- Deck A (Preset 1)
  - Deck A::Subdeck B (Preset 2)
    - Card B1
    - Card B2
Preset 1 and 2 are identical, with two exceptions:
- Preset 1:
- New Cards - Learning steps: 1m 10m
- Display Order - New/review priority: Mix with reviews
- Preset 2:
- New Cards - Learning steps: 20m 2h
- Display Order - New/review priority: Show after reviews
If you choose to study Deck A:
- Learning steps for all new cards will be 1m 10m (preset 1 applies)
- All new cards will be mixed with reviews (preset 1 applies)
If you choose to study Subdeck B:
- Learning steps for all new cards will be 20m 2h (preset 2 applies)
- All new cards will be shown after reviews (preset 2 applies)
Daily Limits
New Cards/Day
Controls how many new cards are introduced each day you open the program. If you study fewer than the limit, or miss a day, the next day the counts will be back to your limit - they do not accumulate.
When decks are nested (e.g Parent, Parent::Child, Parent::Child::Grandchild), the way the limits are applied depends on the scheduler version.
- v1 applies parent limits to children, regardless of which deck you click on
- v2 behaves similarly to v1 for new cards. For reviews, only the limits of the deck you click on are honored.
- v3 honors the limits of the deck you click on, and any decks inside it. Limits from parents above the deck you clicked on are ignored.
For more information, please see the v3 scheduler page.
Studying new cards will temporarily increase the number of reviews you need to do a day, as freshly learnt material needs to be repeated a number of times before the delay between repetitions can increase appreciably. If you are consistently learning 20 new cards a day, you can expect your daily reviews to be roughly about 200 cards/day. You can decrease the reviews required by introducing fewer new cards each day, or by turning off new card display until your review burden decreases. More than one Anki user has excitedly studied hundreds of new cards over their first few days of using the program, and then become overwhelmed by the reviews required.
Maximum Reviews/Day
Allows you to set an upper limit on the number of reviews to show each day. When this limit is reached, Anki will not show any more review cards for the day, even if there are some waiting. If you study consistently, this setting can help to smooth out occasional peaks in due card counts, and can save you from a heart attack when returning to Anki after a week off. When reviews have been hidden due to this option, a message will appear in the congratulations screen, suggesting you consider increasing the limit if you have time.
In the v3 scheduler and v1 schedulers, the counts are affected by parents/selected decks in the same way as new cards.
In the v2 scheduler, the limit is taken solely from the deck you select - any limits on its parents or child decks are ignored.
The v3 scheduler includes learning cards with a 1+ day delay in the review count, so those learning cards will be subject to the daily limit.
New Cards Ignore Review Limit
If using the v3 scheduler, please keep in mind that the new count is capped by the review count by default. If your review limit is set to 200, and you have 190 reviews waiting, a maximum of 10 new cards will be introduced. If your review limit has been reached, no new cards will be shown. If you have a backlog of reviews and still want to introduce new cards, you can do so by suspending the reviews, or increasing your review limit. That said, it is recommended you hold off on new cards until you catch up instead, as introducing more new cards when you're behind will only make the backlog worse.
From Anki 2.1.61 this feature is optional, and can be deactivated globally from the deck options screen.
Per-Deck Daily Limits
From version 2.1.55 it is possible to use the same preset for different decks / subdecks, with customized limits for each one of them. This eliminates the need to create cloned presets just for that purpose, and makes it easier to set custom limits on sub-decks when you have many nested decks.
The options are:
- Preset: The limit is shared with all decks using this preset.
- This deck: The limit is specific to this deck.
- Today only: Make a temporary change to this deck's limit.
New Cards
The settings in this section only affect new cards and cards in initial learning mode. Once a card has graduated (i.e. there are no more learning steps for this card), it becomes a review card, and the settings in this section are no longer applicable.
Learning Steps
Controls the number of learning repetitions, and the delay
between them. One or more delays, separated by spaces must be entered.
Each time you press Good during review, the card moves to the next step.
For example, let's say that your learning steps are 1m 10m 1d.
- When you press
Again, the card goes back to first step, and will be shown again approximately 1 minute later. - When you press
Goodon a new card, or a card answeredAgain, it will move to the next step, and be shown again in approximately 10 minutes. - When you press
Goodon a card after the 10 minute step, it will be delayed until the next day. - When you press
Goodon the card the next day, it will leave learning (i.e. it will graduate), and become a review card. It will be shown again after the delay configured by the graduating interval.
If there’s nothing else to study, Anki will show cards up to 20 minutes early by default. The amount of time to look ahead is configurable in the preferences.
Please see the learning section for more info on how steps work.
Day Boundaries
Anki treats small steps and steps that cross a day boundary differently. With small steps, the cards are shown as soon as the delay has passed, in preference to other waiting cards like reviews. This is done so that you can answer the card as closely to your requested delay as possible. In contrast, if the interval crosses a day boundary, it is automatically converted to days.
Graduating Interval
The delay in days between answering "Good" on a learning card with no steps left, and seeing the card again as a review card. This means that it is the first interval after the learning card becomes a review card. Please see the example in the previous section.
Easy Interval
The delay between answering Easy on a learning
card, and seeing it in review mode for the first time.
The Easy button immediately turns a learning card into a review card,
and assigns it the delay you have configured. It should always be at least
as long as the graduating interval, and typically a few days longer.
Insertion Order
Controls whether Anki should add new cards into the deck randomly, or in order. When you change this option, Anki will re-sort the decks using the current Option Group. Cards with a lower due number will be shown first when studying, by default. Changing this option will automatically update the existing position of new cards.
One caveat with random order mode: if you review many of your new cards, and then add more new cards, the newly added material is statistically more likely to appear than the new cards that were already in the deck. For example, if you have 100 cards in random order, then review the first 50, newly added cards are still given position 1-100, but as you have already reviewed the first 50, the newly added cards are more likely to appear earlier. To correct this, you can change the order to Ordered mode and back again to force a re-sort.
When you select random order, Anki will randomize your notes, keeping the cards of a given note close together. The cards of a given note are shown in the order in which their card types appear, so that siblings are introduced consistently — otherwise you could end up in a state where some notes had all their cards introduced and other notes had only one or two. Please see the "bury related" and "display order" sections below for more info.
Lapses
When you forget a review card, it is said to have 'lapsed', and the card must be relearnt. The default behaviour for lapsed reviews is to reset the interval to 1 (i.e. make it due tomorrow), and put it in the learning queue for a refresher in 10 minutes. This behaviour can be customized with the options listed below.
Relearning Steps
The same as 'learning steps', but for forgotten reviews. When you fail a card
(press Again), the card enters the relearning phase, and before it becomes a
review card again, you will have to pass all the relearning steps — or, alternatively, press
Easy on the card.
If you leave the steps blank, the card will skip relearning, and will be assigned a new review delay.
Minimum Interval
Specifies a minimum number of days a card should wait after it finishes relearning. The default is one day, meaning once relearning is finished, it will be shown again the next day.
Leeches
Control the way Anki handles leeches. Please see the leeches section for more information.
Display Order
The options in this section are taken from the deck you select to study, not the deck of the currently displayed card.
This section is only available when you have the v3 scheduler enabled.
Some further information about display order is available in the studying section.
New Card Gather Order
Controls how Anki gathers cards from each subdeck. The options are:
-
Deck: gathers cards from each deck in order, starting from the top. Cards from each deck are gathered in ascending position. If the daily limit of the selected deck is reached, gathering may stop before all decks have been checked. This order is fastest in large collections, and allows you to prioritize subdecks that are closer to the top.
Decks / subdecks are always ordered alphabetically, so you can give them a numeric prefix like 001 to control the order they are shown. You can also use
_and~as a prefix to place items at the top or bottom.Although position order depends initially on the 'Insertion Order' setting above, you can manually reposition cards in different ways.
-
Deck, then random notes: gathers cards from each deck in order, starting from the top. Cards from each deck are gathered randomly.
-
Ascending position: gathers cards by ascending position (due #), which is typically the oldest-added first.
-
Descending position: gathers cards by descending position (due #), which is typically the latest-added first.
-
Random notes: gathers cards of randomly selected notes. When sibling burying is disabled, this allows all cards of a note to be seen in a session (eg. both a front->back and back->front card)
-
Random cards: gathers cards completely randomly.
New Card Sort Order
Controls how new cards are sorted after they have been gathered. The options are:
-
Card type: Displays cards in order of card type number. If you have sibling burying disabled, this will ensure all front→back cards are seen before any back→front cards. This is useful to have all cards of the same note shown in the same session, but not too close to one another.
-
Order gathered: Shows cards exactly as they were gathered. If sibling burying is disabled, this will typically result in all cards of a note being seen one after the other.
-
Card type, then random: Like Card type, but shuffles the cards of each card type number. If you use Ascending position to gather the oldest cards, you could use this setting to see those cards in a random order, but still ensure cards of the same note do not end up too close to one another.
-
Random note, then card type: Picks notes at random, then shows all of their siblings in order.
-
Random: Fully shuffles the gathered cards.
New/Review Priority
Whether new cards should be mixed in with reviews, or shown before or after them.
Interday Learning/Review Priority
Whether learning cards with a 1+ day delay should be mixed in with reviews, or shown before or after them. Because learning cards tend to be harder than reviews, some users prefer to see them at the end (getting the easy stuff done first), or at the start (allowing more time to review forgotten ones).
Review Sort Order
Controls how review cards are sorted while reviewing. The options are:
-
Due date, then random: The default option prioritizes cards that have been waiting longer, and it's the recomended option when you are up to date, or when you only have a small backlog. If you have taken an extended break or have fallen behind in your reviews, you may want to consider changing the sort order temporarily.
-
Due date, then deck. This also prioritizes cards that have been waiting longer, and then will show reviews for each subdeck in turn.
-
Deck, then due date: This option will ensure reviews are shown for each subdeck in turn. This is generally not recommended, as having material appear consistently in the same order makes it easier to guess the answer based on context, and may lead to weaker memories.
-
Ascending intervals: This will ensure cards with shorter intervals are shown first.
-
Descending intervals: This will ensure cards with larger intervals are shown first.
-
Ascending ease: This will show most difficult cards first.
-
Descending ease: This will allow you to work through the easier material first.
-
Relative overdueness: Display cards that you're most likely to have forgotten first. This is useful if you have a large backlog that may take some time to get through, and you want to reduce the chances of forgetting more cards.
When using the SM-2 scheduler, overdueness is determined by comparing how overdue cards are, and how long their interval is. For example, a card with a current interval of 5 days that is overdue by 2 days, will display before a card with a current interval of 10 days that is overdue by 3 days.
When using FSRS, overdueness is calculated based on on each card's retrievability, and the desired retention in the deck preset.
Timer
Anki monitors how long it takes you to answer each card, so that it can show you how long was spent studying each day. The time taken does not influence scheduling.
The options are:
- Maximum answer seconds: The default limit is 60 seconds. If you take longer than that, Anki assumes you have walked away from your computer or have been distracted, and limits the recorded time to 60 seconds, so that you don’t end up with inaccurate statistics. If you consistently take longer than 60 seconds to answer a card (from when question is shown until you press an answer button), you may want to either consider raising this limit, or, ideally, making your cards simpler.
- Show answer timer: In the review screen, show a timer that counts the number of seconds you're taking to review each card.
- Stop timer on answer: whether the timer should keep running when you show the answer.
Auto Advance
Requires Anki 23.12 or later. Auto Advance allows you to automatically reveal
the answer and/or move to the next card. To use it, you must first set a non-zero
time in "seconds to show question" and/or "seconds to show answer". Then, in the
review screen, use the Auto Advance action from the More button to start advancing.
Burying
When Anki gathers cards, it first gathers intraday learning cards, then interday learning cards, then reviews, and finally new cards. This affects how burying works:
- If you have all burying options enabled, the sibling that comes earliest in that list will be shown. For example, a review card will be shown in preference to a new card.
- Siblings later in the list can not bury earlier card types. For example, if you disable burying of new cards, and study a new card, it will not bury any interday learning or review cards, and you may see both a review sibling and new sibling in the same session.
The options are:
- Bury new siblings: whether other new cards of the same note (e.g., reverse cards, adjacent cloze deletions) will be delayed until the next day.
- Bury review siblings: whether other review cards of the same note will be delayed until the next day.
- Bury interday learning siblings: whether other learning cards of the same note with intervals >= 1 day will be delayed until the next day.
For more info about burying cards, please see this section of the manual.
Audio
By default, Anki automatically plays audio on the front and back of
cards. If you check Don't play audio automatically, Anki will not play
audio until you press the replay audio key, r or F5.
Always include question side when replaying audio controls whether audio from the question side should be played when replaying the audio while an answer is shown. Please note that it does not control what happens when you show the answer; for that please see this section.
Advanced
FSRS
The Free Spaced Repetition Scheduler (FSRS) is an alternative to Anki's legacy SuperMemo 2 (SM2) scheduler. By more accurately determining when you are likely to forget, it can help you remember more material in the same amount of time. This setting is shared by all deck presets.
FSRS is currently in the advanced section, as it was only just integrated into Anki in the 23.10 release. When you enable the setting, some new options will become available, and SM-2 specific settings, such as "Graduating interval", "Easy bonus", etc, will be hidden.
Before Enabling
- Please ensure all of your Anki clients support FSRS. Anki 23.10, AnkiMobile 23.10, and AnkiWeb all support it. AnkiDroid supports it in 2.17alpha3+. If one of your clients doesn't support it, things will not work correctly.
- If you previously used the 'custom scheduling' version of FSRS, please make sure you clear out the custom scheduling section before enabling FSRS.
FSRS Options
Desired Retention
Desired retention controls how likely you are to remember cards when they are reviewed. The default value of 0.9 will schedule cards so you have a 90% chance of remembering them when they come up for review again.
Here is a graph that shows how adjusting this value will affect your workload:
There are two things to notice:
-
As desired retention approaches 1.0, the frequency that you need to review cards increases drastically. For example, imagine you have a card that you have a 90% chance of remembering after 100 days. If your desired retention was 0.95, you'd need to review it after 47 days instead (approximately twice as frequently). At 0.97, the delay would be only 27 days (approximately 3.7x as frequently). At 0.99, you'd be reviewing every 9 days (more than 10x what you'd be doing with the defaults).
-
As desired retention decreases, you'll forget a greater percentage of your cards, and those cards will need to be reviewed again. Eventually, you'll get to a point where the forgotten cards contribute more to your workload than you gain from the longer delays, which is why you see the workload on the left of the graph increasing. Also, bear in mind that forgetting material frequently is demotivating.
For these reasons, we suggest you be conservative when adjusting this number, and recommend you keep it between 0.85 and 0.95.
SM-2 retention
If your actual retention before switching to FSRS was significantly different from 0.9, adjusting this value will allow Anki to better estimate your memory state when it encounters cards that are missing review logs. Since review logs typically won't be missing unless you explicitly deleted them to free up space, most users will not need to adjust this.
FSRS parameters
FSRS parameters affect how cards are scheduled. They are not intended to be manually modified. Once you've accumulated 1000+ reviews, you can have Anki optimize the parameters for you, based on your review history.
Reschedule cards on change
This option controls whether the due dates of cards will be changed when you enable FSRS, or change the parameters. The default is not to reschedule cards: future reviews will use the new scheduling, but there will be no immediate change to your workload. If rescheduling is enabled, the due dates of cards will be changed, often resulting in a large number of cards becoming due, so activating this option is not recommended when first switching from SM2.
If you wish to visualize how FSRS would change your schedule without altering your workload, there are two ways you can do so:
- Enable FSRS without rescheduling, and compare the interval and stability graphs. The interval graph will show the current intervals of cards; the stability graph will show the intervals FSRS would give cards if the desired retention is 0.9.
- Create a backup, enable FSRS with rescheduling, check the future due graph, and then undo or restore from the backup.
Optimize FSRS parameters
The FSRS optimizer uses machine learning to learn your memory patterns and find parameters that best fit your review history. To do this, the optimizer requires several reviews to fine-tune the parameters.
If you have less than 1,000 reviews, you can use the default parameters that are already entered into the "FSRS parameters" field. Even with the default parameters, FSRS should work well for most users.
Once you've done 1000+ reviews in Anki, you can use the Optimize button to
analyze your review history, and automatically generate parameters that are
optimal for your memory and the content you're studying. Parameters are
preset-specific, so if you have decks that vary wildly in difficulty, it
is recommended to assign them separate presets, as the parameters for easy
decks and hard decks will be different. There is no need to optimize your
parameters frequently - once every few months is sufficient.
By default, parameters will be calculated from the review history of all decks using the current preset. You can optionally adjust the search before calculating the parameters, if you'd like to alter which cards are used for optimizing the parameters.
Evaluate FSRS parameters
You can use the Evaluate button in the "Optimize FSRS parameters"
section to see metrics that show how well the parameters in the
"Model parameters" field fit your review history. Smaller numbers
indicate a better fit to your review history.
Log-loss doesn't have an intuitive interpretation. RMSE (bins) can be interpreted as the average difference between the predicted probability of recalling a card (R) and the measured (from the review history) probability. For example, RMSE=5% means that, on average, FSRS is off by 5% when predicting R.
Note that log-loss and RMSE (bins) are not perfectly correlated, so two decks may have similar RMSE values but very different log-loss values, and vice-versa.
Compute optimal retention
This experimental tool assumes you're starting with 0 cards, and will attempt to calculate the amount of material you'll be able to retain in the given time frame. The estimated retention will greatly depend on your inputs, and if it significantly differs from 0.9, it's a sign that the time you've allocated each day is either too low or too high for the amount of cards you're trying to learn. This number can be useful as a reference, but it is not recommended to copy it into the desired retention field.
Learning and Re-learning Steps
(Re)learning steps of 1+ days are not recommended when using FSRS. The main
reason they were popular with the old SM-2 scheduler is because repeatedly
failing a card after it has graduated from the learning phase could reduce
its ease a lot, leading to what some people called "ease hell". This is not
a problem that FSRS suffers from. By keeping your learning steps under a
day, you will allow FSRS to schedule cards at times it has calculated are
optimum for your material and memory. Another reason not to use longer
learning steps is because FSRS may end up scheduling the first review for a
shorter time than your last learning step, leading to the Hard button
showing a longer time than Good.
We also recommend you keep the number of learning steps to a minimum. Evidence shows that repeating a card multiple times in a single day after you've remembered it does not significantly help with memory, so your time is better spent on other cards or a shorter study session
Add-On Compatibility
Some add-ons can cause conflicts with FSRS. As a general rule of thumb, if an add-on affects a card's intervals, it shouldn't be used with FSRS. A list of commonly used add-ons and their FSRS compatibility can be found in Add-on Compatibility.
More
For more info on FSRS, please check:
Maximum Interval
Allows you to place an upper limit on the time Anki will wait to reshow a card. The default is 100 years; you can decrease this to a smaller number if you’re willing to trade extra study time for higher retention.
Starting Ease
Controls the easiness that cards start out with. It is
set when a card graduates from learning for the first time. It defaults
to 2.50, meaning that once you have finished learning a card, answering
Good on subsequent reviews will increase the delay by approximately
2.5x (e.g. if the last delay was 10 days, the next delay would be around 25
days). Based upon how you rate the card in subsequent reviews, the
easiness may increase or decrease from its starting value.
Easy Bonus
An extra multiplier applied to the interval when a review card is answered
Easy. With the default value of 1.30, Easy will give an interval that is
1.3 times the Good interval (e.g. if the Good interval was 10 days, the Easy
interval would be around 13 days).
Interval Modifier
An extra multiplier that is applied to all reviews. At its default of 1.00 it does nothing. If you set it to 0.80, though, for example, intervals will be generated at 80% of their normal size (so a 10 day interval would become 8 days). You can thus use the multiplier to make Anki present cards more or less frequently than it would otherwise, trading study time for retention or vice versa.
For moderately difficult material, the average user should find they remember approximately 90% of mature cards that come up for review. You can find out your own performance by opening the graphs/statistics for a deck and looking at the Answer Buttons graph - mature retention is the correct% on the right side of the graph. If you haven’t been studying long, you may not have any mature cards yet. As performance with new cards and younger cards can vary considerably, it’s a good idea to wait until you have a reasonable amount of mature reviews before you start drawing conclusions about your retention rate.
On the SuperMemo website, they suggest that you can find an appropriate multiplier for a desired retention rate. Their formula boils down to:
log(desired retention%) / log(current retention%)
Imagine we have a current retention rate of 85% and we want to increase it to 90%. We’d calculate the modifier as:
log(90%) / log(85%) = 0.65
You can use Google to calculate it for you.
If you plug the resulting 65% into the interval modifier, you should find over time that your retention moves closer to your desired retention.
One important thing to note however is that the trade-off between time spent studying and retention is not linear: we can see here that to increase our retention by 5 percentage points, we would have to study 35% more frequently. If the material you are learning is very important then it may be worth the extra effort – that is, of course, something you will need to decide for yourself. If you are simply worried that you are forgetting too much, then you may find investing more time at the initial learning stage and/or using mnemonics will give you more gain for less effort.
One final thing to note is that Anki forces a new interval to be at least 1 day longer than it was previously, so that you do not get stuck reviewing with the same interval forever. If your goal is to repeat a card once a day for multiple days, you can do that by setting more learning mode steps, instead of by adjusting this modifier.
Hard Interval
The multiplier used when you use the Hard button. The percentage is relative
to the previous interval: e.g. with a default of 1.20, a card with a 10-day interval
will be given 12 days.
New Interval
The multiplier used when you use the Again button on a review card. The
default 0.00 means that a review card's delay is reset to zero when you forget it
(which then becomes 1 day after the minimum interval is
applied).
If changed from the default, it is possible for forgotten cards to preserve part of their previous delay. For example, if a card had a 100 day interval, and you set the New Interval to 0.20, the new interval would be 20 days.
While preserving part of the interval may seem to make sense, SuperMemo has observed that preserving part of the delay can actually be counter-productive. For this reason, we recommend you leave it on the default setting.
Custom Scheduling
Please see this page.
Syncing with AnkiWeb
- Intro Videos
- Setup
- Automatic Syncing
- Button Color
- Media
- Conflicts
- Merging Conflicts
- Firewalls
- Proxies
AnkiWeb is a service that allows you to keep your collection synchronized across multiple devices, and to study online. Please sign up for a free account before following the steps below.
Intro Videos
For a quick introduction to syncing, please check out the syncing intro videos.
Setup
To start syncing your collection across devices, click the sync button (the top right one on the main screen, or press 'y' on your keyboard. You’ll be prompted for your AnkiWeb ID and password, which you created in the signup process.
When you synchronize your collection for the first time, Anki will ask you if you want to upload or download. If you have cards on your computer and your AnkiWeb account is empty, choose "upload" to send your data to AnkiWeb. If you have cards on AnkiWeb from another device, and no cards on your computer, choose "download" to replace the empty local collection with the cards that are on AnkiWeb. If you have different cards on both devices, more work is required to avoid losing data.
Once the initial one way sync is completed, Anki will be able to merge changes from multiple locations with a few exceptions.
If you have multiple people using Anki on one machine and have created a profile for each user, each user will need to create their own AnkiWeb account to sync with. If you attempt to synchronize multiple profiles with a single AnkiWeb account, you will lose data.
Automatic Syncing
Once syncing is enabled, Anki will automatically sync each time your collection is closed or opened. If you would prefer to synchronize manually, you can disable automatic syncing in Anki’s preferences.
Button Color
The sync button will change to blue when a normal sync is required, and red when a full sync is required.
Media
Related video: https://www.youtube.com/watch?v=phP9GGG-PxY
Anki will synchronize any sounds and images used by your notes. It will notice when media has been added or removed from your media folder, but will not notice if you have edited some existing files without adding or removing any. To get your edits noticed, you need to add or remove a file as well.
One-way syncs (where you're prompted to upload or download) have no influence over how media syncs - media changes are always merged.
To prevent accidental data loss, deletions will only sync to other devices if they are made after media is fully in sync. If you delete files before your device is fully in sync, and the deleted files are already on AnkiWeb, they will be downloaded the next time you sync.
If you have accidentally deleted media files, and want to restore them, open the preferences and log out. The next time you sync, Anki will restore any deleted files, if they are available on AnkiWeb still.
If you’re running Anki off a USB flash drive, you should use an NTFS file system, as Anki may not be able to detect media changes on a FAT32 filesystem.
Conflicts
Related video: https://www.youtube.com/watch?v=UEAcpfMQnjo
Under normal circumstances, reviews and note edits can be merged, so if you review or edit on two different devices before syncing, Anki will preserve your changes from both locations. If the same card has been reviewed in two different locations, both reviews will be marked in the revision history, and the card will be kept in the state it was when it was most recently answered.
There are certain changes that Anki is unable to merge. These mainly relate to the format of notes: things like adding a new field, or removing a card template. When you perform an operation that can’t be merged, Anki will warn you, and give you the option of aborting the operation. If you choose to continue, you’ll be asked to choose whether to keep the local copy or the copy on AnkiWeb when your collection is next synchronized.
If certain problems are detected while syncing, it will also force a one way sync. If you find this consistently happens, please post on our support site.
When a one way sync is required, you need to choose whether you wish to keep the collection on your local device, or the collection on AnkiWeb. If changes have been made on both ends, only changes on one end can be preserved.
If you choose Upload, the content on your local device will be sent to AnkiWeb. You then need to sync your other devices, and choose "Download" to have them grab a copy of that content.
If you choose Download, it will replace any local changes you’ve made with the data that is on AnkiWeb.
Once all devices are in sync, future syncs will return to the normal behaviour of merging changes from both ends.
If you wish to force a full upload or download (for example, because you accidentally deleted a deck on one side and want to restore the deck rather than having its deletion synchronized), you can check the "On next sync, force changes in one direction" box in Tools>Preferences>Network, then sync as usual. (You’ll be given the option to choose which side you want to use.)
Forcing a one way sync only affects card syncing - media is synced as normal. If you have files that you want to remove from AnkiWeb, please ensure your client is fully in sync first. After syncing is up to date, any files you remove (e.g via the Check Media function) will be removed from AnkiWeb on the following sync.
Merging Conflicts
Because the first sync can only sync changes in one direction, if you have added different content to different devices or profiles before setting syncing up, content on one device will be lost if you overwrite it with the content from the other device. With some work, it is possible to manually merge data into a single collection.
Start by taking a backup on each device/profile, in case something goes wrong. With the computer version you can use File>Export to export "all decks" with scheduling information and media files included, and save the file somewhere safe. In AnkiMobile, the Add/Export button on the decks list screen will let you export all decks with media.
Next, if one of your devices is a mobile device, synchronize it first. If there’s a conflict, choose "upload" to overwrite any existing data on AnkiWeb with the data from your mobile device. If both devices/profiles are on your computer, synchronize the device/profile with the most number of decks first.
Now return to the other device/profile. If automatic syncing is enabled, a message may pop up asking if you want to upload or download. Click the cancel button - we don’t want to sync yet.
Once you’re looking at the deck list, click the cog icon next to the first deck, and choose "export". Export the content with scheduling information and media included, and save the .apkg file somewhere. Now you’ll need to repeat this for each top-level deck.
Once all top-level decks have been exported, click the sync button at the top right, and choose "download", which will overwrite the local content with the content you synced from your other device.
You can now use File>Import to import the .apkg files you exported earlier, which will merge the exported content with the existing content, so everything will be in one place.
Firewalls
Anki needs to be able to make outbound HTTPS connections to sync. It must be able to connect to ankiweb.net, sync.ankiweb.net, sync2.ankiweb.net, and so on. These domains may change over time, and the IP addresses they point to may also change, so we recommend you allow wildcard access to *.ankiweb.net to reduce the chance of the firewall rules needing to be updated in the future.
If you have a firewall on your machine, you should add an exception for Anki. If you are on a work or school network, please contact your network administrator for assistance - it is not something we can help you with.
Proxies
If you need a proxy to access the internet, Anki should automatically pick up your system proxy settings if you’re on Windows or macOS, and will honour the HTTP_PROXY environment variable if you’re on another platform.
Anki will only be able to pick up your system settings if a proxy is manually configured, and does not require a password. If your system uses automatic proxy setup, or uses a proxy that requires a username and password, you will need to manually tell Anki the proxy configuration.
To tell Anki your proxy settings, define a HTTPS_PROXY environmental variable that points to the proxy server. It will look like:
http://user:pass@proxy.company.com:8080
If your username or password contains an @ (e.g user@workdomain.com),
you need to change it to %40, like so:
http://user%40workdomain.com:pass@proxy.company.com:8080
Anki 2.0 expects to find HTTP_PROXY instead of HTTPS_PROXY.
To set environmental variables on Windows, please see https://www.google.com/search?q=windows+set+environmental+variable
If you’re on a Mac, please see http://stackoverflow.com/questions/135688/setting-environment-variables-in-os-x
Heavily locked down networks that intercept secure connections and present their own certificate instead may cause Anki to throw up SSL errors. In such environments, you may be able to work around the errors with https://ankiweb.net/shared/info/878367706
An alternative solution is to install a local proxy server, and point that proxy server at your normal proxy server. You can then tell Anki to use the local proxy, which will redirect requests to the proxy you normally use.
Profiles
If more than one person wants to use Anki on your computer, you can set up a separate profile for each user. Each user profile has their own collection, and own program settings. Add-ons are shared across profiles. Profiles are configured by going to the File menu and choosing "Switch Profile".
Only a single profile can be synced to an AnkiWeb account. If you have different users on your computer, each user will need to set up a separate AnkiWeb account for their profile. If you attempt to link two or more profiles to the same AnkiWeb account, you will overwrite the data from one profile with the data from the other.
Profiles are primarily intended to be used by different people, and are not recommended for splitting up your own content. If you have created multiple profiles for yourself, the best option is to merge them into a single profile. You can do so by exporting one deck from profile A, and then importing it into profile B, repeating for any other decks in profile A, until everything is in profile B.
AnkiDroid does not support profiles.
Profiles window
From the Profiles window (accessible via File>Switch Profile from the main window), you can:
- Open / Add / Rename / Delete user profiles.
- Quit the program.
- Restore an automatic backup.
- Downgrade your collection, which is necessary if you want to open it with an earlier Anki release. If you skip this step, you may get an error message when opening your collection in an older Anki version, and you will need to return to this version, downgrade, then try again.
Browsing
- Table Modes
- Sidebar
- Search Box
- Card/Note Table
- Editing Area
- Menus and Actions
- Find and Replace
- Finding Duplicates
The Browse window allows you to search through your cards and notes, and edit them. It is opened by clicking Browse in the main window, or by pressing B. It is comprised of three sections: the sidebar on the left, the card/note table on the top right, and the editing area on the bottom right. By positioning the mouse between two sections, it is possible to click and drag to expand one section and shrink the other.
Table Modes
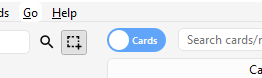
Anki 2.1.45+ offers two modes: either cards or notes are shown in the data table. You can change the current mode by clicking the switch at the top, to the left of the search area, or pressing Ctrl+Alt+T or Cmd+Opt+T. The switch also indicates if Cards or Notes are currently shown.
Note: For the sake of simplicity, this manual generally assumes the Cards mode to be the active one. Whenever selecting/finding/etc. "cards" is mentioned, the reader may substitute it for "cards or notes depending on the active mode".
Sidebar
The sidebar on the left allows quick access to common search terms. On Anki 2.1.45+, it also provides a searchbar, facilities to edit tags and decks, and a choice of two different tools, which are discussed in the following sections. You can switch tools using the toolbar at the top of the sidebar or the shortcuts Alt+1/2.
Search Tool

With this tool, the sidebar behaves as in previous versions: Clicking on an item will search for it.
You can hold down Ctrl (Command on Mac) while clicking in order to append the clicked item to the current search with an AND condition, instead of starting a new search. If you wanted to show learning cards that were also in the German deck for instance, you could click on "Learning", then Ctrl-click on "German".
You can hold down Shift to create an OR search instead of an AND. For example, you could click one deck, then Shift-click another to show cards from either of the decks in the same view.
You can hold down Alt (Option on Mac) in order to reverse the
search (prepend a -): for example, to show all cards in a current deck that
do not have a certain tag. Alt/Option can be combined with
either Ctrl or Shift (e.g. clicking with Ctrl+Alt
will result in adding a new search term that is negated).
On Anki 2.1.39+, you can also hold down both Ctrl and
Shift together when clicking a search term to replace all occurrences of the
same kind of search with the new one.
Let's say you had previously typed in a complicated search expression like
deck:Swahili (is:due or tag:important)
and now want to perform the same search for your Urdu deck. You can hold down
Ctrl+Shift while clicking the Urdu deck in the sidebar to obtain the
following search expression:
deck:Urdu (is:due or tag:important).
Selection Tool
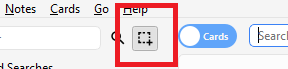
The Selection tool allows for selecting multiple items at the same time by holding down Ctrl or Shift while clicking. It also enables drag-and-drop to reorder decks and tags.
Here is an example: Say you have the tags Math, Calculus, and Algebra.
Click on the Calculus tag, then Ctrl-click on the Algebra tag. Now both
tags are selected, click and drag any of the two onto the Math tag to make them
both children of this tag. Behind the scene, Anki has renamed the two tags to
Math::Calculus and Math::Algebra respectively and updated your notes accordingly.
Another use case for selecting multiple items is searching: If you right-click on a selection of items, you can choose Search > All/Any Selected. This can be combined with keyboard modifiers as described in Search Tool to append the resulting search to the current search.
Saved Searches
If you regularly search for the same thing, you can save the current search by right-clicking the topmost item in the sidebar, choosing “Save Current Search” and typing in a name. You can also drag and drop any sidebar item onto this area to add an equivalent saved search, effectively pinning it at the top.
Editing Items
You can delete or rename tags, decks, and saved searches directly from the sidebar, from the right-click menu, or by using a shortcut key (Del and F2 on Windows). Deletion even works for multiple items at once (see Selection Tool).
Finding Items
To find a certain item in the sidebar tree, type part of its name into the searchbar at the top to temporarily hide all items not matching the search.
Search Box
Above the card list is a search box. You can type in various things there to search for cards. For information on the search syntax, see Searching.
Card/Note Table
The table's rows represent cards or notes that match the current search. When you click on a row, the corresponding note will be shown in the bottom section.
Rows
If you drag the mouse or hold Ctrl or Command to select multiple rows, the editor will be temporarily hidden. Various operations (such as changing the deck) can operate on multiple cards or notes at once, independent of the active mode. Therefore in Cards mode, a note is considered to be selected if any of its cards is selected, and in Notes mode, a card is considered to be selected if its note is selected.
Other operations (like showing card information) only operate on a single card or note. This is called the current card or note, which is usually the one that was last selected or clicked. In Cards Mode, again, the current note is the note of the current card and in Notes mode, the current card is the first card of the current note.
The background colour will change depending on the card and note. In Cards mode, the first match will be used:
- if the card is flagged, use the flag colour,
- if the card is suspended, yellow,
- if the card's note is marked, purple.
In Notes mode, colour is only applied to marked notes.
For more information about marked notes and suspended cards, see Editing and More.
Columns
The columns are configurable: right click on one (or Ctrl-click on a Mac) to choose which columns you'd like to see. You can drag columns to reorder them. Clicking on a column will sort by that column; click again to reverse the sort order. Note that you cannot sort by the Question and Answer columns.
All columns are available for both Cards and Notes mode but sometimes with slightly different names and data. The following table lists the behaviours for both modes.
| Column | Cards mode | Notes mode |
|---|---|---|
| Answer | The back side of the card in one line with the question stripped. You can also choose a custom format in the card type editor instead. | The same as in Cards mode, only for the first card of the note. |
| Card(s) | The name of the card's template. | The number of cards the note has. |
| Card Modified | The last time changes were made to the card (e.g. when you reviewed the card and the review history and interval were updated). | The last time changes were made to one of the note's cards. |
| Created | The same as in Notes mode for the card's note. | The date the note was created. |
| Deck | The name of the deck the card is in. | The number of different decks the note's cards are in, or the deck name if all cards are in the same deck. |
| Due | The due date for cards in review or (re)learning, and the position in the new card queue for new cards. The line is wrapped in brackets if the card is suspended or buried. Sorting is done by type and only then by date or position. | The due date for the note's next due review or (re)learning card that is not suspended, buried or in a filtered deck. |
| (Avg.) Ease | The card's ease if it is not new. | The average ease for the note's cards that are not new. |
| (Avg.) Interval | The card's interval if the card is in review or relearning. | The average interval for the note's cards that are in review or relearning. |
| Lapses | How often the card was rated “Again”. | The total lapses for all cards of the note. |
| Note | The same as in Notes mode for the card's note. | The name of the note's notetype. |
| Note Modified | The same as in Notes mode for the card's note. | The last time the note (e.g. the content of a field) was edited. |
| Question | The front side of the card in one line. You can also choose a custom format in the card type editor instead. | The same as in Cards mode, only for the first card of the note. |
| Reviews | How often the card has been reviewed. | The total review count for all cards of the note. |
| Sort Field | The same as in Notes mode for the card's note. | The content of the note's field that is defined as the notetype's sort field. Only this one field can be displayed and sorted by. You can change the sort field by clicking Fields... in the editing area. |
| Tags | The same as in Notes mode for the card's note. | The note's tags. |
Editing Area
The bottom right area displays the note of the currently selected row. For more information about cards and notes, see Getting Started. For more information on formatting buttons, see Editing.
You can see a preview of what the currently selected card would look like when reviewing by clicking the Preview button at the top of the editing area. Note that this will not display any type-the-answer fields on your cards, which makes it easier to preview the cards quickly. In Notes mode, the preview is shown for the first card of the selected note.
Menus and Actions
At the top of the browser window, you find a toolbar with various menus which in turn offer various actions that can be performed in the browser.
Edit
| Name | Action |
|---|---|
| Undo | Revert the most recently performed operation. |
| Select All | Select all rows displayed. |
| Select Notes | Show only the currently selected notes and select all rows. |
| Invert Selection | Select those rows not selected, and deselect the currently selected rows. |
| Create Filtered Deck | Show the filtered deck dialog and set the current browser search as a filter. Use Alt / Option to set the second filter instead (requires scheduler version 2+). |
Notes
Most of the following actions operate on the selected notes. They are also available through a context menu when a selected row is right-clicked in Notes mode. In Cards mode, they can be found in a submenu of the context menu.
| Name | Action |
|---|---|
| Add Notes | Open the Add dialog. |
| Create Copy | Open a duplicate of the current note in the editor, which can be slightly modified to easily obtain variations of your cards. By default, the duplicate card will be created in the same deck as the original. |
| Export Notes | Open the Export dialog. |
| Add Tags | Add provided tags to all selected notes. |
| Remove Tags | Enter tags and remove them from all selected notes. |
| Clear Unused Tags | Remove all tags from the sidebar that are not used by any notes. |
| Toggle Mark | If the current note is marked (i.e., has the Marked tag), unmark all selected notes. If the current is not marked, mark all selected notes. |
| Change Note Type | Convert the selected notes from one type to another. For example, imagine you have a Russian notetype and a Computer notetype, and you accidentally added some computer-related text into a Russian note. You can use this option to fix that mistake. The scheduling of cards is not affected. Changing the type of a note requires a one-way sync. |
| Find Duplicates | Open the Duplicates dialog. |
| Find and Replace | Open the Find and Replace dialog. |
| Manage Note Types | Open the Notetypes dialog. |
| Delete | Delete all selected notes and their cards. It is not possible to remove individual cards, as individual cards are controlled by the templates. |
Cards
The following actions operate on the currently selected cards. They are also available through a context menu when a selected row is rightclicked in Cards mode. In Notes mode, they can be found in a submenu of the context menu.
| Name | Action |
|---|---|
| Change Deck | Move currently selected cards to a different deck. |
| Set Due Date | Turn cards into review cards, and make them due on a certain date. This can be useful for moving cards forward or back a few days when your study schedule is interrupted. Entering a range like 60-90 will make the selected cards due between 60 and 90 days from now. New cards will have their interval set to the same delay, but reviews will be rescheduled without changing their current interval, unless '!' is included at the end of the range. (Note that answer time is not recorded when manually scheduling cards, since the action can be performed even outside of review, and Anki isn’t aware of which card may or may not be shown at the time.) |
| Forget | Move currently selected cards to the end of the new queue. The existing review history is preserved. In 2.1.50+, there are options to restore the original card position, and to reset the card's lapse and repetition counters. |
| Reposition | Change the order new cards will appear in. You can find out the existing positions by enabling the due column, as described in the table section above. If you run the reposition command when multiple cards are selected, it will apply increasing numbers to each card in turn. By default the number increases by one for each card, but this can be adjusted by changing the "step" setting. The Shift position of existing cards option allows you to insert cards between currently existing ones, pushing the currently existing ones apart. For instance, if you have five cards and you want to move 3, 4, and 5 between 1 and 2, selecting this setting would cause the cards to end up in the order 1, 3, 4, 5, 2. By contrast, if you turn this option off, 1 and 2 will get the same position number (and it will thus be unpredictable which of the cards with the same number comes up first). Please note that when enabled, any card with a higher position will be modified, and all of those changed cards will need to be sent the next time you sync. |
| Toggle Suspend | Suspend or unsuspend all selected cards, depending on whether the current card is suspended or not. |
| Flag | Toggle the flags of all selected cards. Whether a flag is added or removed depends on whether the current card has the chosen flag. |
| Info | Show various information about the current card, including its review history. For more information, see Card Info. |
Go
This menu exists to provide keyboard shortcuts to jump to various parts of the browser, and to go up and down the card list.
Find and Replace
This dialog allows for replacing text on notes. As described above, it is available from the toolbar and the table's context menu.
The first input field is for the text that is going to be replaced, the second one for the replacement. Next, there is a dropdown menu that allows you to specify where Anki should look for text to replace: in a note's tags (requires Anki 2.1.45+), in all fields, or just in a specific field (only fields belonging to a selected note will be listed).
By default, only selected notes will be affected. If you want to lift that restriction, you can untick the "selected notes only" checkbox (requires Anki 2.1.45+).
The regular expression option allows you to perform complex replacements. For example, assume there is the following text in a field:
<img src="pic.jpg" />
We use these settings:
(Note that on Anki versions prior to 2.1.28, you would need to replace ${1}
with \1.)
Then the assumed field content will change to:
pic.jpg
A full discussion on regular expressions is outside the scope of this document. There are a number of syntax guides available on the web:
- For Anki 2.1.28+, see https://docs.rs/regex/latest/regex/index.html#syntax.
- For older Anki versions, see http://docs.python.org/library/re.html.
Finding Duplicates
You can use the Notes > Find Duplicates option to search for notes that have the same content. When you open the window, Anki will look at all of your note types and present a list of all possible fields. If you want to look for duplicates in the Back field, you’d select it from the list and then click Search.
By default, it will search in all note types that have the field you provided. This differs from the duplicate check when you add cards manually, which is limited to a single note type.
The Optional filter text box allows you to narrow down where Anki will look for duplicates. If you only want to search for duplicates in the "French Vocab" and "French Verbs" note types, you would enter:
"note:french vocab" or "note:french verbs"
Or you might want to look only for duplicates in a particular deck, so you could use:
"deck:myDeck"
The search syntax is the same as used when searching in the browser. For more information, see Searching.
You can click one of the links in the search results list to display the duplicate notes in that set. If the search brings up a large number of duplicates, you may wish to instead click the Tag Duplicates button, which will tag all matching notes with duplicate. You can then search for this tag in the browser and handle them all from the same screen.
Filtered Decks & Cramming
- Custom Study
- Home Decks
- Creating Manually
- Order
- Steps & Returning
- Counts
- Due Reviews
- Reviewing Ahead
- Rescheduling
- Catching Up
When you study a regular deck in Anki, only a limited number of cards are shown: the cards Anki thinks you are about to forget, and a daily limit of new cards. This is generally useful, as it ensures you don't spend more time studying than necessary. But sometimes it can be useful to step outside of these normal limits, such as when you need to review for a test, focus on particular material, and so on. To make this possible, Anki provides a different type of deck called a 'filtered deck'.
Filtered decks offer a lot of possibilities. They can be used for previewing cards, cramming cards before a test, studying particular tags, catching up on a backlog with a particular sort order, reviewing ahead of schedule, going over the day's failed cards, and more.
Custom Study
The easiest way to create a filtered deck is with the Custom Study button, which appears at the bottom of the screen when you click on a deck. It offers some convenient preset filters for common tasks like reviewing the cards that you have failed that day. It will create a filtered deck called "Custom Study Session" and automatically open it for you.
If an existing "Custom Study Session" deck exists, it will be emptied before a new one is created. If you wish to keep a custom study deck, you can rename it from the deck list.
Here is a summary of each of the options:
Increase today's new card limit
Add more new cards to the deck you are currently studying. Note that
unlike other options, this does 'not' create a new filtered deck, it
modifies the existing deck.
Increase today's review card limit
If not all reviews due today were shown because of the daily review limit,
this option allows you to show more of them. As with the new cards
option, this modifies the existing deck.
Review forgotten cards
Show all the cards, for which you've answered Again (1) within the number of days
you specify.
Review ahead
Show cards that will be due in the near future (the number of days you
specify). This is useful for working through some of your older cards
before a vacation, but it will not help with cards you have learnt
recently. Please see the reviewing ahead section
below for more info.
Preview new cards
Show cards that you have recently added, without converting them to
review cards as they are answered.
Study by card state or tag
Select a certain number of cards from the current deck to study. You can
choose to select new cards only, due cards only, or all cards; after you
click "Choose Tags", you can also limit the selected cards by tags. If
you wish to see all the cards in the deck (for instance, to study before
a big test), you can set the number of cards to more than the number of
cards in the deck.
Home Decks
When a card is moved to a filtered deck, it retains a link to the deck, from which it came. That previous deck is said to be the card's 'home deck'.
Cards automatically return to their home deck after they are studied in the filtered deck. This can be after a single review, or after multiple reviews, depending on your settings.
It is also possible to move all cards back to their home decks at once:
-
The "Empty" button in the study overview moves all cards in the filtered deck back to their home deck, but does not delete the empty filtered deck. This can be useful if you want to fill it again later (using the Rebuild button).
-
Deleting a filtered deck does the same thing as "Empty" does, but also removes the emptied deck from the deck list. No cards are deleted when you delete a filtered deck.
In the old scheduler, if you create, rebuild, empty, or delete a filtered deck while cards are still in learning, they will be turned back into new cards. In the case of failed reviews in relearning, any remaining relearning steps will be skipped. This was fixed in the v2 scheduler so cards are no longer reset.
Creating Manually
Advanced users can create filtered decks with arbitrary search strings (or 'filters'), instead of relying on the preset filters. To create a filtered deck manually, choose Create Filtered Deck from the Tools menu.
When you click the Build button, Anki finds cards that match the settings you specified, and temporarily moves them from their existing decks into your new filtered deck for study.
If you wish to fetch cards again using the same filter options (for instance, if you want to study all cards with a particular tag every day), you can use the Rebuild button at the bottom of the deck's overview screen.
The search area controls what cards Anki will gather. All of the searches possible in the browser are also possible for filtered decks, such as limiting to tags, finding cards forgotten a certain number of times, and so on. Please see the searching section of the manual for more information on the different possibilities.
Filtered decks cannot pull in cards that are suspended, buried, or already in a different filtered deck. And if you are using the v1 scheduler, cards in (re)learning will not be included either. For this reason, a search in the browser may reveal cards that do not end up in the filtered deck.
The limit option controls how many cards will be gathered into the deck. The order you select controls both the order cards are gathered in, and the order they will be reviewed in. If you select "most lapses" and a limit of 20 for example, then Anki will show you only the 20 most lapsed cards.
The enable second filter option allows you to create a filtered deck comprised of two different searches, so that you can, for example, include due cards with one order, and a smaller amount of new cards with a different order.
Order
The "cards selected by" option controls the order that cards will appear in. If the maximum number of cards you select is lower than the number of cards that match the filter criteria, Anki will exclude the cards at the end of this sorted list first.
Oldest seen first
Display those cards first, that you haven't seen in reviews for the longest
time.
Random
Randomize the order of all cards that match the filter criteria (use no
set order).
Increasing intervals
Display cards that have the smallest interval first.
Decreasing intervals
Display cards that have the largest interval first.
Most lapses
Display those cards first, that you have failed the most times.
Order added
Display cards that you added first (i.e. those cards that have the earliest
creation date).
Order due
Display cards with the earliest due date first.
Latest added first
Display cards that you have most recently added to the deck first.
(This is the opposite of 'Order added'.)
Relative overdueness
Display cards that you're most likely to have forgotten first. This is useful if
you have a large backlog that may take some time to get through, and you want to
reduce the chances of forgetting more cards.
When using the SM-2 scheduler, overduessness is determined by comparing how overdue cards are, and how long their interval is. For example, a card with a current interval of 5 days that is overdue by 2 days, will display before a card with a current interval of 10 days that is overdue by 3 days.
When using FSRS, overdueness is calculated based on on each card's retrievability, and the desired retention in the deck preset.
Steps & Returning
Please see the section on learning as a reminder of how steps work.
By default, Anki will use the steps of a card’s home deck. If a new card would normally be reviewed twice when being learnt, the same thing will happen when you study it in a filtered deck.
Cards return to their home deck when (re)learning is complete. Thus if you have 3 learning steps, a new card will return to its home deck upon three presses of "Good" or a single press of "Easy".
v1 and v2 scheduler
In the v1 scheduler, the custom steps option allows you to override the home deck’s steps and provide your own steps instead. The provided steps apply to both cards being learnt, lapsed reviews, and reviews ahead of time. Please note, however, that from the v2 scheduler filtered decks no longer support custom steps.
v3 scheduler
Filtered decks with rescheduling disabled show 4 buttons in the v3 scheduler - the provided delay applies to the Again button, and Hard/Good will use 1.5x and 2x the provided delay. Easy will remove the card.
Counts
In a filtered deck, reviews that were already due are displayed in the review count as normal. Learning cards and non-due reviews are counted in the new card count, due to how the underlying implementation works. Reviews that were not due are not scheduled like new cards however: Anki uses a special algorithm that takes into account how close they were to their normal due time when reviewed.
Due Reviews
If the filtered deck includes cards that were due for review, they will be shown like they would have been in their original deck: they appear in the review card count at the bottom of the screen, and there are four choices for how well you remembered. Upon a correct answer, the card will be moved back to its home deck, and its next delay adjusted using the home deck's settings. If you forget the card, it will be shown according to the relearning steps defined in the home deck.
Reviewing Ahead
If your search included cards that are not due, Anki will show the reviews ahead of time.
Anki uses a special algorithm for these reviews that takes into account how early you are reviewing. If the cards were almost due to be shown, they will be given a new delay similar to what they would have received if you had reviewed them on time. If the cards are reviewed soon after they were scheduled however, their new delay will be similar to their previous delay. This calculation works on a sliding scale.
Because reviewing a card shortly after it is scheduled has little impact on scheduling (e.g. a card due tomorrow with a one day interval will remain due tomorrow if reviewed early), the "review ahead" custom study setting is not appropriate for repeated use. If used to go through a week's worth of cards before a trip, the mature cards will be rescheduled into the future and the new cards will remain at small intervals, because you don't know them well enough for them to be rescheduled further. If you review ahead again the next day, all you'll end up doing is going through those same new cards again, to little benefit.
Early reviews are included in the new card count rather than the review count, and will be shown according to the number of relearning steps defined in the home deck (unless you have provided custom steps). This means that if you have customized the number of relearning steps in the home deck, the non-due card may be shown more than once.
If you have multiple steps, Anki will only consider the first answer when deciding the next delay, and like relearning in normal decks, "Good" and "Easy" differ only in the step change and not the resulting delay.
Rescheduling
By default, Anki will return cards to their home decks with altered scheduling, based on your performance in the filtered deck. There is a reschedule cards based on my answers option available which alters this behaviour.
From the v2 scheduler, when rescheduling is disabled, cards are shown in a simple "preview mode", and when they are returned to the original deck, they are returned exactly as they started.
In the v1 scheduler, cards were presented more similarly to how they normally are, but studying cards had side effects, and the original position of new cards was lost when you studied them.
Catching Up
Filtered decks can be useful for catching up when you've fallen behind in your reviews. One Anki user describes the way they use the filtered decks to catch up as follows:
I did this for a backlog of 800 cards with filtered subdecks. Worked
very well for me.

Just Due filter with: "is:due prop:due>-7"

Over Due filter with: "is:due prop:due<=-7"

The Just Due deck will then contain cards that became due in the past
week. That's the deck you should study every day as it gets the cards
that become due regularly. With this you can study as if there weren't
any backlog.

The Over Due deck will contain your backlog — cards which you didn't
study in time. You can study them the same way you would study new
cards. They go back into the regular cards, so the number of overdue
will never grow as long as you keep your Just Due deck in check.

How long it takes depends on how many overdue cards you study each day
in addition to the ones that become due regularly. You can still motor
through them when you feel like it - or you can do a specific number per
day like you would for new cards. Up to you.
Searching
- Simple searches
- Limiting to a field
- Tags, decks, cards and notes
- Ignoring accents/combining characters
- Regular expressions
- Card state
- Card properties
- Recent Events
- Matching special characters
- Object IDs
Anki's Browse screen and the Filtered Deck feature use a common method of searching for specific cards/notes.
Simple searches
When you type some text into the search box, Anki finds matching notes and displays their cards. Anki searches in all fields of the notes, but does not search for tags (see later in this section for how to search for tags). Some examples:
dog
search for "dog" - will match words like "doggy" and "underdog" too.
dog cat
finds notes that have both "dog" and "cat" on them, such as "raining
cats and dogs".
dog or cat
finds notes with either "dog" or "cat".
dog (cat or mouse)
finds notes with dog and cat, or dog and mouse.
-cat
finds notes without the word "cat".
-cat -mouse
finds notes with neither "cat" nor "mouse".
-(cat or mouse)
same as the above.
"a dog"
finds notes with the exact sequence of characters "a dog" on them, such
as "atta dog", but not "dog a" or "adog".
-"a dog"
finds notes without the exact phrase "a dog"
d_g
finds notes with d, <a letter>, g, like dog, dig, dug, and so on.
d*g
finds notes with d, <zero or more letters>, g, like dg, dog, dung,
etc.
w:dog
search for "dog" on a word boundary - will match "dog", but not "doggy"
or "underdog". Requires Anki 2.1.24+ or AnkiMobile 2.1.61+. Note that
formatting changes may be interpreted as word boundaries e.g. searching
for w:exam will match example.
w:dog*
will match "dog" and "doggy", but not "underdog".
w:*dog
will match "dog" and "underdog", but not "doggy".
Things to note from the above:
-
Search terms are separated by spaces.
-
When multiple search terms are provided, Anki looks for notes that match all of the terms - an implicit 'and' is inserted between each term. On Anki 2.1.24+ and AnkiMobile 2.0.60+ you can be explicit if you like ("dog and cat" is the same as "dog cat"), but older Anki versions will treat "and" as just another word to search for.
-
You can use "or" if you only need one of the terms to match.
-
You can prepend a minus sign to a term to find notes that don’t match.
-
You can group search terms by placing them in parentheses, as in the dog (cat or mouse) example. This becomes important when combining OR and AND searches — in the example, with the parentheses, it matches either 'dog cat' or 'dog mouse', whereas without them it would match either 'dog and cat' or 'mouse'.
-
Anki is only able to search within formatting in the sort field you’ve configured. For example, if you add "example" to one of your fields, this will not be matched when searching for "example" unless that field is the sort field. If a word is not formatted, or the formatting does not change in the middle of the word, then Anki will be able to find it in any field.
-
Standard searches are case insensitive for Latin characters - a-z will match A-Z, and vice versa. Other characters such as Cyrillic are case sensitive in a standard search, but can be made case insensitive by searching on a word boundary or regular expression (
w:,re:).
Limiting to a field
You can also ask Anki to match only if a particular field contains some text. Unlike the searches above, searching on fields requires an 'exact match' by default.
front:dog
find notes with a Front field of exactly "dog". A field that says "a
dog" will not match.
"animal front:a dog"
find notes where the "Animal Front" field is exactly "a dog". The double quotes are
mandatory, see below.
front:*dog*
find notes with Front field containing dog somewhere
front:
find notes that have an empty Front field
front:_*
find notes that have a non-empty Front field
front:*
find notes that have a Front field, empty or not
fr*:text
find notes in a field starting with "fr". Requires Anki 2.1.24+ or AnkiMobile 2.1.60+.
Tags, decks, cards and notes
tag:animal
find notes with the tag "animal", or subtags like "animal::mammal"
tag:none
find notes with no tags
tag:ani*
find notes with tags starting with ani
deck:french
find cards in a French deck, or subdecks like French::Vocab
deck:french -deck:french::*
find cards in French, but not subdecks
deck:"french vocab"
searching when a deck has a space
"deck:french vocab"
also ok
deck:filtered
filtered decks only
-deck:filtered
normal decks only
preset:"Default"
cards in all decks that use the 'Default' deck options preset.
Requires Anki 23.10+.
card:forward
search for Forward cards
card:1
search for cards by template number - eg, to find the second cloze
deletion for a note, you’d use card:2
note:basic
search for cards with a Basic note type
Ignoring accents/combining characters
Requires Anki 2.1.24+ or AnkiMobile 2.0.60+.
You can use nc: to remove combining characters ("no combining"). For example:
nc:uber
matches notes with "uber", "über", "Über" and so on.
nc:は
matches "は", "ば", and "ぱ"
Searches that ignore combining characters are slower than regular searches.
Regular expressions
Anki 2.1.24+, AnkiMobile 2.0.60+ and AnkiDroid 2.17+ support searching in notes with "regular expressions", a standard and powerful way of searching in text.
Start a search with re: to search by regular expression. To make things easier, Anki will
treat the following as raw input, so bear in mind the rules listed there.
Some examples:
"re:(some|another).*thing"
find notes that have "some" or "another" on them, followed by 0 or more characters, and then "thing"
re:\d{3}
find notes that have 3 digits in a row
Regular expressions can also be limited to a specific field. Please note that unlike the normal searches in a specific field, regular expressions in fields don't require an exact match. Eg:
front:re:[a-c]1
matches uppercase or lowercase a1, B1 or c1 that occurs anywhere in the "Front" field
front:re:^[a-c]1$
like the above, but will not match if any other text falls before or after a1/b1/c1.
Anki 2.1.50 added regex support for tags:
tag:re:^parent$
find notes with the exact tag "parent", disregarding any child tags like "parent::child"
"tag:re:lesson-(1[7-9]|2[0-5])"
find notes with tags "lesson-17" through "lesson-25"
You can learn more about regular expressions here: https://regexone.com/lesson/introduction_abcs
Some things to be aware of:
- The search is case-insensitive by default; use
(?-i)at the start to turn on case sensitivity. - Some text like spaces and newlines may be represented differently in HTML - you can use the HTML editor in the editing screen to see the underlying HTML contents.
- For the specifics of Anki's regex support, please see the regex crate documentation: https://docs.rs/regex/1.3.9/regex/#syntax
Card state
is:due
review cards and learning cards waiting to be studied
is:new
new cards
is:learn
cards in learning
is:review
reviews (both due and not due) and lapsed cards
is:suspended
cards that have been manually suspended
is:buried
cards that have been buried, either automatically or
manually
Note that with the new scheduler, Anki now distinguishes between manually and automatically buried cards so you can unbury one set without the other.
Cards that have lapsed fall into several of these categories, so it may be useful to combine them to get more precise results:
is:learn is:review
cards that have lapsed and are awaiting relearning
-is:learn is:review
review cards, not including lapsed cards
is:learn -is:review
cards that are in learning for the first time
flag:1
cards with a red flag
flag:2
cards with an orange flag
flag:3
cards with a green flag
flag:4
cards with a blue flag
flag:5
cards with a pink flag
flag:6
cards with a turquoise flag
flag:7
cards with a purple flag
Card properties
prop:ivl>=10
cards with interval of 10 days or more
prop:due=1
cards due tomorrow
prop:due=-1
cards due yesterday that haven’t been answered yet
prop:due>-1 prop:due<1
cards due between yesterday and tomorrow
prop:reps<10
cards that have been answered less than 10 times
prop:lapses>3
cards that have moved into relearning more than 3 times
prop:ease!=2.5
cards easier or harder than default
prop:cdn:d>5 (Requires Anki 2.1.64+.)
cards with the value of d in custom data (usually refers to Difficulty in FSRS) greater than 5
prop:cds:v=reschedule (Requires Anki 23.10+.)
cards with the string v in custom data equal to reschedule
prop:s>21 (Requires Anki 23.10+ and FSRS enabled.)
cards with stability greater than 21 days
prop:d>0.3 (Requires Anki 23.10+ and FSRS enabled.)
cards with difficulty greater than 0.3
prop:r<0.9 (Requires Anki 23.10+ and FSRS enabled.)
cards with retention less than 0.9
Recent Events
Added
added:1
cards added today
added:7
cards added in last week
The check is made against card creation time rather than note creation time, so cards that were generated within the time frame will be included even if their notes were added a long time ago.
Edited
edited:n
cards where the note text was added/edited in the last n days.
This requires Anki 2.1.28+ / AnkiMobile 2.0.64+.
Answered
rated:1
cards answered today
rated:1:2
cards answered Hard (2) today
rated:7:1
cards answered Again (1) over the last 7 days
rated:31:4
cards answered Easy (4) in the last month
Rating searches had been limited to 31 days before version 2.1.39.
First Answered
On version 2.1.45+, you can also search for the very first review only:
introduced:1
cards answered for the first time today
introduced:365
cards answered for the first time within the last 365 days
Matching special characters
This section was written for Anki 2.1.36+ - earlier versions did not support escaping characters in certain situations.
As shown in the previous section, some characters like *, _ and " have a
special meaning in Anki. If you need to locate those characters in a search,
you need to tell Anki not to treat them specially.
-
Space
To match something including spaces, enclose the"entire term"in double quotes. If it is a colon search, you also have the option to only quote thepart:"after the colon"(unless there are spaces before the colon as well). -
",*and_
Add a backslash before these characters to treat them literally. For example,_will match any single character, but\_matches only an actual underscore. -
\
Because a backlash is used to remove the special meaning from other characters, it too is treated specially. If you need to search for an actual backslash, use\\instead of\. -
(and)
You can search for parentheses either by enclosing the full term in quotes, and/or by using a backslash. That is,"some(text)",some\(text\)and"some\(text\)"are all equivalent, butsome(text)is not. -
-
Starting a search term with-usually inverts it:-dogmatches everything except dog for example. If you instead wish to include an actual hyphen, you can either use a backslash, or include the text in quotes, such as\-.-or"-.-". -
:
Colons have to be escaped unless they are preceded by another, unescaped colon. Sow:e:bis a word boundary search fore:b,w\:e\:bsearches literally forw:e:bandw\:e:bsearches the fieldw:eforb(see field searches). -
&,<, and>
&,<, and>are treated as HTML when searching in Anki, and as such searches containing them don't work as expected. However, you can search for them by using their corresponding HTML entity names (&for&,<for<, and>for>). For example, searching<&text>searches for a card with<&text>in a field.
Raw input
Text preceded by certain keywords (like re:) will be treated as raw input. That is,
the characters listed above largely lose their special meaning. In such a context, only
a minimum of escaping is required to prevent ambiguity:
-
"must be escaped. -
Spaces and unescaped parentheses require the search term to be quoted.
-
The search term must not end in an odd number of backslashes.
Object IDs
nid:123
the note with note id 123
cid:123,456,789
all cards with card ids 123, 456 or 789
Note and card IDs can be found in the card info dialog in the browser. These searches may also be helpful when doing add-on development or otherwise working closely with the database.
Importazione
Anki può importare file di testo, mazzi Anki impacchettati creati dalla funzione di esportazione, file .db di Mnemosyne 2.0 e file .xml di SuperMemo. Per importare un file, fai clic sul menu File e poi su "Importa".
File di testo
- Fogli di calcolo e UTF-8
- HTML
- Importazione di file multimediali
- Importazione in massa di file multimediali
- Aggiunta di etichette
- Duplicati e aggiornamento
- Intestazione dei file
Anki può importare qualsiasi file di testo semplice contenente campi separati da virgole, punti e virgola o tabulazioni, purché siano soddisfatte alcune condizioni.
-
I file devono essere puramente testuali (miofile.txt). Altri formati come miofile.xls, miofile.rtf, miofile.doc devono essere prima salvati prima come file di testo semplice.
-
I file devono essere codificati nel formato UTF-8 (vedi sotto).
-
La prima riga definisce anche il carattere di separazione: se Anki trova un punto e virgola (;) nella prima riga userà quello, se trova una virgola (,) userà quella, ecc.
-
Anki determina il numero di campi nel file analizzando la prima riga non commentata. Se alcune delle righe successive contengono un numero inferiore di campi, Anki considera quelli mancanti come vuoti. Se alcune righe contengono campi aggiuntivi, il contenuto extra non viene importato.
I campi del file di testo possono essere mappati a qualsiasi campo delle tue note, incluso il campo delle etichette. Durante l'importazione è possibile scegliere quale campo del file di testo corrisponde ad uno specifico campo della nota.
Quando importi un file di testo, puoi scegliere in quale mazzo inserire le carte. Tieni presente, però, che se hai abilitato l'opzione di sovrascrittura del mazzo per uno o più dei tuoi modelli, le carte verranno inserite in quel mazzo specifico anziché in quello selezionato durante l'importazione.
Questo è un esempio di un file valido avente tre campi:
mela;banana;uva
del testo;altro testo;ancora più testo
Ci sono due modi per includere righe a capo o il separatore di campo stesso, all'interno dei campi.
Delimitare il contenuto del campo con le virgolette:
ciao;"questa è
una risposta su due righe"
due;questo è un campo su una riga
"questo include ; (punto e virgola)";un altro campo
Poiché le virgolette delimitano l'inizio e la fine di un campo, se desideri inserirle all'interno del campo stesso, devi sostituire ogni singola virgoletta con due virgolette per "escluderle" dall'interpretazione predefinita, come mostrato nel seguente esempio:
campo uno;"campo due con ""virgolette doppie"" al suo interno"
Quando utilizzi un programma di fogli di calcolo come LibreOffice per creare il file CSV, questo si occupa automaticamente di codificare correttamente le virgolette.
Utilizzare il tag HTML <br>:
ciao; questa è<br>una risposta su due righe
due; questa è una riga unica
Per abilitare le interruzioni di riga HTML, devi spuntare la casella "Consenti l'HTML nei campi" nella finestra di dialogo di importazione.
Le righe multiple correttamente codificate non funzionano correttamente se utilizzi eliminazioni cloze su più righe. In questo caso, è necessario usare le interruzioni di riga HTML.
Puoi anche includere le etichette in un altro campo e selezionarli come campo delle etichette nel dialogo di importazione:
primo campo;secondo campo;etichette
Questo è un esempio di un file valido, in cui la prima riga è ignorata (#):
# questo è un commento ed è ignorato
pippo pluto;pluto paperino;paperino quaquo
campo1;campo2;campo3
Fogli di calcolo e UTF-8
Se il tuo file contiene caratteri non latini (come gli accenti, il giapponese ecc.), Anki si aspetta che sia salvato con la codifica "UTF-8". Il modo più semplice per farlo è quello di utilizzare il programma gratuito LibreOffice Calc al posto di Excel per modificare il file, poiché supporta facilmente UTF-8 e, a differenza di Excel, esporta correttamente i contenuti multi-riga. Se invece preferisci continuare a utilizzare Excel, consulta questo post del forum (inglese) per maggiori informazioni.
Per salvare il tuo foglio di calcolo in un file che Anki possa leggere, usando LibreOffice, vai su File> Salva con nome e quindi seleziona CSV come tipo di file. Dopo aver accettato le opzioni predefinite, LibreOffice salverà il file e potrai quindi importarlo in Anki.
HTML
Anki può interpretare il testo importato da file testuali come HTML (il linguaggio usato per le pagine web). Ciò significa che il testo in grassetto, corsivo e altre formattazioni può essere esportato in un file di testo e successivamente reimportato. Se desideri includere la formattazione HTML, puoi spuntare la casella "Consenti HTML nei campi" durante l'importazione. È però consigliato disattivare questa opzione se stai cercando di importare carte che contengono parentesi uncinate (<>) o altra sintassi HTML.
If you wish to use HTML for formatting your file but also wish to include angle brackets or ampersands, you may use the following replacements:
Se vuoi utilizzare l'HTML per formattare il tuo file, ma devi anche includere le parentesi uncinate, puoi usare le seguenti sostituzioni:
| Carattere | Sostituzione |
|---|---|
| < | < |
| > | > |
| & | & |
Importazione di file multimediali
Se vuoi includere audio e immagini durante l'importazione da un file di testo, devi copiare i file nella cartella collection.media. Non creare sottocartelle all'interno della cartella "media", poiché potrebbe causare malfunzionamenti.
Dopo aver copiato i file, modifica uno dei campi nel tuo file di testo come segue:
<img src="miaimmagine.jpg">
oppure
[sound:mioaudio.mp3]
Alternativamente, puoi utilizzare la funzionalità Trova e sostituisci nella schermata "Sfoglia" per aggiornare tutti i campi contemporaneamente. Se ciascun campo contiene testo come "mioaudio" e vuoi che riproduca un suono, puoi cercare (.*) e sostituirlo con "[sound:\1.mp3]", avendo l'accortezza di abilitare l'opzione 'Considera l'immissione come espressione regolare'.
When importing a text file with these references, you must make sure to enable the "Allow HTML" option.
Quando importi un file testuale con tali riferimenti, assicurati di abilitare l'opzione "Consenti HTML".
You might be tempted to do this in a template, like:
Potresti essere tentato di fare ciò in un modello, come per esempio:
<img src="{{nome del campo}}">
Tuttavia Anki non lo supporta per due motivi: la ricerca dei media è dispendiosa, in quanto ogni singola carta deve essere elaborata, e tale funzionalità non è ovvia per gli utenti dei mazzi condivisi. Utilizza invece la tecnica del "Trova e sostituisci".
Importazione in massa di file multimediali
Un'altra opzione per importare grandi quantità di file multimediali in una volta sola è quella di usare l'add-on per l'importazione dei file multimediali. Questo add-on crea automaticamente delle note per tutti i file presenti in una cartella selezionata, con i nomi dei file sul fronte (senza l'estensione del file, per cui se hai un file chiamato "mela.jpg", il fronte riporterà la dicitura "mela") e le immagini o l'audio sul retro. Se desideri una disposizione diversa dei file multimediali e dei nomi dei file, puoi successivamente cambiare il tipo di nota delle carte create.
Aggiunta di etichette
Se vuoi aggiungere le etichette "etichetta1" ed "etichetta2" a ogni riga che importi, inserisci quanto segue all'inizio del file testuale:
tags:etichetta1 etichetta2
Duplicati e aggiornamento
Durante l'importazione di file di testo, Anki utilizza il primo campo per determinare se una nota è unica. Per impostazione predefinita, se il file da importare contiene un primo campo che corrisponde a una delle note già presenti nella tua collezione e la nota esistente è dello stesso tipo di quella che stai importando, tutti gli altri campi della nota esistente vengono aggiornati in base al contenuto del file importato. Un menù a tendina nella schermata di importazione ti consente di modificare questo comportamento, dandoti la possibilità di ignorare completamente i duplicati o di importarli come nuove note invece di aggiornare quelle esistenti.
L'opzione "Ambito di corrispondenza" determina come vengono identificati i duplicati. Quando è impostata al valore "Tipo di nota", Anki identifica un duplicato se un'altra nota dello stesso tipo ha lo stesso primo campo. Quando invece è impostata al valore "Tipo di nota e mazzo", un duplicato viene segnalato soltanto se la nota esistente si trova anche nel mazzo in cui la stai importando.
Se hai abilitato l'aggiornamento e nella collezione sono già presenti versioni precedenti delle note che stai importando, queste vengono aggiornate nella loro posizione originale (nei loro mazzi attuali) anziché essere spostate nel mazzo impostato nella finestra di dialogo di importazione. Qualora le note vengano aggiornate in loco, le informazioni di pianificazione relative a tutte le loro carte vengono preservate.
Per informazioni su come vengono gestiti i duplicati nei file .apkg, consulta la sezione Pacchetti di mazzi.
Intestazione dei file
Anki 2.1.54 e versioni successive supportano alcune intestazioni che possono essere incluse nel file di testo per
rendere l'importazione più potente o conveniente. Queste intestazioni consistono in coppie #chiave:valore
e devono essere elencate in righe separate in cima al file, sebbene la riga delle etichette possa precederle. Poiché le righe di intestazione iniziano con il carattere di commento #, i client Anki precedenti le ignorano.
Per poter utilizzare questa funzionalità nella versione 2.1.54, è necessario abilitare la nuova opzione di importazione nella schermata delle preferenze. Nella versione 2.1.55, il nuovo percorso di importazione è quello predefinito.
| Chiave | Valori consentiti | Comportamento |
|---|---|---|
separator | Comma, Semicolon, Tab, Space, Pipe, Colon, o i rispettivi caratteri letterali | Determina il separatore di campo. |
html | true, false | Determina se il file è trattato come HTML. |
tags | Elenco di etichette, separata da spazi | Identico alla vecchia sintassi. |
columns | Elenco di nomi, separati dal separatore precedentemente impostato | Determina il numero di colonne e mostra i nomi a loro assegnati durante l'importazione. |
notetype | Nome o id del tipo di nota | Preimposta il tipo di nota, se esiste. |
deck | Nome o id del mazzo | Preimposta il mazzo, se esiste. |
notetype column | 1, 2, 3, ... | Determina quale colonna contiene il nome o l'id del tipo di nota di ciascuna nota, vedi Colonna del tipo di nota. |
deck column | 1, 2, 3, ... | Determina quale colonna contiene il nome o l'id del mazzo di ciascuna nota, vedi Colonna del mazzo. |
tags column | 1, 2, 3, ... | Determina quale colonna contiene le etichette di ciascuna nota. |
guid column | 1, 2, 3, ... | Determina quale colonna contiene il GUID di ciascuna nota, vedi Colonna del GUID. |
N.B.: Ad eccezione dei valori di tags, columns, notetype e deck, tutte le altre coppie chiave:valore devono essere in inglese.
Alcune intestazioni hanno ulteriori implicazioni.
Colonna del tipo di nota
Solitamente, tutte le note provenienti da un file vengono mappate a un singolo tipo di nota, ed è possibile scegliere quale colonna viene mappata a un campo specifico di quel tipo di nota.
La situazione cambia se è presente una colonna con i nomi o gli id dei tipi di nota. In tal caso, è possibile importare note con tipi di nota diversi, i cui campi saranno mappati implicitamente: la prima colonna normale viene utilizzata per il primo campo di qualsiasi nota, indipendentemente dal suo tipo di nota, la seconda colonna normale per il secondo campo, e così via. Una "colonna normale" è una colonna che non contiene informazioni speciali come mazzi, etichette, tipi di nota o GUID.
Colonna del mazzo
In genere, tutte le nuove carte create a seguito dell'importazione di un file testuale vengono inserite in un singolo mazzo a propria scelta ma, se il file contiene una colonna dedicata al mazzo, le nuove carte di una nota vengono inserite nel mazzo specificato. Se il mazzo non esiste, viene creato un nuovo mazzo con il nome specificato.
Colonna del GUID
GUID, acronimo di Globally Unique Identifier (Identificatore Univoco Globale), è un ID univoco che Anki assegna a ciascuna nota creata. Questo ID può essere utilizzato per la verifica dei duplicati. Se esporti le tue note includendo il GUID, puoi modificarle e, purché non modifichi il campo GUID, puoi reimportarle per aggiornare le note esistenti.
Sebbene Anki sia progettato per creare il GUID automaticamente, se preferisci creare ID personalizzati, come per esempio MIANOTA0001, è consigliato inserirli nel primo campo, anziché assegnarli al GUID interno. In fase di importazione, Anki può utilizzare sia il primo campo che il GUID per la verifica dei duplicati, quindi non è necessario che gli ID siano dei GUID per poter aggiornare le note. Va inoltre sottolineato che l'opzione "duplica" non funziona per le righe contenenti un GUID non vuoto. Se viene fornito un GUID e questo esiste già nella collezione, non viene creato alcun duplicato.
Mazzi impacchettati
I pacchetti Anki (file .apkg) permettono di importare mazzi, note, tipi di note e carte da altri utenti. Sono comunemente condivisi su AnkiWeb.
Pianificazione
I pacchetti Anki possono contenere anche informazioni sulla pianificazione, utili se desideri trasferire mazzi tra dispositivi o profili. Tuttavia, quando importi un mazzo condiviso da qualcun altro, non è generalmente desiderabile utilizzare i loro intervalli di ripasso o la cronologia delle ripetizioni.
Se le carte importate hanno intervalli inaspettatamente grandi, l'autore del mazzo potrebbe aver accidentalmente incluso le sue informazioni di pianificazione. È possibile utilizzare la funzione Imposta Data di Scadenza per reimpostare le carte importate. A partire da Anki 23.10, è possibile rimuovere le informazioni di pianificazione durante il processo di importazione, lasciando deselezionata l'opzione "Importa anche eventuali progressi di apprendimento". In questo modo verranno anche rimosse eventuali etichette sanguisuga (leech) o contrassegnate (marked) dalle carte importate.
Aggiornamento
Quando importi un file .apkg, Anki identifica tutte le note in esso presenti che sono già presenti nella tua collezione per via di un'importazione precedente. Se le note nel file sono più recenti della tua copia locale, verrano aggiornate con il contenuto del file per impostazione predefinita.
Questo processo di aggiornamento non è generalmente possibile se il tipo di nota viene modificato (ad esempio, se tu o l'autore del mazzo avete aggiunto un campo extra al tipo di nota). Tuttavia, puoi comunque importare tutte le note mancanti dal file, ma le note che hai importato in precedenza non verranno aggiornate se l'autore del mazzo ha apportato delle modifiche.
Anki 23.10 e versioni successive
La versione 23.10 di Anki ha introdotto una maggiore flessibilità: è ora possibile scegliere di aggiornare incondizionatamente le note e i tipi di nota, sovrascrivendo sempre le modifiche apportate, oppure, al contrario, di non aggiornare mai gli oggetti esistenti.
Inoltre, se sia tu che l'autore del mazzo avete modificato lo stesso tipo di nota, ora puoi decidere di unire le due versioni. In questo modo si preservano tutti i modelli e i campi contenuti nell'uno o nell'altro, richiedendo però una sincronizzazione completa e potrebbe contrassegnare altre note esistenti come modificate.
Nota agli autori dei mazzi
L'unione si basa sugli id dei modelli e dei campi, che sono stati introdotti nella versione 2.1.67 di Anki. Se un modello o un campo non ha un id, perché creato con una versione precedente, Anki cerca di trovare un equivalente mediante il confronto dei nomi.
Consulta questo add-on per capire perché è vantaggioso condividere i tipi di nota con id di campo e modello, e come aggiungerli a quelli esistenti.
Soluzione per Anki 2.1.66 e versioni precedenti
Se sai che l'autore del mazzo ha apportato delle modifiche e desideri accedervi, ripristinare il tipo di nota è possibile, ma la procedura è piuttosto complessa. Ecco i passaggi da seguire:
- Crea un nuovo profilo e importa il file .apkg.
- Nella schermata Sfoglia, individua una delle note che non si è aggiornata e selezionala.
- Usa i tasti Campi e Carte per controllare i nomi dei campi e del modello e annotali.
- Usa la console di debug per determinare l'id del tipo di nota. L'id è il numero che compare alla fine della riga.
nt = bcard().note().note_type()
print("L'id del tipo di nota", nt["name"], "è", nt["id"])
- Torna al profilo normale, individua la stessa carta e selezionala. Quindi esegui quanto segue:
nt = bcard().note().note_type()
print("attuale: l'id di", nt["name"], "è", nt["id"])
nt = mw.col.models.get(xxx)
print("desiderato: l'id di", nt["name"], "è", nt["id"])
-
Se i nomi dei due tipi di nota sono diversi, utilizza l'azione Modifica Tipo di Nota per cambiare il tipo di nota delle note esistenti con quello desiderato.
-
Usa i tasti Campi e Carte per verificare che i nomi dei campi e del modello corrispondano esattamente a quello del profilo di test. Non devono esserci campi in meno o in più, e devono essere scritti alla stessa identica maniera.
Exporting
Exporting allows you to save part of your collection as a text file or packaged Anki deck. To export, click the File menu and choose 'Export'.
Text Files
If you choose "Notes in Plain Text", Anki will write the contents of the notes into a text file. Each field is separated by a tab. If you edit the resulting file and don't modify the first field, you can later import that file back into Anki and Anki will update your notes based on your edits, provided you import back into the same note type.
If you find yourself needing to edit the first field as well, you'll need to change the format of your note type so that the first field is an ID number rather than actual text. (You can install the Add note id add-on to make this easier.)
In order for formatting to be preserved when you import text back in, the text is exported with all the HTML formatting embedded in it.
Packaged Decks
A 'packaged deck' consists of cards, notes, note types, and any sounds or images bundled up into a file ending with .apkg or .colpkg. You can use packaged decks to transfer cards between people, or for backing up parts of your collection.
There are two different kinds of packaged decks.
Collection (.colpkg)
When you export all decks with scheduling included, this is called a 'collection package'. Anki will copy your entire collection into a file ending in .colpkg, and place it on your desktop. A collection package is used to back up your collection, or copy it to another device.
Collection packages created with previous versions of Anki were called collection.apkg.
When this file is later imported, Anki will delete all the current cards in the collection, and replace the collection with the items in the file. This is useful for copying your collection back and forth between devices.
Existing media in your collection is not deleted when you import a collection package. To delete unused media, use Tools>Check Media.
If you choose Anki 2.1.50+ Collection Package format, imports and exports will be faster, and media files will be compressed, but the resulting .colpkg file will not be readable by older Anki clients.
Deck (.apkg)
Deck packages contain a single deck (and any child decks it may have). They have a filename ending with .apkg, but a filename other than collection.apkg. When you import a deck package, Anki will add the contents into your collection, rather than overwriting your collection.
If some notes in the deck package have previously been imported, Anki will keep the version with the most recent modification time. So if you download an updated deck, the edits that have been made in the updated version will be made in your collection as well, but if you re-import an unchanged deck after making edits in your collection, the changes in your collection will be kept.
If you choose not to include scheduling information, Anki will assume that you are sharing the deck with other people, and will remove marked and leech tags so that they will have a clean copy of it.
Backups
Automatic backups
Anki will create automatic backups of your card data. These include the text on your cards and your scheduling information, but do not include sounds or image files.
Automatic backups can be useful to recover from mistakes, but you should not rely solely on them. Because they are stored on your local device, they will not protect you if your device breaks or is stolen. We recommend you combine them with manual backups.
Restoring
To restore from an automatic backup:
- Open Anki, and choose Switch Profile from the File menu.
- Click on the "Open Backup" button.
- Select the backup you wish to restore from.
When restoring from a backup, any changes made since the backup was created will be lost.
Anki disables automatic syncing and backups when you restore from a backup. Once you're happy that you've restored the correct backup, close and re-open Anki to return to normal.
Anki 2.1.50+
Backups are created periodically. You can configure the time between backups in the preferences screen. The default is 30 minutes.
Certain operations will trigger a backup, even if the configured time has not elapsed yet:
- A one-way sync download
- Importing a .colpkg file using File>Import
- Tools>Check Database
After backups are two days old, Anki will start removing some of the older ones. You can control how many daily, weekly and monthly backups you'd like to keep.
Backups created with 2.1.50 will not be importable into older Anki versions.
Older Anki versions
Each time your collection is closed (when closing Anki, switching profiles, or doing a full sync download), Anki creates a backup. By default it will store up to 30 backups; you can adjust this in the preferences.
Manual colpkg backups
Restoring
You can restore from a manual backup by using File>Import.
Creating
In Anki 2.1.50+, you can use File>Create Backup to trigger an immediate backup. This functions like regular automatic backups, and does not include media files.
To create a backup that includes your sounds and images:
- Select Export from the File menu.
- Ensure "Anki collection package (.colpkg)" is selected.
- Enable the "include media" option.
This will create a .colpkg file that contains all of your cards and any sounds/images they use. We recommend you store the file somewhere safe, like a different device, or a cloud-based file storage service like Dropbox or Google Drive.
AnkiWeb
Synchronising your collection with AnkiWeb provides some level of protection against your device being lost or stolen. If you need to restore your collection from AnkiWeb, you can force a one-way sync in the preferences screen, or sync from a new device, and then choose "Download".
Deletion log
Anki logs deleted notes to a text file called deleted.txt in your profile folder. These notes are in a text format that can be read by File>Import, though please note the import feature only supports a single note type at one time, so if you have deleted notes from different note types, you'll need to split the file into separate files for each note type first.
Managing Files and Your Collection
- Checking Your Collection
- File Locations
- Startup Options
- DropBox and File Syncing
- Network Filesystems
- Running from a Flash Drive
- Backups
- Inaccessible Harddisk
- Permissions of Temp Folder
- Corrupt Collections
Checking Your Collection
It is a good idea to occasionally check your collection file for problems. You can do this via the Tools>Check Database menu item. Checking the database ensures the file has not been corrupted, rebuilds some internal structures, and optimizes the file.
When you check the database, your tag list is also rebuilt. When you delete individual decks or cards, Anki does not update the list of used tags, as it's inefficient to do so. If you want to clear old tags out from the list that are no longer in use, checking your database is the way to do it.
Please note that Anki will automatically optimize your collection once every 2 weeks. This optimization ensures the collection performs well, but it does not check for errors or rebuild the tag list when automatically optimizing.
File Locations
On Windows, the latest Anki versions store your Anki files in your
appdata folder. You can access it by opening the file manager, and
typing %APPDATA%\Anki2 in the location field. Older versions of Anki
stored your Anki files in a folder called Anki in your Documents
folder.
On Mac computers, recent Anki versions store all their files in the
~/Library/Application Support/Anki2 folder. The Library folder is
hidden by default, but can be revealed in Finder by holding down the
option key while clicking on the Go menu. If you're on an older Anki
version, your Anki files will be in your Documents/Anki folder.
On Linux, recent Anki versions store your data in
~/.local/share/Anki2, or $XDG_DATA_HOME/Anki2 if you have set a
custom data path. Older versions of Anki stored your files in
~/Documents/Anki or ~/Anki.
Within the Anki folder, the program-level and profile-level preferences are stored in a file called prefs.db.
There is also a separate folder for each profile. The folder contains:
-
Your notes, decks, cards and so on in a file called collection.anki2
-
Your audio and images in a collection.media folder
-
A backups folder
-
Some system files
You should never copy or move your collection while Anki is open. Doing so could cause your collection to become corrupt. Please do not move or modify the other files in the folder either.
Startup Options
If you have made a destructive change on one computer and have an undamaged copy on another computer, you may wish to start Anki without syncing in order to use the full sync option without first downloading the changes. Similarly, if you are experiencing problems with Anki, you might want to (or might be instructed to) disable add-ons temporarily to see if one might be causing the problem. You can do both of these things by holding down the Shift key while starting Anki.
It is possible to specify a custom folder location during startup. This is an advanced feature that is primarily intended to be used with portable installations, and we recommend you use the default location in most circumstances.
The syntax to specify an alternate folder is as follows:
anki -b /path/to/anki/folder
-
If you have multiple profiles, you can pass -p <name> to load a specific profile.
-
If you pass -p some-fake-name, Anki will show the profile screen on startup. If no profile is provided, the last-used profile is loaded.
-
To change the interface language, use -l <iso 639-1 language code>, such as "-l ja" for Japanese.
If you always want to use a custom folder location, you can modify your shortcut to Anki. On Windows, right-click on the shortcut, choose Properties, select the Shortcut tab, and add "-b \path\to\data\folder" after the path to the program, which should leave you with something like
"C:\Program Files\Anki\anki.exe" -b "C:\AnkiDataFolder"
You can also use this technique with the -l option to easily use Anki in different languages.
On Windows, you should use a backslash (\) not a forward slash (/).
On a Mac there is no easy way to alter the behaviour when clicking on the Anki icon, but it is possible to start Anki with a custom base folder from a terminal:
open /Applications/Anki.app --args -b ~/myankifolder
Alternatively, you can define the environment variable "ANKI_BASE". On Windows, you can define the environment variable with:
set "ANKI_BASE=C:/path/to/AnkiDataFolder"
On Linux and macOS, you can use:
export ANKI_BASE="/path/to/AnkiDataFolder"
DropBox and File Syncing
We do not recommend you sync your Anki folder directly with a third-party synchronization service, as it can lead to database corruption when files are synced while in use.
If you just want to synchronize your media, you can link external folders into services like DropBox. Please see DropboxWiki: Sync Folders Outside Dropbox (archive.org) for more info.
If you wish to keep your collection in sync as well, it is strongly recommended that you create a script that copies your files from your synced folder to a local folder, launches Anki, and then copies the files back when Anki is closed. This will ensure that the files are never synchronized while they are open.
Network Filesystems
We strongly recommend you have Anki store your files on a local hard disk, as network filesystems can lead to database corruption. If a network filesystem is your only option, regular use of Tools>Check Database to detect corruption is recommended.
Running from a Flash Drive
On Windows, Anki can be installed on a USB / flash drive and run as a portable application. The following example assumes your USB drive is drive G.
-
Copy the \Program Files\Anki folder to the flash drive, so you have a folder like G:\Anki.
-
Create a text file called G:\anki.bat with the following text:
g:\anki\anki.exe -b g:\ankidata
If you would like to prevent the black command prompt window from remaining open, you can instead use:
start /b g:\anki\anki.exe -b g:\ankidata
- Double-clicking on anki.bat should start Anki with the user data stored in G:\ankidata.
The full path including drive letter is required - if you try using
\anki\anki.exe instead you will find syncing stops working.
Media syncing with AnkiWeb may not work if your flash drive is formatted as FAT32. Please format the drive as NTFS to ensure media syncs correctly.
Backups
Please see this section.
Inaccessible Harddisk
If Anki can't write to files in the Anki folder, a message will be displayed on startup saying that Anki can't write to the harddisk, and Anki will close. If you're unsure how to fix the permissions, please contact someone near you who is knowledgeable about computers and can help you out.
Permissions of Temp Folder
Anki uses the system's temporary folder to store temporary data. If the permissions of this folder have been changed from the default settings by a rogue app or buggy antivirus app, Anki will not function properly.
If you're on a Windows 7 machine, the general steps to fix the problem are listed below. As this is somewhat complicated, please ask someone knowledgeable about Windows if you are not sure.
-
Click on the start bar, and type in %temp% (including the percents), then hit Enter.
-
Go up one folder, and locate the temp folder. Right click on it, and choose Properties.
-
In the security tab, click on Advanced.
-
Click on the Owner tab. If you're not listed as the owner, click the button to take ownership.
-
On the permissions tab, ensure that you have full control. On a default W7 install the control will actually be inherited from c:\users\your-username.
Corrupt Collections
Anki uses a file format that is robust against program and computer crashes, but it's still possible for your collection to become corrupt if the files are modified while Anki is open, stored on a network drive, or corrupted by a bug.
When you run Tools>Check Database, you will receive a message if Anki detects the file has been corrupted. The best way to recover from this is to restore from the most recent automatic backup, but if your backup is too old, then you can attempt to repair the corruption instead.
On Linux, make sure sqlite3 is installed. On a Mac, it should be installed already. On Windows, download http://www.sqlite.org/sqlite-3_6_23.zip.
Next, create a backup of your collection.anki2 file, in case something goes wrong with the steps below.
Linux/macOS
Open a terminal, change to the folder your collection is located in, and type:
sqlite3 collection.anki2 .dump > dump.txt
Open the resulting dump.txt file in a text editor, and look at the final line. If it reads "rollback;", change it to "commit;"
Then run the following in a terminal:
cat dump.txt | sqlite3 temp.file
Make sure you use temp.file - do not put collection.anki2 on the right, or you will blank out the file. When you're done, proceed to the final step.
Windows
Copy the sqlite3.exe program and your deck to your desktop. Then go to
Start>Run and type in cmd.exe.
If you're on a recent Windows, the command prompt may not start on your desktop. If you don't see desktop displayed in the command prompt, type something like the following, replacing 'administrator' with your login name.
cd C:\Users\Administrator\Desktop
Then type:
sqlite3 collection.anki2 .dump > dump.txt
Open the resulting dump.txt file in a text editor, and look at the final line. If it reads "rollback;", change it to "commit;"
Then run the following in a terminal:
type dump.txt | sqlite3 temp.file
Make sure you use temp.file - do not put collection.anki2 on the right, or you will blank out the file. When you're done, proceed to the final step.
Final Step
Check that you didn't get an error message, and that temp.file is not empty. The procedure optimizes the collection in the process, so it's normal for the new file to be somewhat smaller than the old one.
When you've confirmed the file is not empty:
-
rename the original collection.anki2 file to something else
-
rename temp.file to collection.anki2
-
move collection.anki2 back into your collection folder, overwriting the old version
-
start Anki and go to Tools>Check Database to make sure the collection has been successfully restored.
Card Info, Graphs and Statistics
Card Info
You can display information about a card by using the Cards>Info menu item, by right-clicking on the card and then selecting Info, or by pressing I on the review screen.
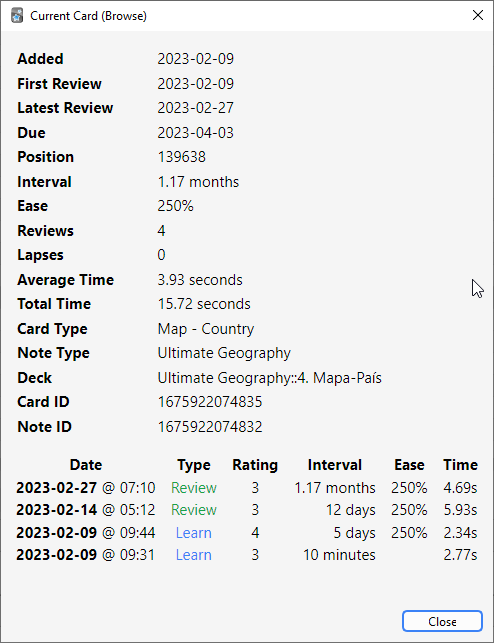
A few notes:
Position
It shows the order the card will appear
in relative to other new cards. The position can be changed in the
browser. Once a card has been studied, the position is not used, unless
the card is manually reset to new again.
Interval
The delay from one review to the next. Times are abbreviated; "0s, 1m,
3h, 4d, 5mo, 6y" refers to seconds, minutes, hours, days, months and
years respectively.
Ease
The approximate amount the interval will grow when you answer a review
card with the "Good" button.
The bottom section shows the review history for the card. Rating denotes the button (1 = Again, 4 = Easy). When cards are manually rescheduled using the "reset" or "set due date" actions, the type will be listed as Manual and the rating as 0.
Statistics
The statistics window is accessed by clicking on Stats button at the top of the main window, or by pressing T.
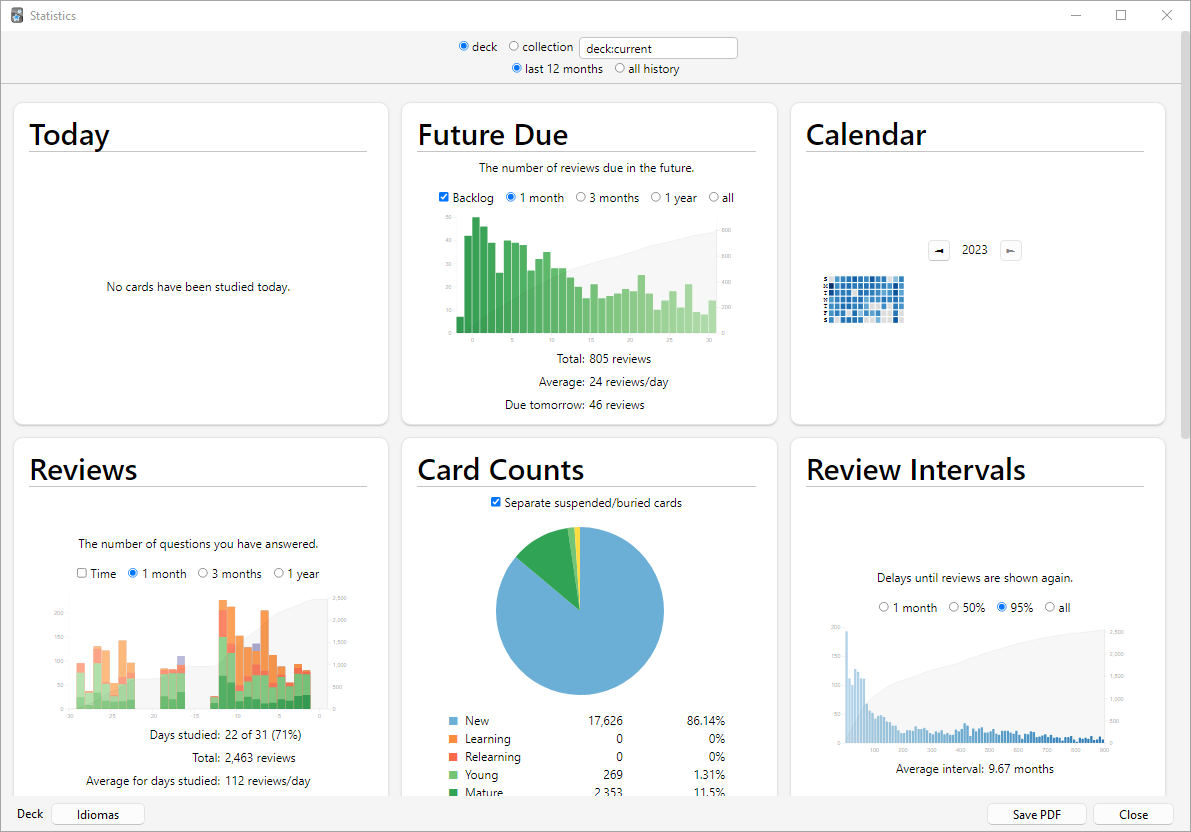
Selecting Decks / Collection
Deck.
By default, the statistics window will show statistics from the currently selected deck and any subdecks it may contain, but you can select any deck from your collection by typing its name in the text box at the top of the screen or (from Anki 2.1.61), by using the deck selector at the bottom.
Collection
If you select this checkbox, statistics will be shown for your entire collection. You can also display graphs for arbitrary searches by adding filters in the search box at the top (2.1.28+).
History
By default, Anki 2.1.28+ will show you statistics for the last 12 months. You can change this to all history scope or deck life scope at the top. (The "today" section at the top remains of course unaffected by this selection.)
Older versions of Anki will by default show you statistics for the previous month. You can change this to a year scope or deck life scope at the bottom. (Again, the “today” section at the top is unaffected by this selection.)
More
-
Clicking on "Save PDF" at the bottom will save a PDF document of the statistics to a file on your desktop to make it easy to share your statistics with others.
-
When you delete notes, their review history is maintained in Anki. It will not be included when looking at statistics for a specific deck (as Anki has no way of knowing which deck the deleted cards belonged to), but will be included when you look at statistics for the whole collection.
-
Anki 2.1.28+ introduced redesigned graphs. The old graphs are still accessible with a Shift-click on the Stats button.
Today
At the top of the statistics window is a brief list of textual statistics about the reviews that you have completed today. A “review” in this context is 'one answering of a card', so a card might count as multiple reviews if it needed to be seen multiple times, and a learning card answered also counts as a “review.” A couple of the stats whose meaning may not be immediately obvious:
Again Count
This is the number of reviews that you have failed (i.e., pressed Again
on). The correct percentage listed afterwards is the number of cards you
did 'not' fail divided by the total number of cards you studied.
Learn, Review, Relearn, Filtered
The number of reviews that were learning cards, review cards, relearning
cards, or studied in a filtered deck when not due.
The stats for the current day are not a good overall indicator of your learning progress; everyone has bad days and good days, and seeing that you got a lower percentage correct on a particular day should not be cause for concern. The remainder of the stats, which take longer periods of time into account, will give more useful information if you wish to try to change your study habits or scheduling settings based on your performance.
The “today” statistics are unaffected by the time period selected at the bottom of the window.
The Graphs
Future Due
This graph shows an estimated number of reviews that will be due on a
given day in the future if you learn no new cards and fail no cards. The
bars and the left axis show the number of cards due on each day if you
study all cards each day, while the line and the right axis show the
number of cards due on that day if you don’t study at all until then.
Note that the forecast graph does not count reviews that are currently
overdue, so if you have a large backlog, the overdue cards will not be
displayed.
Calendar This graph shows past card review activity. Hovering the mouse over a specific item allows you to view the number of revisions made that day. Click on a day of the week to make that the starting day.
Reviews
This graph counts the number of card reviews you have done. The bars may
correspond to days, weeks, or months, depending on the time period
you’ve selected at the bottom of the screen. The differently colored
blocks show how many of the cards you answered on each day were
mature, young, relearning, or learning cards.
There is also a separate group for cards answered in a filtered/cram
deck while they were not due. The line and the right axis shows the
cumulative total for each type of review as time progresses across the
graph (so at 0 days, it would display the number for the entire time
period displayed on the graph).
Card Counts
This pie chart shows what percentage of your deck or collection consists
of mature, unseen, young/learn, and suspended cards. If you wish to
calculate a more precise percentage, the key shows the exact number of
cards in each section, and the total number of cards is displayed to the
side.
Review Time
This graph works exactly like Review Count, except that it deals with
the amount of time you spent on each card rather than the number of
cards answered.
Review Intervals
This graph displays the number of cards that have a given interval (the
delay between two reviews). The line and the right axis tell you what
percentage of your cards have an interval of less than or equal to the
time below that point. The time scope has a different effect on this
graph than other graphs: rather than changing which cards or period of
studying is included, it limits how far out the intervals are displayed
to (so 14-month intervals are not displayed at all on a 1-year graph).
Card Ease This graph shows the number of cards that have a specific ease factor. Average ease of the selected deck / collection is also displayed here.
Hourly Breakdown
This graph shows what percentage of total reviews you have passed (i.e.,
not pressed Again on) during given hours. The larger, darker bars and
left axis show the success rate; the thinner, lighter bars and right
axis show the number of reviews you’ve made at that hour (so you know
how significant the results are).
Answer Buttons
This graph shows how many times you’ve chosen the Again, Hard, Good, or
Easy button while studying learning/new, young, and
mature cards. Anki also displays the percentage
of correct reviews for each type of card.
Manual Analysis
If you’re interested in getting information from your statistics other than what Anki provides, it is possible to access the data directly. Because of the complexity involved, this is not something we can provide any support for.
One option is to write an add-on that adds another graph or more details to the statistics window. There are several add-ons of this sort on AnkiWeb already, which you can look at to get an idea of how it works.
A more powerful and more complex option is to extract the review log information directly from Anki’s database and analyze it in an external program. Anki uses a database format called SQLite. There are many tools available for working with SQLite databases; one of the easiest to start with is called SQLite Browser, which will allow you to look around the database as well as export a CSV version of tables for import into another program.
The most important table for statistics is the 'revlog' table, which stores an entry for each review that you conduct. The columns are as follows:
id
The time at which the review was conducted, as the number of
milliseconds that had passed since midnight UTC on January 1, 1970.
(This is sometimes known as 'Unix epoch time', especially when in
straight seconds instead of milliseconds.)
cid
The ID of the card that was reviewed. You can look up this value in the
id field of the 'cards' table to get more information about the card,
although note that the card could have changed between when the revlog
entry was recorded and when you are looking it up. It is also the
millisecond timestamp of the card’s creation time.
usn
This column is used to keep track of the sync state of reviews and
provides no useful information for analysis.
ease
Which button you pressed at the end of the review (1 for Again, 4 for
Easy).
ivl
The new interval that the card was pushed to after the review. Positive
values are in days; negative values are in seconds (for learning cards).
lastIvl
The interval the card had before the review. Cards introduced for the
first time have a last interval equal to the Again delay.
factor
The new ease factor of the card in permille (parts per thousand). If the
ease factor is 2500, the card’s interval will be multiplied by 2.5 the
next time you press Good.
time
The amount of time (in milliseconds) you spent on the question and
answer sides of the card before selecting an ease button.
type
This is 0 for learning cards, 1 for review cards, 2 for relearning cards,
and 3 for early "cram" cards (cards being studied in a filtered deck when they
are not due).
Media
Anki stores the sounds and images used in your notes in a folder next to the collection. For more on the folder location, please see the file locations section. When you add media within Anki, either by using the paperclip icon in the editor or by pasting it into a field, Anki will copy it from its original location into the media folder. This makes it easy to back up your collection’s media or move it to another computer.
If your media filenames contain spaces or other special characters such
as percentage signs, the way the filenames appear in the HTML editor will
differ from the way the filenames appear on disk. For example, a file called
hello 100%.jpg will appear as hello%20100%25.jpg in the HTML editor.
Internally, Anki still uses the original filenames, so if you would like to
search for the file or modify the filename with Find&Replace, you will
need to use the name as it appears on disk, not as it appears in the
HTML editor. Exporting to a text file is another way to see the underlying
representation.
Checking Media
You can use the Tools>Check Media menu option to scan your notes and media folder. It will generate a report of files in the media folder that are not used by any notes, and media referenced in notes but missing from your media folder. It also allows you:
- To delete unused media files.
- To tag notes that refer to missing media files.
- To empty your trash folder.
- To restore the deleted files back to your media folder.
This tool does not scan question or answer
templates, which is why you can’t place media references to fields in
the template. If you need a static image or sound on every card, name it
with a leading _ (e.g., \_dog.jpg) to tell Anki to ignore it when
checking for media. If you delete media using the unused media check,
Anki will move it into your operating system’s trash folder, so you can
recover if you accidentally delete media that shouldn’t have been
deleted.
Manually Adding Media
When you add media via Anki's interface, Anki takes care of ensuring the filenames are encoded in a way that should work across different devices, removing characters that won't work on certain operating systems, and truncating very long filenames.
If you manually add files to your media folder, you should use Tools>Check Media afterwards, to ensure the filenames are encoded correctly. If you skip this step, any filenames that are not compatible will be skipped when syncing.
Supported Formats
Anki uses a program called mpv (and mplayer as a fallback) in order to support sounds and videos. A wide variety of file formats are supported, but not all of these formats will work on AnkiWeb and the mobile clients. MP3 audio and MP4 video seems to be the most universally supported.
Math and Symbols
MathJax
MathJax is a modern, browser-based typesetting system, useful for mathematical and chemical equations. It does not require the installation of any extra software, so it is easy to use, and it is recommended for most users.
MathJax is supported out of the box on Anki 2.1+, AnkiMobile, and AnkiDroid 2.9+.
To try it out:
-
Type the following in a field:
\sqrt{x} -
Select the text you just typed.
-
Click the rightmost button in the editor, and choose "MathJax inline" from the menu. Anki will change the text so it reads:
\(\sqrt{x}\) -
If you click the Cards… button, you’ll see a preview of how the equation will appear when the card is reviewed.
Anki’s MathJax support expects content in TeX format. If you’re not
familiar with TeX formatting, please see this cheatsheet.
Please note that point 2 does not apply in Anki - Anki uses \( and
\) for inline equations, and \[ and \] for display equations.
If you want to use newlines in a MathJax expression, please use Shift+Enter instead of just Enter, as a normal newline will prevent MathJax from working correctly.
Anki includes built in support for mhchem for rendering chemical equations. Please see the 'chemical equations' section and the following sections for more information: https://mhchem.github.io/MathJax-mhchem/
It is possible to customize some settings.
LaTeX
LaTeX is a powerful typesetting system, useful for entering mathematical formulas, chemical formulas, musical notation and so on. Anki provides some support for LaTeX, allowing you to enter LaTeX code in your notes. When you review a card, Anki will call LaTeX and display the generated image instead.
LaTeX is more work to set up, and images can only be generated with the computer version of Anki - though once generated, the images can be displayed by mobile clients. Because of the extra complexity LaTeX brings, it is only recommended for users that need more features than MathJax provides.
Assumed Knowledge
Anki’s LaTeX support is not turn-key: it is assumed that you know how to use LaTeX already, and that you have it installed. If you have no experience with LaTeX, please consult one of the many guides available on the internet. If you are having trouble with markup, please ask on a LaTeX forum.
To install LaTeX, on Windows use MiKTeX; on macOS use MacTeX, and on Linux use your distro’s package manager. Dvipng must also be installed.
On Windows, go to Settings in MikTeX’s maintenance window, and make sure "Install missing packages on the fly" is set to "Always", not to "Ask me first". If you continue to have difficulties, one user reported that running Anki as an administrator until all the packages were fetched helped.
On macOS, LaTeX has only been tested with MacTeX and BasicTeX. If you use BasicTeX, you need to install dvipng separately, with the following command:
sudo tlmgr update --self; sudo tlmgr install dvipng
The command may not be on the path, so you may need to provide the full path, e.g /usr/local/texlive/2014basic/bin/x86_64-darwin/tlmgr.
If you are not using the above LaTeX packages, you will need to use the edit LaTeX add-on to specify the full path to latex and dvipng.
Web/Mobile
When you review a card with LaTeX on it, Anki will generate an image for that LaTeX and place the image in your collection’s media folder for future use. The web & mobile clients will display these images if they already exist, but can not generate the images on their own.
To avoid having to review all your cards at least once before you can study on the other clients, Anki can generate the images in bulk for you. To generate all the images, please go to Tools>Check Media. After that, syncing should upload the generated media to AnkiWeb and the other clients.
Example
The most general way to input LaTeX content is to surround it with [latex][/latex] tags. There’s a shortcut button for this documented in the editor section.
[latex] tags must be used inside a field - placing them in the card template will cause problems.
For example, entering the following on the front of an Anki flashcard:
Does [latex]\begin{math}\sum_{k = 1}^{\infty}\frac{1}{k}\end{math}[/latex] converge?
will produce this when the flashcard is viewed:
The formula in the example above is called a 'text formula', because it is displayed right within the non-mathematical text. In contrast, the following example shows a 'displayed formula':
Does the sum below converge?

[latex]\begin{displaymath}\sum_{k = 1}^{\infty}\frac{1}{k}\end{displaymath}[/latex]
'Text formulas' and 'display formulas' are the most common type of LaTeX expressions, so Anki provides abbreviated versions of them. Expressions of the form:
[latex]\begin{math}...\end{math}[/latex]
can be shortened to
[$]...[/$]
and expressions of the form
[latex]\begin{displaymath}...\end{displaymath}[/latex]
can be shortened to
[$$]...[/$$]
For example, the two LaTeX snippets shown before are equivalent to
Does [$]\sum_{k = 1}^{\infty}\frac{1}{k}[/$] converge?
and
Does the sum below converge?

[$$]\sum_{k = 1}^{\infty}\frac{1}{k}[/$$]
respectively.
Packages
Anki allows you to customize the LaTeX preamble so you can import custom packages for chemistry, music and so on. For example, imagine you find an example file for chemtex on the internet:
\documentclass[a4paper,12pt]{report}
\usepackage{chemtex}
\begin{document}

\initial
\begin{figure}[h]\centering
\parbox{.3\textwidth}{\ethene{H}{H$_3$C}{CH$_3$}{Br}}
\hfil
\parbox{.3\textwidth}{\cbranch{H}{S}{H}{S}{C}{S}{}{S}{H}
  \xi=-200 \cright{}{Q}{C}{D}{O}{S}{OH}}
\hfil
\parbox{.3\textwidth}{\hetisix{Q}{Q}{Q}{Q}{Q}{Q}{O}{Q}{O}
  \xi=-171 \fuseup{Q}{Q}{Q}{Q}{D}{Q}{D}{Q}{D}}
\caption{Chemie mit {\tt CHEMTEX}\label{a1}}
\end{figure}

\end{document}
Firstly, follow the documentation of the package and MiKTeX/MacTeX in order to install the package. To check the package is working, you’ll want to put code like the above into a .latex file and test if you can compile it from the command line. Once you’ve confirmed that the package is available and working, we can integrate it with Anki.
To use the package with Anki, click "Add" in the main window, then click the note type selection button. Click the "Manage" button, then select the note type you plan to use and click "Options". The LaTeX header and footer are shown. The header will look something like:
\documentclass[12pt]{article}
\special{papersize=3in,5in}
\usepackage{amssymb,amsmath}
\pagestyle{empty}
\setlength{\parindent}{0in}
\begin{document}
To use chemtex, you’d add the usepackage line in the earlier example, so it looks like:
\documentclass[12pt]{article}
\special{papersize=3in,5in}
\usepackage{amssymb,amsmath}
\usepackage{chemtex}
\pagestyle{empty}
\setlength{\parindent}{0in}
\begin{document}
After that, you should be able to include lines like the following in your Anki cards:
[latex]\ethene{H}{H$_3$C}{CH$_3$}{Br}[/latex]
Template Conflicts
As of Anki 2.1.20 / AnkiMobile 2.0.56 / AnkiDroid 2.13, this workaround is no
longer required, as {{field}} text inside fields no longer causes problems. If
you need to support older versions and want to keep using this syntax, please
make sure you place the {{=<% %>=}} string at the very top of your front and
back template, as recent Anki versions will not recognize it anywhere but the
start.
For older versions:
It’s not uncommon for {{ and }} to pop up in LaTeX code when writing mathematical equations. To ensure that your LaTeX equations don’t conflict with Anki’s field replacements, it’s possible to change the separator to something else.
For example, if you have a template:
{{latex field}}
Changing it to the following will make it unlikely that the LaTeX will conflict:
{{=<% %>=}}
<%latex field%>
Cloze Conflicts
Cloze deletions are terminated with }}, which can conflict with a }}
appearing in your LaTeX. To prevent LaTeX from being interpreted as a closing
cloze marker, you can put a space between any double closing braces that do not
indicate the end of the cloze, so
{{c1::[$]\frac{foo}{\frac{bar}{baz}}[/$] blah blah blah.}}
will not work, but
{{c1::[$]\frac{foo}{\frac{bar}{baz} }[/$] blah blah blah.}}
will (and LaTeX ignores spaces in math mode, so your equation will render the same). If you want to avoid adding the extra space into the rendered text (for example, when you are making Cloze cards for learning programming languages), another option is to use a HTML comment when editing the card in HTML mode:
{{c1::[$]\frac{foo}{\frac{bar}{baz}<!-- -->}[/$] blah blah blah.}}
You may use either workaround if you need to use the :: character
sequence within the Cloze-deleted text. The first card generated for the
following note text will read [type] in C++ is a type-safe union:
{{c1::std:<!-- -->:variant::~type~}} in C++ is a {{c2::type-safe union}}
Unsafe Commands
Anki prohibits certain commands like \input or \def from being used on cards or in templates, because allowing them could allow malicious shared decks to damage your system. (To be on the safe side, these commands are prohibited even in comments, so if you’re getting this error but don’t think you’ve used one, please double-check any comments you have in your headers, templates, and cards.) If you need to use these commands, please add them to a system package and import that package as described in the previous section.
Leeches
Leeches are cards that you keep forgetting. Because they require so many reviews, they take up a lot more of your time, compared to other cards.
Anki can help you identify leeches. Each time a review card 'lapses' (is failed while it is in review mode), a counter increases. When this counter reaches 8, Anki tags the note as a leech and suspends the card. The threshold, and whether to suspend or not, can be adjusted in the deck options.
If you keep failing that card, Anki will continue to alert you about the leech periodically. These warnings occur at half the initial leech threshold. For example, if you set the warning at 8 lapses, future warnings will happen every 4 lapses (at 12, 16, and so on).
Once a leech is found, there are several ways to handle it.
Editing
The most efficient method to deal with leeches is to change how the information is presented. Maybe your cards have too much information, or you’re trying to memorize something without fully understanding it. Often, it helps to follow the 20 rules of formulating knowledge, proposed by Dr Piotr Wozniak, the creator of SuperMemo. Some cards can benefit from a mnemonic. Even some well-written cards may need a boost in coherence, e.g. by adding cards for related concepts. However, it takes a lot of experience to know how to formulate the material properly, break it down into smallest possible components, and use mnemonic techniques.
Deleting
If the material you’re struggling with isn't important enough to justify the time spent, you can simply delete the card. By selectively deleting difficult and obscure items, you can spend more time learning other material, making studying more enjoyable. If you think the card might be useful for future reference, you can leave it suspended.
Waiting
Some leeches are caused by 'interference'. For example, an English learner may have recently learnt the words "disappoint" and "disappear". As they look similar, the learner may find themselves confusing the two when trying to answer. In such situations, it’s often helpful to concentrate on one idea at a time. Once that idea is firmly ingrained in your mind, you can then start learning the other idea. So, in these situations, you might want to leave one of the words suspended until you have learnt the other one well, and then unsuspend it.
For a more detailed discussion, you can refer to the article "Dealing with Leeches", written by Soren Bjornstad.
Add-on
È possibile estendere le funzionalità di Anki mediante dei componenti aggiuntivi chiamati add-on. Questi add-on possono introdurre funzionalità aggiuntive come un migliore supporto per lingue specifiche, un maggiore controllo sulla pianificazione e così via.
Per esplorare gli add-on disponibili, seleziona Strumenti → Add-on, quindi fai clic su Scarica add-on. In alternativa accedi alla pagina ankiweb.net/shared/addons dal browser.
Se hai scaricato un add-on e non funziona correttamente o se hai commesso un errore durante la sua modifica, puoi eliminarlo utilizzando l'opzione "Elimina" dal menu.
Gli add-on utilizzano e modificano parti arbitrarie del codice sorgente di Anki. Di conseguenza, l'aggiornamento di Anki potrebbe, in alcuni casi, compromettere la compatibilità con add-on più vecchi. Se uno dei tuoi add-on smette di funzionare in seguito all'aggiornamento di Anki, è consigliabile segnalare il problema all'autore dell'add-on. Se questo è un add-on di cui non puoi fare a meno, dovrai continuare a usare una versione di Anki meno recente fino a quando tale add-on non verrà aggiornato.
Nella maggior parte delle pagine degli add-on su AnkiWeb è presente un pulsante chiamato "Contact Author" (contatta l'autore). In alternativa, molti autori includono il proprio indirizzo email direttamente nel codice dell'add-on, per cui potresti provare a leggere i file dell'add-on e controllare in cima a uno di essi per verificarne la presenza.
Se vuoi imparare a sviluppare gli add-on, consulta la guida allo sviluppo degli add-on (inglese).
Troubleshooting
If you encounter a problem with Anki, please try the following steps in order:
1. Restart Anki
Please close Anki, then start it again.
If you are unable to close Anki because of an error message, you can either terminate Anki using your task manager, or restart your computer. Anki saves periodically, so you should not lose more than a few minutes of work in most circumstances.
If the problem does not occur again, you can skip the following steps.
2. Check add-ons
Please close Anki, then start it again while holding down the shift key. If the problem goes away, that indicates an add-on is causing the problem. Remove any add-ons you don't need, and disable half of the others. If the problem continues, try the other half. Repeat the process until you've figured out which add-on is causing the problem. Then please report the issue to the add-on author, using the Copy Debug Info button, and pasting that into the report.
3. Check your Anki version
You can find the version you're using in the Help>About or Anki>About menu. If the version you're using is not the latest version published on https://apps.ankiweb.net, please close Anki, install the latest version, and then start Anki again to see if the problem has gone away.
If you're using Linux, please make sure you can reproduce the error using the packaged version on the Anki website, as distros often distribute broken versions.
4. Check your database
After restarting Anki, please try the Tools>Check Database menu item to make sure your collection doesn't have any problems.
5. Restart your computer
Sometimes restarting your computer may help.
6. Change the Video Driver
Crashes and display issues can be caused by the video driver. Changing to a different video driver in the preferences screen or via the gldriver file may help. Make sure you try all three options.
7. Reset window sizes
Sometimes pressing 'reset window sizes' button in the preferences screen immediately after starting Anki will help.
8. If the problem remains
If you're confirmed you are using the latest Anki version, and are still receiving errors when starting Anki while holding down the shift key, please report the problem, including the next error you receive in your post.
Self-Hosted Sync Server
Advanced users who cannot or do not wish to use AnkiWeb can use a self-hosted sync server instead.
Things to be aware of:
- This is an advanced feature, targeted at users who are comfortable with networking and the command line. If you use this, the expectation is you can resolve any setup/network/firewall issues you run into yourself, and use of this is entirely at your own risk.
- Newer clients may depend on changes to the sync protocol, so syncing may stop working if you update your Anki clients without also updating the server.
- Third-party sync servers also exist. No testing is done against them, and they tend to take time to catch up when the sync protocol changes, so they are not recommended.
- The messages inside Anki will use the term 'AnkiWeb' even if a custom server has been configured, (e.g "Cannot connect to AnkiWeb" when your server is down).
Installing/Running
There are various ways you can install and run the server. You can use either:
- the sync server bundled with the desktop version of Anki
- a separate minimal sync server that doesn't include Anki's GUI dependencies. Python and Rust implementations are available.
From a Packaged Build
This uses the sync server built into the desktop version of Anki as of version 2.1.57+.
On Windows in a cmd.exe session:
set SYNC_USER1=user:pass
"\Program Files\anki\anki.exe" --syncserver
Or MacOS, in Terminal.app:
SYNC_USER1=user:pass /Applications/Anki.app/Contents/MacOS/anki --syncserver
Or Linux:
SYNC_USER1=user:pass anki --syncserver
With Pip
To avoid downloading desktop Anki's GUI dependencies, you can run a standalone Anki sync server using a Python package downloaded from PyPI instead. Make sure you have Python 3.9+ installed.
python3 -m venv ~/syncserver
~/syncserver/bin/pip install anki
SYNC_USER1=user:pass ~/syncserver/bin/python -m anki.syncserver
With Cargo
From Anki 2.1.66+, you can alternatively build a Rust implementation of the standalone sync server using the below command. Make sure you have Rustup installed.
cargo install --git https://github.com/ankitects/anki.git --tag 2.1.66 anki-sync-server
Replace 2.1.66 with whatever the latest Anki version is.
Protobuf (protoc) will need to be installed.
After building, you can run it with:
SYNC_USER1=user:pass anki-sync-server
From a source checkout
If you've cloned the Anki repo from GitHub, you can install from there:
./ninja extract:protoc
cargo install --path rslib/sync
Multiple Users
SYNC_USER1 declares the first user and password, and must be set.
You can optionally declare SYNC_USER2, SYNC_USER3 and so on, if you
wish to set up multiple accounts.
Hashed Passwords
Advanced users may wish to use hashed passwords instead of plain text passwords. If you wish to do this, you'll need to use a separate tool (such as this one) to generate a password hash. You can then tell the server to expect hashed passwords by setting the env var PASSWORDS_HASHED to 1 (or any other value).
When hashed passwords are used, SYNC_USER variables are expected to be in username:password_hash format, where password_hash is a hash of the password in the PHC Format.
Storage Location
The server needs to store a copy of your collection and media in a folder.
By default it is ~/.syncserver; you can change this by defining
a SYNC_BASE environmental variable. This must not be the same
location as your normal Anki data folder, as the server and client
must store separate copies.
Public Access
The server listens on an unencrypted HTTP connection, so it's not a good idea to expose it directly to the internet. You'll want to either restrict usage to your local network, or place some form of encryption in front of the server, such as a VPN (Tailscale is apparently easy), or a HTTPS reverse proxy.
You can define SYNC_HOST and SYNC_PORT to change the host and port
that the server binds to.
Client Setup
You'll need to determine your computer's network IP address, and then
point each of your Anki clients to the address, e.g something like
http://192.168.1.200:8080/. The URL can be configured in the preferences.
If you're using AnkiMobile and are unable to connect to a server on your local network, please go into the iOS settings, locate Anki near the bottom, and toggle "Allow Anki to access local network" off and then on again.
Older desktop clients required you to define SYNC_ENDPOINT and
SYNC_ENDPOINT_MEDIA. If using an older client, you'd put it as e.g.
http://192.168.1.200:8080/sync/ and http://192.168.1.200:8080/msync/
respectively. AnkiDroid clients before 2.16 require separate configuration for
the two endpoints.
Reverse Proxies
If using a reverse proxy to provide HTTPS access (e.g. nginx), and binding to a subpath
(e.g. http://example.com/custom/ -> http://localhost:8080/), you must make sure to
including a trailing slash when configuring Anki. If you put http://example.com/custom
instead, it will not work.
On iOS, TLS 1.3 is not supported, so your reverse proxy will need to have TLS 1.2 enabled, or you'll get an "error code -9836".
Large Requests
The standard AnkiWeb limit on uploads is applied by default. You can optionally
set MAX_SYNC_PAYLOAD_MEGS to something greater than 100 if you wish to
increase the limit. Bear in mind that if you're using a reverse proxy, you may
need to adjust the limit there as well.
Contributing Changes
Because this server is bundled with Anki, simplicity is a design goal - it is targeted at individual/family use, and PRs that add things like a REST API or external databases are unlikely to be accepted at this time. If in doubt, please reach out before starting work on a PR.
If you're looking for an existing API solution, the AnkiConnect add-on may meet your needs.
Miscellanea
Menu Shortcuts
On Windows/Linux you can hold down the Alt key and press a highlighted letter to activate a particular menu.
Although macOS doesn’t support this feature, it does allow you instead to assign shortcuts to specific menu items. Please see https://support.apple.com/en-au/guide/mac-help/mchlp2271/mac for more information.
Debug Console
Sometimes you may be asked to use the debug console to change a setting or check something. Unless asked to enter text in the "debug console", you will probably not need this. Advanced users may like to read more about it in the add-on writing guide.
When asked to enter text into the "debug console", please start Anki, and in the main window, press
Ctrl+Shift+;
(the control key, shift key, and semi-colon key at the same time)
On a Mac, press
Command+Shift+;
(the command key, shift key, and semi-colon key at the same time)
On some non-English keyboards, you may need to press : or + instead of ;.
In the window that has popped up, please paste the text you were asked to paste in the top section. When you’ve done so, please press Ctrl+Return (Command+Return on a Mac), and some text should appear in the bottom section. If you’ve been asked to paste the resulting output, please copy it from the bottom area, and paste it back to the support person.
If you press Ctrl+Shift+Return instead of just Ctrl+Return, Anki will try to print the result rather than doing what you asked it to. If you are getting unexpected errors, please make sure you’re not holding down the Shift key.
Contributing
Sharing Decks Publicly
To share decks with the general public, synchronize them with AnkiWeb, then log into AnkiWeb and click on "Share" from the menu next to the deck you wish to share.
If you shared a deck previously (including with previous versions of Anki), you can update it by clicking "Share" as above. Updating a shared deck will not reset the download counts or ratings. You can delete a shared deck that you have uploaded using the Delete button on the shared deck's page.
When updating a deck, AnkiWeb expects the deck to be at the same location as before. If you shared a deck when it was called "Korean Verbs" for example, and then renamed it to "Korean::Korean Verbs", resharing will not be able to update the existing copy. If you have forgotten the original name, you can guess it by downloading the deck on AnkiWeb and importing it (File > Import) in a new profile (File > Switch profile > Add). Then you can copy the exact name of the deck when it was first shared. If this doesn't work, please contact support.
When you update a shared deck, users who downloaded the deck previously will not automatically receive updates. If they download the deck again and re-import it, newly added material will be imported without altering their existing study progress, provided neither you nor the user has altered the note type since the first import.
Sharing Decks Privately
If you’d like to share decks with a limited group of people (such as a study group or class) rather than the general public, you can do so by sharing them outside of AnkiWeb.
To share a deck privately, go to the File menu and choose Export. Select a single deck (not "All Decks"), and turn off "include scheduling information". This will produce an .apkg file which you can share with others.
You can share the .apkg file by emailing it to people, placing it on a website or shared folder, or using a free file sharing service like Dropbox or Google Drive and sending people a link.
Both the computer version and mobile clients make it easy to import from an apkg file simply by clicking or tapping on it. AnkiWeb does not have the ability to import apkg files however, so the recipients of your deck will need to have the computer version or Anki on their mobile device.
When a user imports an .apkg file, cards that already exist in their collection will be ignored and any new cards will be added. As long as they use the same note type, modified cards will also be updated. To prevent data loss, cards that have been deleted in the new apkg file will not be deleted in the user’s collection, so if you need to delete cards from users' decks for whatever reason, you will need to contact them about it.
Sharing Add-ons
Please see https://addon-docs.ankiweb.net/sharing.html
Translating Anki
Please see https://translating.ankiweb.net
Contributing Code
Anki's source code is available at https://github.com/ankitects/anki
Before contributing, please see contributing.md.
Frequently Asked Questions
Please see https://faqs.ankiweb.net
Resources
The SuperMemo site has a lot of good information about spaced repetition and memory: https://supermemo.guru/wiki/SuperMemo_Guru
Michael Nielsen has written a thorough piece about long term memory and how he uses Anki. He also provides a condensed version as a series of tweets.
Some medical students have banded together to make a paid-for guide focusing on the use of Anki in medical school: https://www.theanking.com/anki-mastery-course
Soren Bjornstad has written a series of extensive articles about memory, SRS and how to use Anki effectively.